Service Locator
- Angler Endorsement
- Boat Towing Coverage
- Mechanical Breakdown
- Insurance Requirements in Mexico
- Agreed Hull Value
- Actual Cash Value
- Liability Only
- Insurance Payment Options
- Claims Information
- Towing Service Agreement
- Membership Plans
- Boat Show Tickets
- BoatUS Boats For Sale
- Membership Payment Options
- Consumer Affairs
- Boat Documentation Requirements
- Installation Instructions
- Shipping & Handling Information
- Contact Boat Lettering
- End User Agreement
- Frequently Asked Questions
- Vessel Documentation
- BoatUS Foundation
- Government Affairs
- Powercruisers
- Buying & Selling Advice
- Maintenance
- Tow Vehicles
- Make & Create
- Makeovers & Refitting
- Accessories
- Electronics
- Skills, Tips, Tools
- Spring Preparation
- Winterization
- Boaters’ Rights
- Environment & Clean Water
- Boat Safety
- Navigational Hazards
- Personal Safety
- Batteries & Onboard Power
- Motors, Engines, Propulsion
- Best Day on the Water
- Books & Movies
- Communication & Etiquette
- Contests & Sweepstakes
- Colleges & Tech Schools
- Food, Drink, Entertainment
- New To Boating
- Travel & Destinations
- Watersports
- Anchors & Anchoring
- Boat Handling
- ← Maintenance

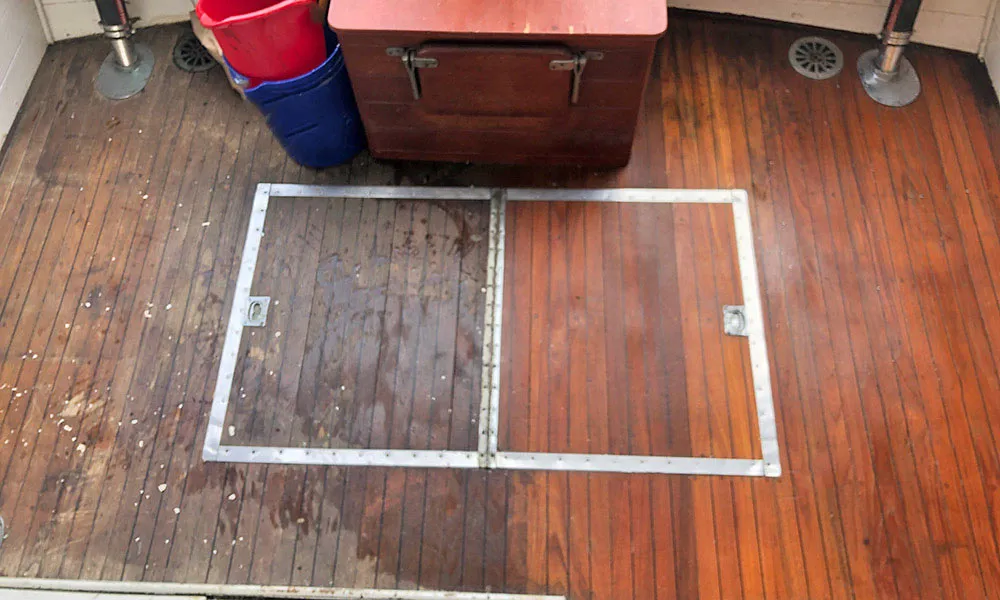
Restoring Teak
Advertisement
There's nothing prettier than teak on a boat, but it requires some upkeep. Here are some tips and products to help keep it looking great.

The natural, unfinished teak on the sailboat above is a beauty. But with brightwork varnished and the deck oiled (above), she sparkles! Here you can see the difference in a teak deck that's been sanded (top) and unsanded (bottom).
Teak maintenance is a love-hate affair for most boat owners. We love the warm, golden glow of a freshly cleaned deck, but not so much the elbow grease required to keep it so. Let's take a look at some cleaning tips that can help bring your tired teak back to life.
The Versatility Of Teak
Due to its resistance to deterioration, rot, and insects, teak is one of the few things onboard that allows a boater to decide the amount of effort they want to spend maintaining it. Many prefer the golden glow and accentuated grain highlighted by properly oiled or varnished teak deck or trim, viewing the additional work required to achieve it as time well spent. Others take the more laid-back approach of letting it attain a natural silver-gray color, safe in the knowledge that less than 1/100 of an inch below that weathered-gray look lies beautiful, oily wood (just be aware that thinner pieces of teak trim can become severely sun-dried and brittle or crack if neglected for too long).

Regardless of your chosen maintenance philosophy, at some point a reason will arise to give your teak a thorough cleaning, be it spring commissioning, selling the boat, or readying the wood for oiling or varnishing. Ironically, cleaning is when teak is most likely to sustain damage due to the use of harsh chemicals and overaggressive or incorrect cleaning methods. Improper cleaning with pressure washers, stiff bristle brushes, or harsh chemicals can remove the soft, lighter-colored grain of the wood, creating a washboard effect. Once that occurs, these ridges (which more readily trap dirt) can only be removed by sanding, which again removes more wood in a vicious cycle of owners loving their teak to death.
Teak-Cleaning Tips
Most teak dies an early death, not from neglect, but from improper cleaning by well-meaning owners. Although you should always follow the manufacturer's recommendations for any cleaner or product being used, here are eight general tips on proper teak care that will serve you well in all situations.
- Use the mildest cleaner possible to get the job done.
- Always wear recommended protective equipment (e.g., rubber gloves, goggles) when handling teak cleaners.
- Protect adjacent areas and finishes while cleaning. Gel teak cleaners have an advantage in this regard, providing you more control during application on horizontal or even vertical surfaces. Teak cleaners can damage anything from gelcoat and paint to anodized aluminum and even chrome fittings. Wet adjacent areas with water prior to cleaning and keep them wet, being sure to rinse all areas thoroughly (especially those being cleaned) as any residue will continue to eat away at whatever surface it remains on.
- When cleaning teak, scrub across the grain of the wood with a 3M Scotch-Brite pad. A soft, polypropylene bristle brush will do in a pinch — just remember to scrub lightly and never with the grain.
- Badly worn teak should be lightly sanded to smooth the wood's surface. While sanding also removes some of the wood, a smooth surface is easier to properly maintain and can increase the life of teak by exposing less wood to the elements and preventing the grain from trapping dirt and airborne contaminants.
- Keep teak wet while cleaning. An overcast or even drizzly day is better than a blazing sunny day, as it helps prevent the area from drying out.
- Use two-part cleaners as a last resort only, and then use sparingly.
- Keep cleaned and/or treated teak covered if possible, to prevent UV light and weather damage.
The Teak Cleaning Enigma: Less Is More
A quick look at any well-stocked chandlery will show there's no shortage of teak cleaners. One-part, two-part, pastes, powders, gels — the list seems endless. But which one to use? Simplify selection by remembering your teak cleaning prime directive is to start with the mildest cleaning product that looks like it has a chance of success, then work your way up (as required) to stronger cleaners that can do the job with as little damage to the wood as possible.
One-part cleaners tend to be less harsh than two-part products, but may require longer dwell times (the time required to work after the product is applied), multiple applications, or simply lack the cleaning power of their two-part brethren, especially when faced with ultra-gnarly teak.
Two-part cleaners should be considered the "nuclear option" of teak cleaning due to the harsh chemicals and toxic nature of most. Sure, they can clean even the nastiest piece of teak, but they do so by removing some of it in the process. They should be used sparingly and only after milder one-part cleaners have been tried. The first part of a two-part cleaner contains the primary cleaning agent, while the second part (depending on the product) may provide additional cleaning power, contain a wood brightener (to lighten and impart a more uniform color), or simply act as a neutralizing agent for the first part.

Powering off the grime on teak decks with a cleaner and brush. Remember: Less is more.
Other factors to consider when selecting a teak cleaner include ease of application, harshness, dwell time, and "greenness" or environmental concerns. For example, products that have to be mixed require more preparation and time than one that can be applied directly from the container. The same is true for a cleaner that requires a 20-minute dwell time verses one a user can start scrubbing on immediately. On the flip side, many users may be perfectly content to wait that extra 20 minutes if the cleaner is milder on both crew and boat (meaning they don't have to remove teak trim due to worries about damage to adjacent gelcoat or painted surfaces), cheaper, or more environmentally friendly.
While teak cleaners are typically used in preparation for varnishing or oiling, most commercially available teak cleaners are simply too harsh for regular daily or weekly cleaning. For routine cleaning you'll find that sudsy ammonia or a solution of water and mild detergent (such as Original Pine-Sol cleaner) will compare well to most teak cleaners while being a lot easier on the wood, surrounding surfaces, and the environment.
On The Shelf
Here's a sample market scan of both one- and two-part cleaners.

Amazon's One-Step Teak Cleaner
Claims to easily remove dirt, rust stains, fish blood, and other sorts of grease and grime from weathered teak. It's billed as an acid-free formula that won't harm fiberglass or damage the teak's soft grain, while enhancing the natural texture of the wood. Application instructions: Wet area to be cleaned with fresh- or saltwater (including adjacent areas that the cleaner may also contact), then scrub or agitate as needed with a soft scrubbing pad. Rinse with water, then repeat if necessary. Safety precautions include wearing protective gloves and washing hands thoroughly after use. The manufacturer recommends following with an application of Amazon's Teak Prep (a brightener) followed by a good oiling with Amazon's Teak Oil. 32 oz., $15.99 | MDRAmazon.com
West Marine One-Step Teak Cleaner & Brightener

Advertised for cleaning lightly soiled teakwood surfaces. For badly stained or weathered teak, West Marine's Heavy Duty Teak Cleaner Kit is recommended. Product literature states that it won't harm wood and that it removes stains, oils, and so on, while restoring teak to its natural color. It also states its intended for use on teak wood only and that it may damage gelcoat, paint, and metal surfaces.
Application instructions: Spray teak with water, then apply cleaner, allowing it to penetrate for 2 to 3 minutes. Scrub the wood with a soft-bristled deck brush, keeping the surface wet while cleaning. Rinse the wood thoroughly with water. Keep all adjacent surfaces wet with water and immediately rinse thoroughly if accidental contact occurs. West Marine recommends following up with its Golden Teak Oil. 32 oz., $22.99 | WestMarine.com
Iosso Teak Cleaner

Comes as a powder (a 16-ounce jar makes 4 gallons of cleaner) that, per product labeling, safely removes dirt, black algae, and mildew stains in one easy step without harsh chemicals. Iosso states that its product emits no harmful vapors; is biodegradable and nontoxic; won't harm fabrics or colors, vinyls, canvas carpeting, metals, paints, fiberglass, or plastic surfaces; and is gentle to skin (although product labeling recommends avoiding prolonged contact). Application instructions: Mix up a batch of cleaner using the provided measuring scoop — one scoop makes a quart, four scoops a gallon, and so on, when combined with water. The instructions state to use a plastic container, mix only what you'll need for the job, and dispose of any unused solution afterward. Thoroughly mix until the powder is completely dissolved (warm water is recommended for best results), then apply the solution on any horizontal or vertical surface to be cleaned. Cool surfaces with water prior to application if hot. Let stand for 10 minutes or longer while keeping the area wet with solution (thoroughly brushing it into the wood) then rinse with water. Extremely weathered wood may require a second application. 16 oz., $15.25 | Iosso.com

Amazon's Quicki II 2-Part Teak Cleaner
Per the manufacturer, this cleaner is environmentally safe (contains no caustics or acids and is non-butyl) and won't harm fiberglass. Part 1 takes care of the deeper stains, grease and grime, while Part 2 follows through with surface cleaning and brightening agents. Each kit includes a teak scrubber for easier teak cleaning. Application instructions: Wet the area to be cleaned, then apply Part 1 full strength and agitate with provided scrubber; let sit for 10 minutes, then rinse. Apply Part 2, agitate for final dirt and grease removal, let set for 15 minutes and rinse thoroughly. Follow-up manufacturer's recommended product is Amazon's Golden Teak Oil. 2 x 32 oz., $33.30 for set | MDRAmazon.com
West Marine Heavy Duty Teak Cleaner Kit

Advertised for cleaning badly stained or weathered teak. Step 1 chemically attacks stained teak, while step 2 neutralizes step 1. Instructions state the product will not harm seam compounds, however, the label also says it may damage gelcoat, paint, and metal surfaces.
Application instructions: The manufacturer recommends wearing rubber gloves and eye protection when using this kit. First, wet the surface to be cleaned as well as the surrounding areas (including hull and deck), then apply Step 1 Teak Cleaner. Spread and agitate lightly with a synthetic deck brush. As the area darkens (in 3 to 5 minutes), scrub lightly. Rinse thoroughly with water, then apply Step 2 and spread evenly with a deck brush. Agitate lightly, then as the deck turns a light golden tone, hose off all surfaces thoroughly (including the hull). 2 quarts, $47.99 | WestMarine.com
Related Articles
The truth about ceramic coatings for boats.
Our editor investigates the marketing claims of consumer-grade ceramic coatings.
Fine-Tune Your Side Scan Fishfinder
Take your side-scanning fishfinder off auto mode, and you’ll be spotting your prey from afar in no time
DIY Boat Foam Decking
Closed-cell foam flooring helps make boating more comfortable. Here’s how to install it on your vessel
Click to explore related articles
Frank Lanier
Contributing Editor, BoatUS Magazine
Capt. Frank Lanier is a SAMS Accredited Marine Surveyor with more than 40 years of experience in the marine and diving industries. He’s also an author, public speaker, and multiple award-winning journalist whose articles on boat maintenance, repair, and seamanship appear regularly in numerous marine publications worldwide. He can be reached via his YouTube channel “Everything Boats with Capt. Frank Lanier” and website captfklanier.com.
BoatUS Magazine Is A Benefit Of BoatUS Membership
Membership Benefits Include:
Subscription to the print version of BoatUS Magazine
4% back on purchases from West Marine stores or online at WestMarine.com
Discounts on fuel, transient slips, repairs and more at over 1,200 businesses
Deals on cruises, charters, car rentals, hotel stays and more…
All for only $25/year!
We use cookies to enhance your visit to our website and to improve your experience. By continuing to use our website, you’re agreeing to our cookie policy.
Better Sailing

How to Restore Teak on a Boat
There is nothing that can make or break the look of a sailboat more than the look of the exterior teak. But teak isn’t a maintenance-free boat surface that can be ignored or neglected for a long time. Though teak doesn’t rot, it can crook, check or look dull if proper care is not provided. Keep in mind that this article is not about deck restoration, so, we will not going to get into applying new Sikaflex on your deck, etc.
Teak is amazingly flexible and can be made new again even after a lot of rough use. Teak with grey weathering rarely extends far below the surface of the wood. Instead of tedious sanding and scrapping to restore the weathered surface, a standard chemical cleaning is enough to bring back the teak from its worst condition to nearly its original appearance. Chemical cleaners can clean almost the worst off weathered teak.
Though, chemical cleaning may be tough on wood. Many chemical cleaners depend upon an acid or a caustic to bleach and clean the wood’s surface. But sometimes these chemical cleaners wear away the surface gradually. To achieve the best results, you should never allow your teak to get to that condition where you have to take these drastic measures. However, if things happened and there is a need for extreme cleaning, make an effort to keep it clean moving forward.
Keep in mind that this article we will not going to get into applying new Sikaflex on your deck, etc. The article is coming though and will link it here as soon as it’s available.
If the teak of your boat got dark brown because of age or got weathered grey due to negligence, then the first thing necessary is to clean it thoroughly. The severity of the discoloration of your teak will tell the restoration method required. Since cleaners contain caustic and acids that are tough on wood, you have to use a mild cleaner as less as possible to do the job. The value of a mild scrub using a soft cleaner is that it’s gentle for the teak. As it is more probable to have soft cleaners in your boat, always try this method before applying drastic measures.
The mildest cleaner for teak could be a common purpose domestic powdered soap. A concentrated powdered cleaner with vigorous scrubbing using a soft brush will clean the teak, which is just dirty. Scrub it as lightly as you can and also keep in mind that you have to scrub across the grain. Every time the teak is scrubbed, softer wood is removed, which eventually causes a rough surface that elevates the grain. Using a scrubbing brush regularly to scrub the grain, makes it weak and rough.
First of all, try to wet down the teak with fresh water, then clean it with a detergent solution. After that rinse it with water, then leave it to get dry for some time. If the teak’s wood gets clean, even a light tan, then you are in luck. Otherwise, you will need to use a powerful cleaner.
Pro-Tip: You can also use the same washing machine power that you use to clean your clothes. I am talking about the powered detergents with the small grains in them. Those will actually help scrub the wood better because the granules will get into the teak. The best way is to sprinkle it directly on the teak instead of using a bucket and then doing it. However, you are looking for better results the following options could be better for you.
One-Part Cleaners
The next step is to use “one-part cleaners” made explicitly for teak. It can be liquid or powdered. Most cleaners consist of a mild and abrasive acid-like oxalic acid or phosphoric acid. These acids are more efficient in lightening the surface of the wood than a simple detergent. Most of the household cleaners have oxalic acid. You should take precautions while using these cleaners, which contain acids.
Even a badly weathered wood of teak can be cleaned using “one-part cleaners”. After drying the wood, it should come out as light tan. After cleaning one time, if some areas remain grey, repeat cleaning will do the trick. Still, if the wood of the teak is discolored or mottled, then you have to use “Two-part cleaners”.
I recommend this teak wood cleaner from Star Bright , it is soft on the teak but gets the job done. Make sure to get a Scrub Pad and a Stainless Teak Scrub too so you can get the best result as easy as possible. Here is a video on how to do it properly:
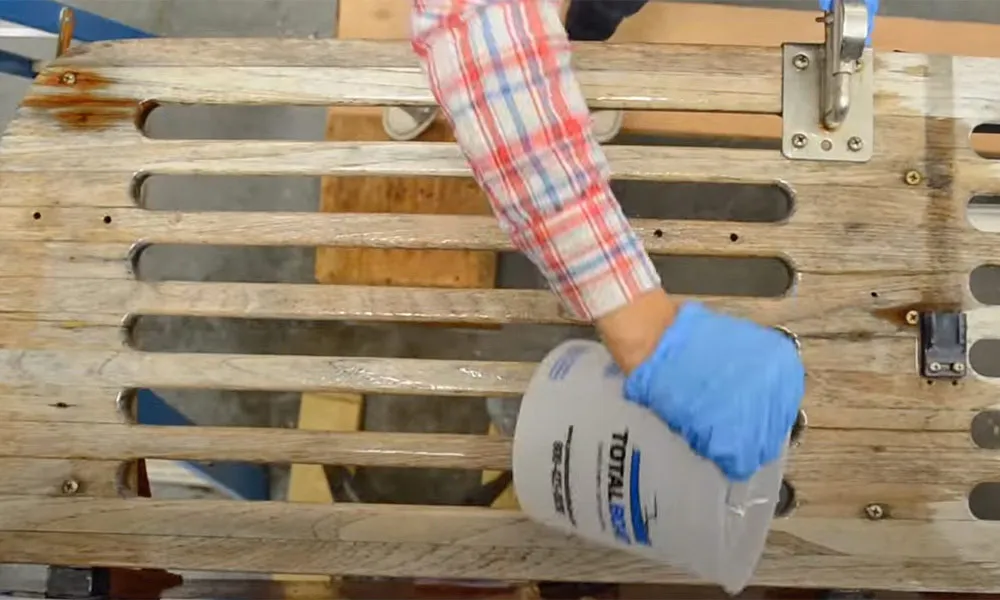
Two-Part Cleaners
These cleaners are more powerful, but they are hard on the teak. They are potent acids and caustics that can do a fantastic job of brightening and cleaning the teak. But it should be handled with care to avoid harm to adjoining surfaces. Also, surrounding surfaces, whether varnish or paint, should not be tainted by these cleaners. Continuous flushing of surrounding surfaces with fresh water among cleaning is usually sufficient, but covering off freshly varnished or painted surfaces will be more efficient.
There are slight differences in the guidelines for different “Two-part cleaners”, but the common principles are described below:
- Wet down the teak
- Apply “one-part cleaner”, dispersing and gently scrubbing with a soft brush
- When the surface of the teak is a muddy brown, uniform wet, apply “Two-part cleaner”, dispersing with clean stiffed brush
- Apply and disperse the acid required to turn teak into a uniform tan
- Wash it off thoroughly and then let it dry completely
Most commonly, the “two-part cleaner” is used twice as the first to obtain a uniform bright color. So it would be an excellent idea to buy an extra bottle of acid in case it’s needed. Also do not wash off the brown muddy surface of teak, unless the directives require it, after treating it with caustic. Furthermore, neutralizing the acid will reduce the problems.
This is the best 2-Part Cleaner made from TotalBoat and below is a video on how to use it. For large surface areas you might also want to get a get a large deck brash with a handle just to make the job easier.
Preparing for Finishing
A recently cleaned teak is a pleasure to witness, but the teak won’t remain fresh, light, and clean for a long time if proper finish is not applied. The teak’s surface will start to oxidize as soon as it dries. The earlier you complete the treatment after scrubbing, the better.
Teak consists of grain that differs in stiffness, even in the same portion of the wood. Cleaning it with detergent may erode the softer parts of the teak’s grain, leaving ranges of firmer grain. The abnormality of such surface merely increases the speed at which the teak goes dull again.
If the surface of the teak that you have cleaned is plywood, there is a good chance that thorough polishing the teak, the surface may go right off from side to side, exposing the coating of the veneer, effectively ruining the piece. On the usual fiberglass boat, plywood or veneered components are the companionway hatch tops, drop boards, and occasionally cockpit soles and seats. Before polishing any part, inspect them cautiously to understand whether they are veneer or solid lumber.
Polish the uneven grain of severely weathered teak once it is clean.
Decks are typically solid lumber, so they can create problems. If the flooring is less than half inch dense, and has beavered fastenings, polishing the grain edges will sand away sufficient solid to sand from side to side or release the bungs, revealing the fastenings. Even if the grain of teak is on fixed teak surfaces, you will be better off living with a clean uneven surface instead of opening the “Pandora’s Box” trying to make a perfectly flat surface.
On other hard teak objects such as toerails, dorade boxes, and handrails, thorough scraping of the washed surface, before applying it with sealer may produce an attractive surface. Don’t attempt to refurbish grey teak and badly weathered teak by scraping before cleaning it as I described above. There is a chance that you may quickly learn that discouraging quantity of scraping is necessary, and you will use chemical cleaners. Polishing both before and after the treatment is just a waste of effort, and may eradicate more wood. Teak with noticeable surface abnormalities would definitely take an eternity to scrap out to obtain an even surface. While cleaning with chemicals will swiftly lighten up even the inmost grain or gouges defects. Also, wait till the scrubbed teak is completely dry before polishing or applying teak covering.
Polishing scrubbed teak isn’t always needed. Mainly polishing is necessary if the teak’s surface needs to be preserved with oil covering instead of using a gloss polish like varnish. Granted, flawlessly smooth teak’s surface is more uniform in color. From a merely practical point of view, irregularities are insignificant except in the case of simplified scrubbing. Unless you plan to put the effort needed to preserve your teak’s surface between main cleanings, polishing the teak’s surface smooth is just a waste of your time. The chemical cleaning may recur the grain of the teak raising cycle, needing another rubbing.
If you are keen to keep your teak up, a good scraping will improve the wood’s form. The safest instrument for general smoothing is the high-speed sander like the “Makita XOB01Z” or any other small sander. I just like this one because it’s cordless, portable, and durable. It is also made by Makita, and I have great experiences with the brand. Inexpensive, slow-speed, and heavy sanders must be sidestepped. They leave revealing twirl marks on the teak’s surface that are emphasized by the finish. Also never use the sander on the surface of the teak to be scrapped bright.
The same is the case for a belt sander. A belt sander is maybe the most effective tool for leveling flat and large surfaces. But can also do some painful and permanent damage if the person using this tool is inexperienced. For hatches and decks of hard lumber, belt sander may be the solution, only if you’re comprehensively experienced with this equipment.
When doing power sanding, remember to cover surrounding areas of gelcoat. Just lightly touching the refined gelcoat surface with the sander will damage it. This same instruction applies to manual sanding. Remove the masking tape instantly after the completion of sanding. Even just leaving tape overnight on the exterior surface may make it difficult for you to remove.
The adhesive residue could be removed with the mild solvent like alcohol and gentle rubbing with a rough cloth. Many teak coverings are easily put with polyfoam brush.
Remove dirt from the surface with a vacuum cleaner, after sanding. If electricity isn’t available, just sweep thoroughly with a large paintbrush or dusting brush. Obviously, you do not need to sacrifice your finest paintbrush. The cheapest stiffen brush will do just fine.
Applying Finish
The last step in restoring the surface of teak is the application of a sealer or coating to preserve for a long time the look of freshly installed wood. Your preference should be a covering that doesn’t blacken the wood. A good idea would be to look nearby boats whose teak looks good to you, then ask the owners about the products which they use.
No teak polish lasts for very long. To get the best results, monthly use of coating is needed, with good cleaning before putting on a fresh coat. You’re kidding yourself if you think a once-a-year treatment will keep your teak looking good. Don’t try to use domestic type equipment oils for teak. They may not stand against the weather.
Whatever teak covering you utilize, be wary of smearing it. Splattered teak covering will not look good when it’s put on fiberglass. However, it unavoidably blackens with time, leaving marks that look as ugly as varnish marks, and are hard to eradicate. Clean up these spills and overruns straightaway with any rag dunked in spirits like alcohol unless the manufacturer indicates an alternative solvent. Covering tape isn’t particularly efficient in defending surfaces from teak oil or varnish, as the thickness of most coverings is so thin that they just drain under the edge of the tape. The solution to this problem is careful use and thorough cleaning.
Depending on the look that you want to give to your boat’s teak you can get some standard teak oil from Star Bright for a matte look or if you want to go for a high-gloss varnish you can get this product made from TotalBoat .
Also, to avoid splatter and oil marks on the teak, the best way to apply the finish is with a foam brush . They are cheap and give the best result with lowest effort.
Maintaining
Your work is not done when the final coat of finish is applied. Teak requires constant attention to make it look good at all times. When a boat is used in saltwater, repeated wash downs with freshwater will definitely extend the lifespan of the covering. But, constant interaction with saltwater will likely decrease it. Highly traffic places like the teak cockpit will need the most care of all. Although they are easy to brush and retreat, sanding isn’t always desirable.
How to Restore Teak on a Boat – Conclusion
I know it seems like a lot of work. That clarifies why the exterior teak surface on many boats looks so dirty. It takes less effort than preserving a varnished teak surface. If you think you need varnished teak, first of all, try to maintain a freshly oiled surface just for a year and revisit the idea then.
Few things look better on a boat, mostly a white fiberglass sailboat than a well preserved exterior teak. A person who neglects teak wood may also be the same person who hardly replaces engine oil, and who hardly troubles himself to place the sail protections after a sail when he assumes he is going to sail again tomorrow. So, if you are looking for a sailboat to buy, remember that a clean and neat exterior probably means a well-maintained boat overall.

Peter is the editor of Better Sailing. He has sailed for countless hours and has maintained his own boats and sailboats for years. After years of trial and error, he decided to start this website to share the knowledge.
Related Posts

Best Non Skid Boat Deck Paints

How to Remove Pinstripes From Your Boat

Common Sailboat Problems and How to Fix Them

Common Outboard Marine Engine Issues and How to Fix Them
- Buyer's Guide
- Destinations
- Maintenance
- Sailing Info
Hit enter to search or ESC to close.
A Complete Guide to Teak Maintenance on Your Sailboat

By Joshua Bremmerer, CEO at Komodo Covers Teak surfaces are divisive in the boating world—loved by some for their sparkling appearance and perfect grip, loathed by others for the perceived difficulty of teak maintenance. The reality is that teak is nothing to be afraid of, as long as you follow some essential tips to take care of the material properly, minimizing costs in the process.
Teak is famed for its various grains of hard and softwood, making it naturally adhesive and anti-slip in practically any weather condition. Furthermore, it maintains a relatively cool temperature , insulating a boat to avoid engine overheating. Due to the several types of wood, different teak maintenance methods can drastically affect its ability to last.
So, it’s crucial to take the following steps into account to make sure you don’t mark the surface and keep your boat in excellent condition.
Cleaning is king
First things first, whatever you do, don’t use high-pressure cleaners on your teak because they will destroy the softer wooden elements, leaving ridges and areas that can quickly rot. Additionally, hard brushes or powerful cleaning detergents will cause a similar effect, damaging the vulnerable soft sections.
Instead, it’s much better to do regular cleaning—weekly if possible—with a very soft brush or Brite pad. You will see good results from lightly brushing against the grain with a mild detergent. If you see mildew or just want to make your sailboat sparkle, you could consider using a tiny amount of bleach, but do it with caution.

Smooth sailing with sanding
Most boaters with a teak deck consider it a standard practice to sand the surface once a year before the start of a season. Sandpapers come in various grits—for a teak deck, between 80 and 120-grit is the ideal level. The higher the number of grit, the more slippery the deck will be, so a medium level is suitable for teak as it will maintain the characteristic non-slip.
Seal the deal
Once you have cleaned and sanded the teak evenly, you can be forgiven for clapping your hands together and proclaiming a “job well done.” But you are still missing one last step—and it is a crucial one. A teak sealer will prolong the natural appearance of the wood for years to come while maintaining the pristine condition. Depending on the type of seal, some can contain biocides and even UV inhibitors which go that extra step in terms of preservation.
Aside from sealers, you can also consider using teak oil products, but be careful on how much you apply as sometimes overapplication of oil can promote mildew growth. If your boat isn’t going to be used regularly, this may not be the best course of action. The other issue with teak oil is that it doesn’t last particularly long, usually 4-12 weeks, depending on how well you have applied it.
Following these tips will put you in a great position to get your boat ready for a season on the water. If you choose the right cleaning products, sand your deck appropriately, and seal it with a good sealer, you should be able to maintain your sailboat deck for longer than you had ever imagined!
About Josh Bremmerer

Josh Bremmerer is an innate navigator, an experienced leader in the boating industry with over a decade of experience in management and company development and a lifelong passion for boating. As the manager of Glacier Ski Shop, Josh grew the small Shop into a nationally recognized business and increased profits by 400%. With that background, it’s no wonder Josh started his own business in the boating industry: Komodo Covers .
Five Best Places Where To Sail At Least One Time In Your Life
Sailing for beginners: a guide to ensuring the safety of guests on your boat, us debut of the sunreef 80 eco zeahorse at palm beach international boat show 2024, registration opens for the 2024 camden classics cup , live your passion, subscribe to our mailing list.
- Forums New posts Unanswered threads Register Top Posts Email
- What's new New posts New Posts (legacy) Latest activity New media
- Media New media New comments
- Boat Info Downloads Weekly Quiz Topic FAQ 10000boatnames.com
- Classifieds Sell Your Boat Used Gear for Sale
- Parts General Marine Parts Hunter Beneteau Catalina MacGregor Oday
- Help Terms of Use Monday Mail Subscribe Monday Mail Unsubscribe

Cleaning and Refinishing Teak
- Thread starter Bill and Kathy McDonald
- Start date Sep 27, 2016
- Catalina Owner Forums
- Catalina 22

Bill and Kathy McDonald
The exterior wood on the boat we just bought needs some TLC. I have been reading articles on cleaning the teak (detergent and bleach mix with gentle scrubbing. Light sanding....then the debate becomes.....Tung Oil or Spar Varnish or heaven forbid Lindseed Oil. Any advice?

pclarksurf said: This is a loaded argument Lot's of good and viable choices but I'll toss my favorite out-- 1) clean and sand to your comfort level 2) 3 coats of Smiths penetrating epoxy (aka CPES). Burnish with scotch bright in between coats. Top coat with three coats of Epifanes. Not qutie done yet-- but here is the mast post with it's three coats of CPES....already pretty. View attachment 128556 View attachment 128557 Click to expand
Barnacle_Bob
pclarksurf said: This is a loaded argument Lot's of good and viable choices but I'll toss my favorite out-- 1) clean and sand to your comfort level 2) 3 coats of Smiths penetrating epoxy (aka CPES). Burnish with scotch bright in between coats. Top coat with three coats of Epifanes. Not qutie done yet-- but here is the mast post with it's three coats of CPES....already pretty. Click to expand

This was a project I took on last winter. I started by removing all the teak so I could work on it inside during the winter. I started first by scrubbing with water and bleach, then teak cleaner. It's amazing how much cleaner it looks at this point! Next I sanded, starting with 80 and moving to 120 to get it smooth. Had to get the raised grain out. Finally, finished with 3 coats of Sikkens Cetol. It has been in the sun all Sumer and still looks great! it is a long process, but looks a lot better after.

I may get arrested here for teak abuse but my c22's crib boards looked really bad when I bought it. I just used a 2 part teak cleaner and then lightly pressure washed them to get the remaining dirt out of the grain. After they dried, I hand sanded with 100 grit to knock the fuzz off and applied 2 coats of Cetol. I prefer oil for interior teak but for exterior I like Cetol. After 2 years it still looks good.

Regardless of what you use to clean the teak, you'll need to thoroughly remove any existing finish. For cleaning - after trying several different methods and products, I've settled on Semco's 2 part teak cleaner as mentioned in a post above. http://www.defender.com/product.jsp?path=-1|10918|2303285|2303300&id=1744369 It's relatively fast and remarkable in how much grime it removes so be prepared to wash away the dirt. You'll want plenty of water (think hose) to flush any boat surfaces that may come in contact with the runoff (deck and topsides). Pre-wet all surfaces and try to continuously wash everything during the process. I've found that using 2 spray bottles, one for each step, limits product waste during application (wear gloves and try to apply on a calm day). Treat small areas at a time with minimal scrubbing to reduce raising the grain on the teak. Your scrub brush/pad will get clogged with material, so a wash bucket is handy to rinse/ring out whatever tool you scrub with. Depending on the condition of your wood, you may have to repeat the process. You'll know when it's clean by the color of the runoff. Plenty of opinions elsewhere on how to finish the cleaned teak.

Whatever you put on will "stick" better if you remove the teak's surface oils prior to finishing. After all cleaning and sanding, get you some clean white cloths and some acetone. scrub the wood with the first acetone-soaked rag and then pitch the rag and do it again. You will see a lot of orange dust and oil picked up in the first rag. Repeat until the rags are coming away from the wood wet, yet clean. At that point you have removed the teak's natural oils from the fresh surface. Then within minutes, not hours, start applying your finish. The finish will soak into the wood, into the voids left by your removal of the teak oil. This will provide you a much more durable and lasting finish, regardless which type you choose to use...
This is a project that will wait until the new year. We are in the rainy season and all my work is outdoors. So far Starbrites 3 step kit is all I have found down here and of course TSA is not going to allow me to put it in my luggage. Concentrating on cleaning the cabin, recovering cushions, solar vent, etc. The beauty of living down here is you can sail almost 365.

Jeff Miller
I know the "how to refinish teak" question is as old as time, but my question is a of a slight variation. I'm in the process of "improving" (I won't call it "restoring") my 23' Kells Coaster that had been neglected for many years before she followed me home one day. I've taken off many pieces of the teak to refinish in the basement, but not all, mostly those that are screwed and bunged like the toe rails. I will probably take the rest off as well so that I can also re-bed them this winter but I'm wondering about the inevitable time down the road when the teak needs "freshening". I don't relish the thought of having to remove it all again so I'm wondering how you maintain the teak bits when they are still attached to the deck, and without making a mess out of the fiberglass. Your responses will be appreciated.

Trent Lindsey
Thanks for posting. I was going to ask the same questions. I am making a bunch of, what I hope to be, improvements to Merganser over the winter. Refinishing teak, sewing cushions, painting, cleaning, cleaning, and more cleaning!

SV_GALATEIA
I saw this on youtube. Varnish and Epoxy~ a Professional Wood Finish for Teak Part1" on YouTube A little different approach for teak that may speed up the refinish project. Comments?

Will Gilmore
Gene Neill said: Epifanes - widely considered the gold standard in varnish - flatly tells you you need TWELVE COATS to achieve good UV protection, with an additional two coats per year required in the tropics. Click to expand
philwsailz said: Whatever you put on will "stick" better if you remove the teak's surface oils prior to finishing. After all cleaning and sanding, get you some clean white cloths and some acetone. scrub the wood with the first acetone-soaked rag and then pitch the rag and do it again. Click to expand

I'm also going to tackle our teak in the off-season, (if we have much of one here). All this is good feedback and as of yet undecided, although have had good luck with Sikkens on custom wood doors in the past, recoating every 2 years or so. Need to do more research though, I'm sure as hell not going the 12 coat Epifanes route!! One thing that will help preserving the teak imo is a canvas snap on cover over the cabin. A moth-eaten one came with the boat from the PO, so snaps are already installed from front lip of cabin top, along both sides and down aside the crib boards covering nearly all the teak on the boat. Had a new one made, just need to get the snaps put on, should help preserve it some....will post a pick once on the boat....fwiw.

+1 on canvas cabin cover to keep brightwork bright!
I am starting to redo my teak. I am starting with the interior. I am installing a new halyard plate, so I have the compression post out and figured, why not give the teak some shine? I am going to try a product call Le Tonkinois. It sounds like it might be easier to apply and then maintain afterwards. I'll post a picture as I progress. I am starting the projec this weekend. Good luck!
- This site uses cookies to help personalise content, tailor your experience and to keep you logged in if you register. By continuing to use this site, you are consenting to our use of cookies. Accept Learn more…
Free Shipping On All Orders!
- Epoxy Resins
- Polyester Resin
- Urethane Resins
- Epoxy Project Supplies
- Antifouling Paints
- Topside Paints
- Thinners & Solvents
- Paint Supplies
- Wood Oils & Finishes
- Wood Finishing Supplies
- Cleaning & Polishing
- Accessories

Table Top Epoxy

Clear High Performance Epoxy Kits

5:1 Traditional Epoxy Resin Kits
- Thinners & Solvents

Wet Edge Topside Paint

Premium Marine Topside Primer

Spartan Multi-Season Antifouling Paint
- Wood Finishes
- Wood Oils & Finishes

Gleam 2.0 Marine Spar Varnish

Lust Rapid Recoat Marine Spar Varnish

Halcyon Water-Based Marine Varnish

TotalBuff Rubbing Compound

TotalShine Finishing Compound

White Knight Fiberglass Stain Remover
- TotalBoat Gear

FlexFit Fitted Mesh Back Baseball Cap

Men’s Long Sleeve T-Shirt Hoodie

Women’s Long Sleeve T-Shirt Hoodie
FREE SHIPPING with a minimum puchase of $1,200.00 You are $10.00 away from your free shipping!
Shipping, taxes, and dicount codes calculated at checkout.
How to Clean and Restore Teak Wood

Does your dirty gray outdoor teak furniture look like it should go in the fire pit, not around it? How about your dull, weathered teak boat deck – does it look like it belongs on The Flying Dutchman? Or make you want to walk the deck, swearing at the wind because you don’t know how to bring your teak back from the brink?
Well you can stop swearing and start scrubbing because teak wood care is easy with the right products and a little elbow grease.
In this post, we’ll show you how to make your teak go from gray, stained, moldy, slimy, mildewy, and dingy to golden, bright, and beautiful in a few easy steps that include cleaning, brightening, and finishing (or leaving bare). Finishing can include applying some type of teak wood oil, teak sealer, varnish , or synthetic finish, depending on the look you want.
How to Clean and Brighten Teak Wood Without Damaging It
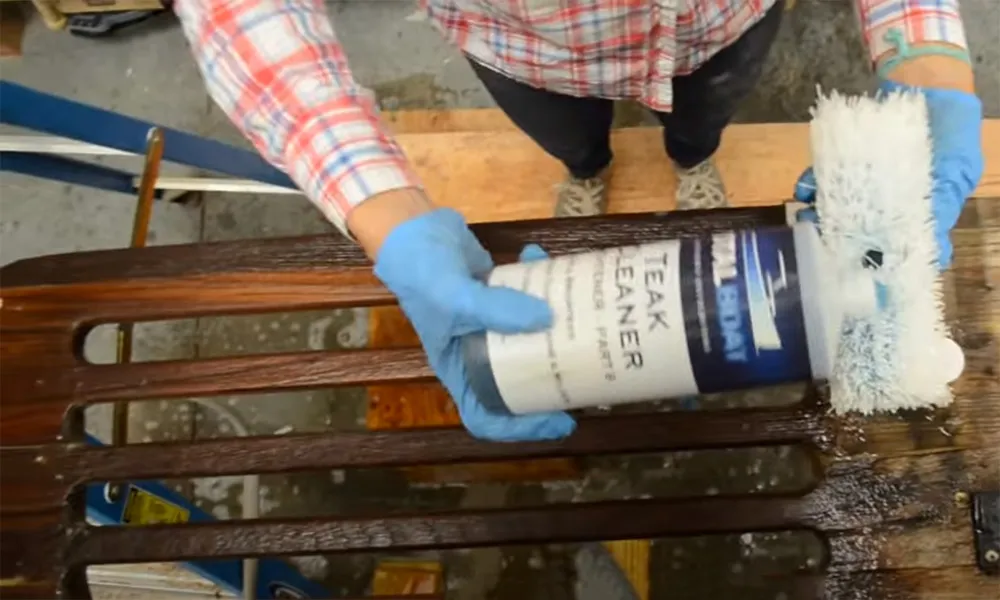
For fast, easy, amazing results, use a 2-part teak cleaner that’s safe for use on teak wood. This type of product includes a cleaner (Part A) and a brightener (Part B). The cleaner component removes dirt, grime, grease, and stains, while the brightener neutralizes the cleaner and returns teak to its natural golden tone.
Before you start cleaning your teak, put on some disposable gloves and wear protection for your face, eyes and skin. You’ll also want to protect any surrounding surfaces that might be damaged by the teak cleaner by masking or removing any painted parts or aluminum parts that are on or near the teak.
Step 1: How to Clean Teak Wood
Start by soaking the teak with fresh water.
Use a sponge to apply Part A, then use a soft bristle brush or a Scotch-Brite® pad to scrub lightly across the grain – not with the grain. If you scrub with the grain, you’re pushing the dirt and grime down deeper, and you can actually do damage because you’re removing more of the wood grain.
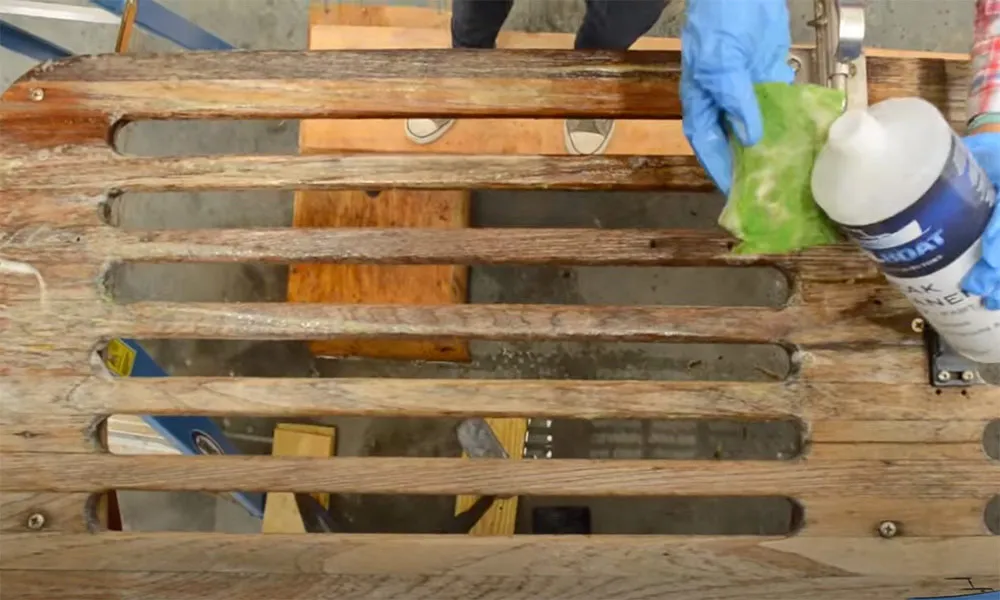
As you scrub, you’ll notice the froth turning a dark brown color as the dirt and grime comes out. Rinse the surface with fresh water.
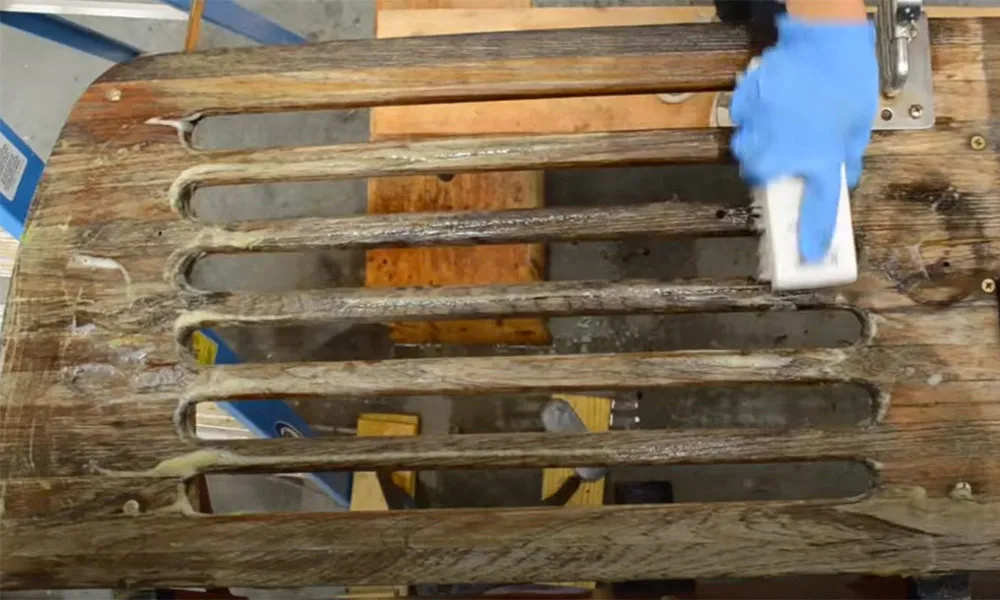
Step 2: How to Brighten Teak Wood
Use a soft bristle brush to apply Part B, and scrub lightly across the grain. As you scrub, you’ll notice the teak begin to lighten in color.
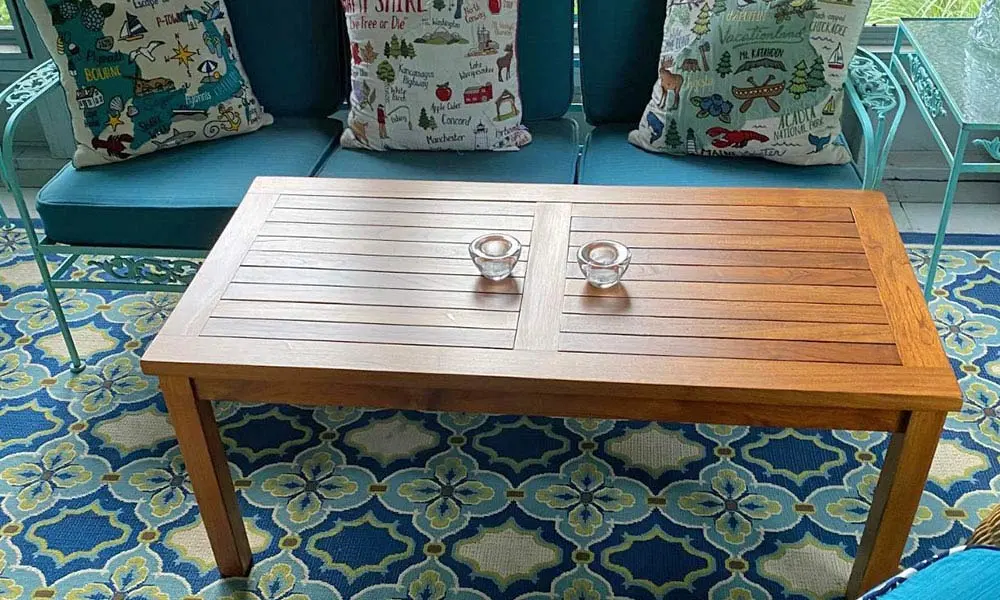
Rinse thoroughly with fresh water to remove all residue from Part B. Remember to scrub while rinsing to help remove the brightener completely. Here’s a little teak table top that was dirty and stained – see how different it looks after cleaning!
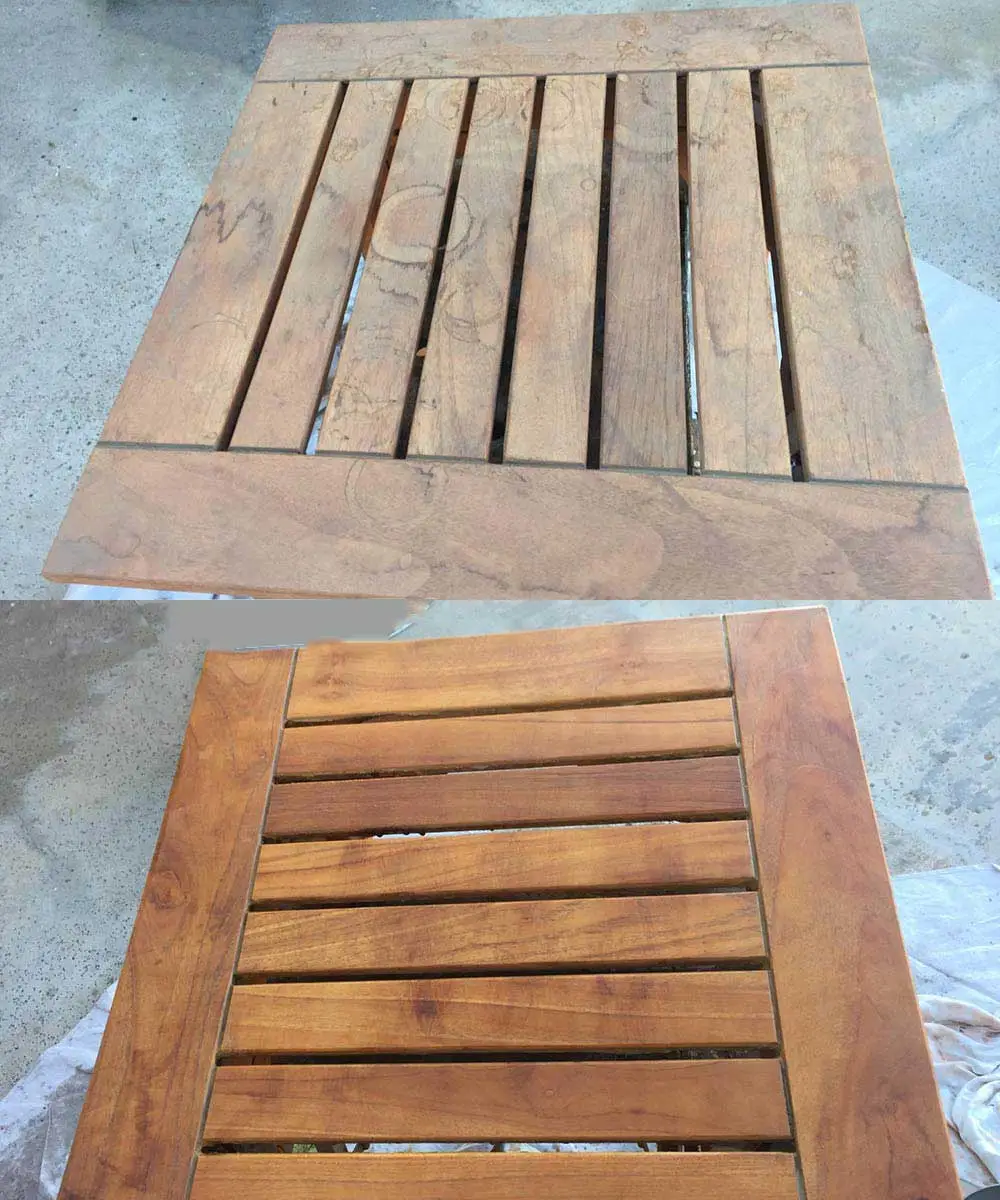
After cleaning your teak, always wait at least a few days for the teak to dry completely to a light, golden color. You may notice that as the water evaporates, the wood grain gets raised a little. You’ll want to sand lightly – in the direction of the wood grain – until the surface is smooth, before applying a teak treatment.
How to Protect Teak Wood from Sun, Salt, Mold, Mildew, Dirt and Stains
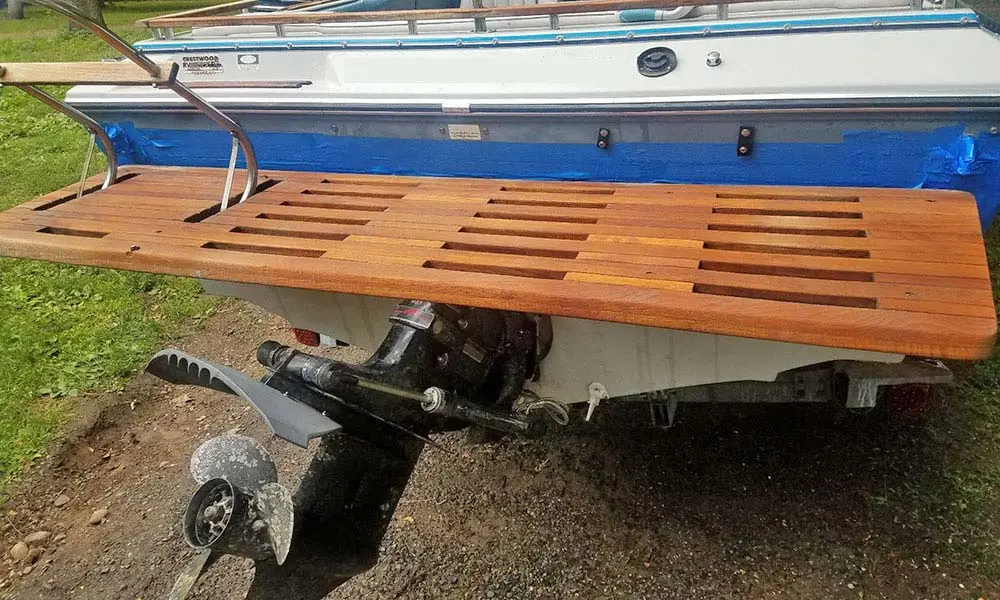
So what do you do now that your teak is bright and beautiful again? You can either leave it as is, or apply some type of teak oil, teak sealer, varnish, or synthetic wood finish product. The choice is yours. Certain teak items like boat swim platforms don’t really need to be coated with anything because they spend most of their time under water, though an application of teak oil will offer a degree of protection.
The important thing to note here is that some finishes will last longer, require less maintenance, and provide better protection than others. One thing’s for sure, if you do nothing, the teak will become silvery gray and weathered a lot sooner.
Teak Wood Oil

What is teak oil , anyway? It’s a blend of oils and solvents designed to replenish teak’s natural oils. A teak oil finish prevents wood from drying out, restores its original color, and provides an attractive matte finish.
Teak Wood Sealer
Teak sealer is used to seal in teak’s natural oils, prevent wood from drying out, and preserve the beguiling golden hue associated with teak. In addition to sealing in the natural oils, teak sealer also helps to repel dirt and stains, and prevent mold and mildew
When to Use Teak Oil or Teak Sealer
We recommend using marine teak oil for initial rejuvenation and maintenance coats. If the teak wood is not in great condition and needs better oil penetration initially, and some degree of mildew protection, apply teak sealer. Later on, you can use teak oil for maintenance coats. It’s not necessary to apply teak oil then follow with an application of teak sealer.
Advantages of Using Teak Oil and Teak Sealer
- Creates the most natural-looking results
- Fast and easy to apply
- Relatively inexpensive compared to varnish
- These finishes do not become slippery when wet, so they are ideal to use on teak swim platforms, teak decking, teak handrails
The downside of teak oils and teak sealers is that they require regular maintenance. And compared to varnish and synthetic wood finishes, teak oils and sealers don’t last as long, or provide as much protection from the elements. Maintenance coats are a must, and depending on sun exposure, climate, and the condition of the wood, you may need to apply maintenance coats monthly, twice a year, or annually.
Another type of natural finish for teak that’s worth mentioning is tung oil . It adds waterproofing properties, creates a low-sheen, hand-rubbed finish that won’t mildew or turn yellow, and it protects against staining. Here’s more information about the differences between teak oil vs. tung oil .
Synthetic Marine Wood Finish
For a finish that offers beauty, UV protection and moisture resistance similar to varnish, but is less expensive and easier to apply, try a synthetic marine wood finish . These products form a protective coating and come in a variety of finishes, including a natural teak wood finish, a gloss finish, and a satin finish.
Advantages of Using a Synthetic Marine Wood Finish on Teak Wood
- Faster and easier to apply, and more affordable than varnish
- Forms a protective coating and has UV protection similar to varnish
- Easier to repair than varnish
- More durable than teak oil and teak sealer
- Maintenance coats are applied annually – much less frequently than teak oil or teak sealer
- Not just for boats, synthetic wood finish products are great for outdoor teak furniture
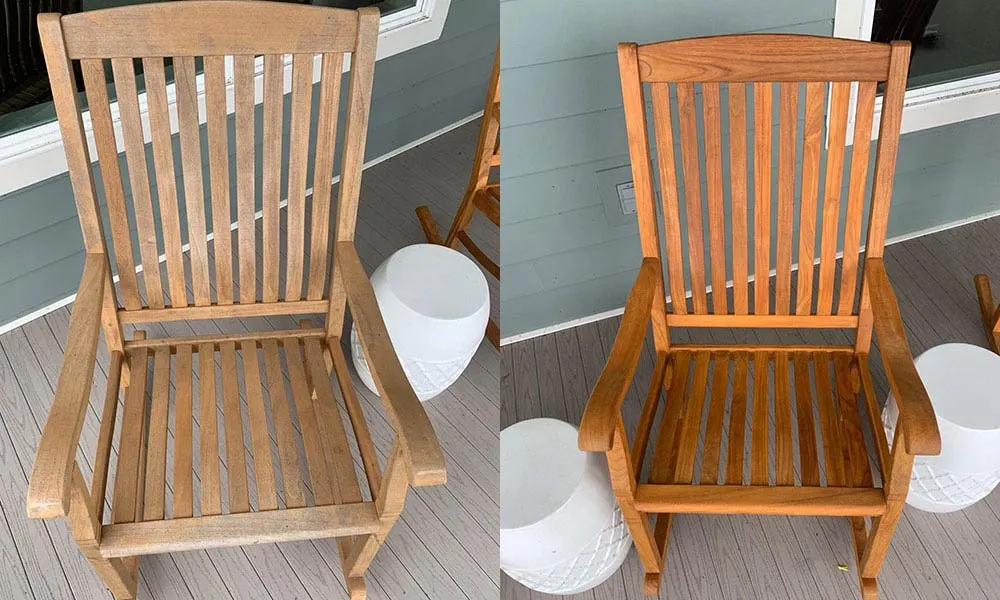
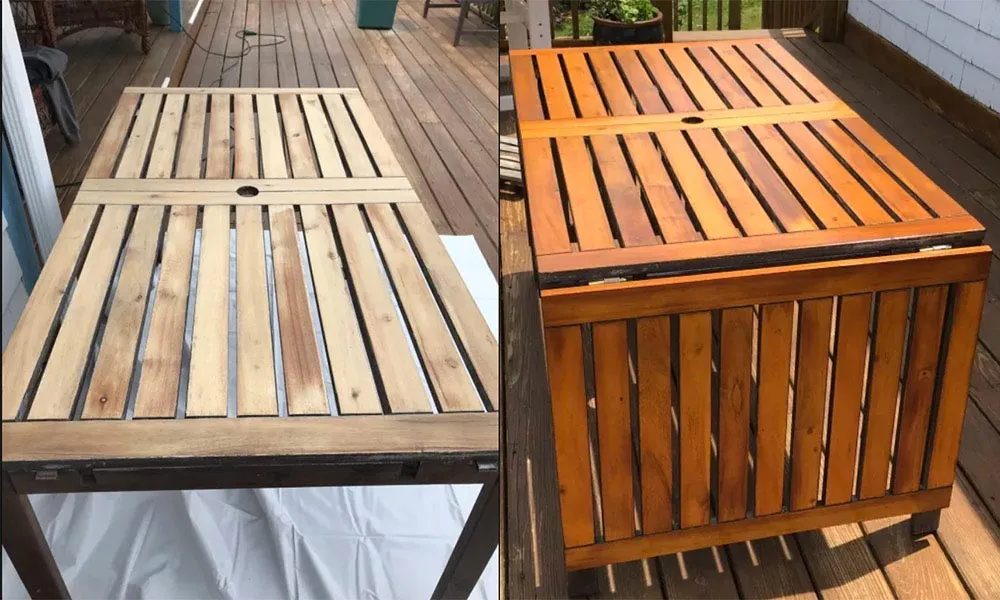
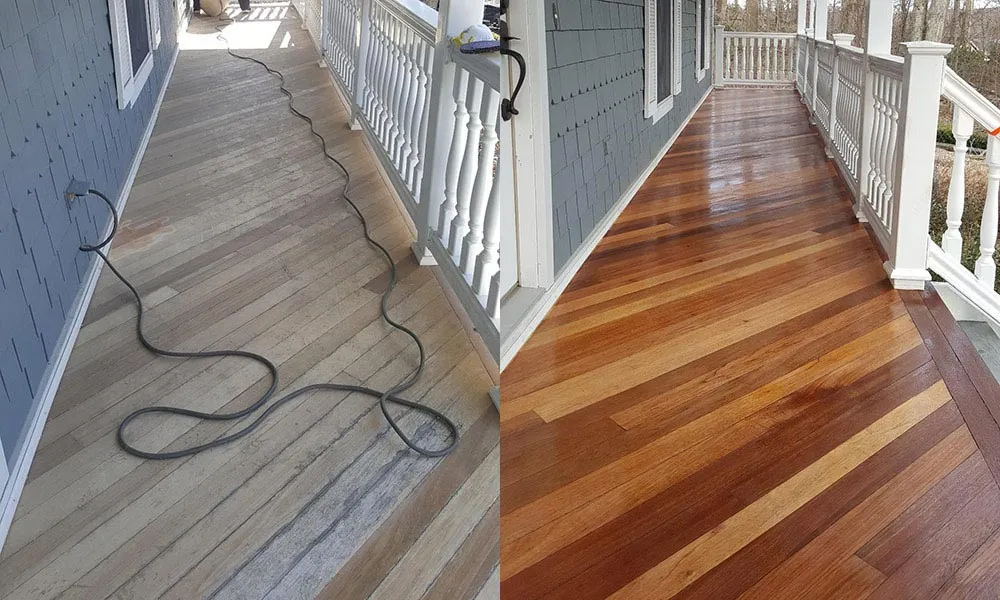
Synthetic wood finishes look great on all types of wood, not just teak. Here’s an example of how beautiful TotalBoat Marine Wood Finish looks on a refinished porch floor.
There’s nothing quite like varnish to highlight the wood grain, protect against UV and moisture damage, and maintain the natural golden color of teak wood. But that beauty and protection take more time, effort, and money than teak oil, teak sealer, or synthetic wood finishes.
Varnish protects by forming a coating over the teak that shields it from the elements. This coating leaves a durable finish that comes in a variety of options, including high gloss varnish , rubbed effect varnish, matte varnish , and satin varnish .
Some traditional varnish products require thinning the initial coats, sanding between coats and applying multiple coats, while more modern varnish products feature rapid recoating , no sanding between coats, and up to 5 coats in 1 day! There are also water-based varnish products that dry fast to a durable finish, have no harsh odors, and are easy to clean up with soap and water.
Advantages of Using Varnish on Teak Wood
- Best at showcasing the wood grain
- Achieves distinctness of image (DOI), or gloss
- Helps restore and retain teak’s natural color and beauty
- Provides the best UV protection and moisture resistance
- Offers exceptional resistance to stains, oils, grease, and dirt
To read more about sealing teak and other woods with varnish, teak oil, teak sealer, and marine wood finish products, take a look at our TotalBoat Varnishing How To Guide . If you have any questions about teak care or teak finishing, please call our Tech Support Team at (800) 497-0010.

Marine Wood Finish

2-Part Teak Wood Cleaner and Brightening System
Leave a comment
Related articles.

Refitting a Sailboat and Fixing Leaks with Ran-Day
Randall, or as you may know him as Ran-Day, from Yacht Hunters is an avid sailor and cyclist, embarking on a monumental project: refitting and modernizing an old Scheel 45...

Boat Building with Richard Honan and Friends
There's something magical about Sundays, isn't there? It's a day when time seems to slow down just enough for us to appreciate the simple joys of life. For TotalBoat Ambassador,...

TotalTread Transforms Decks on Slow Car Fast Ho...
Danielle and Tommy, from Slow Car Fast Home, are the proud owners of a 1978 SeaCamper - a 24ft trailerable houseboat that they are bringing back to life with a...

Arabella Gets a New Mizzen Boom!
Welcome back aboard Arabella! A few episodes back on Acorn to Arabella, Arabella’s mizzen boom broke on their trip to Harwich Port, MA. And, with Robin’s dad's shop just a...
- Choosing a selection results in a full page refresh.
- New Sailboats
- Sailboats 21-30ft
- Sailboats 31-35ft
- Sailboats 36-40ft
- Sailboats Over 40ft
- Sailboats Under 21feet
- used_sailboats
- Apps and Computer Programs
- Communications
- Fishfinders
- Handheld Electronics
- Plotters MFDS Rradar
- Wind, Speed & Depth Instruments
- Anchoring Mooring
- Running Rigging
- Sails Canvas
- Standing Rigging
- Diesel Engines
- Off Grid Energy
- Cleaning Waxing
- DIY Projects
- Repair, Tools & Materials
- Spare Parts
- Tools & Gadgets
- Cabin Comfort
- Ventilation
- Footwear Apparel
- Foul Weather Gear
- Mailport & PS Advisor
- Inside Practical Sailor Blog
- Activate My Web Access
- Reset Password
- Pay My Bill
- Customer Service

- Free Newsletter
- Give a Gift
How to Sell Your Boat

Cal 2-46: A Venerable Lapworth Design Brought Up to Date

Rhumb Lines: Show Highlights from Annapolis

Open Transom Pros and Cons

Leaping Into Lithium

The Importance of Sea State in Weather Planning

Do-it-yourself Electrical System Survey and Inspection

Install a Standalone Sounder Without Drilling

Rethinking MOB Prevention

Top-notch Wind Indicators

The Everlasting Multihull Trampoline

In Search of the Snag-free Clew

What’s Involved in Setting Up a Lithium Battery System?

Reducing Engine Room Noise

Breaking Point: What Can Go Wrong With Your Yanmar?

Mildew-resistant Caulks for Boats

Can We Trust Plastic Boat Parts?

Repairing Molded Plastics

Mailport: Marine plywood, fuel additives, through bolt options, winch handle holders

The Day Sailor’s First-Aid Kit

Choosing and Securing Seat Cushions

Cockpit Drains on Race Boats

Rhumb Lines: Livin’ the Wharf Rat Life

Safer Sailing: Add Leg Loops to Your Harness

Resurrecting Slippery Boat Shoes

Tricks and Tips to Forming Do-it-yourself Rigging Terminals

Marine Toilet Maintenance Tips

Learning to Live with Plastic Boat Bits

The Ultimate Guide to Caring for Clear Plastic
- Boat Maintenance
Maintenance of Interior Teak
Nevertheless, the simplicity of finishing teak, the economy of a single variety of wood in inventory, and the ready acceptance by boat buyers, are all attractive reasons why boatbuilders use the wood for interior decor.
With resistance to weathering as its primary virtue, however, teak makes less sense for use as trim below. Nevertheless, the simplicity of finishing teak , the economy of a single variety of wood in inventory, and the ready acceptance by boat buyers, are all attractive reasons why boatbuilders use the wood for interior decor .
Typically, only the most expensive boats have interior teak that is varnished, usually with a satin-finish varnish for a “hand-rubbed” effect. Such a finish should last for years if it is not abused or allowed to get wet. Maintenance can be no more than an occasional wipe with furniture oil or polish and another coat of varnish every decade or so.
Many boatowners wonder if it would be worthwhile to varnish the oiled teak trim in a typical production boat in order to take advantage of the easiermaintenance. From the standpoint of reduced maintenance, the answer is, “probably not.” At least three coats of varnish would be required (a Hinckley, for example, has six to eight). The time required to prepare the surfaces, and to sand and varnish the trim in a 30-foot production boat, could amount to a full winter’s work. In fact, it is quite likely that the total amount of work would be more than the amount of effort required to maintain the oiled teak trim over the lifetime of the boat.
On the other hand, from the standpoint of aesthetics, a varnished interior has much to recommend it. After all, such an interior may be the best way to upgrade your boat’s interior to resemble a Hinckley or a Swan. Of course, if the wood is anything but teak, the question is moot; oak, mahogany, butternut, birch, and ash must be protected with varnish, preferably with an epoxy sealer underneath.
The quality of the interior finish varies widely among boatbuilders. Some builders leave teak rough and bare, others (curse them) rough and oiled, and still others (to their credit) make a real effort to sand the wood smooth and oil it carefully. Despite the variation, however, almost any production boat with teak below can benefit from a reasonable amount of time and energy devoted to improving the look and feel of the wood.
Preparation The key to finishing joinerwork is to start with a smooth surface, and that, of course, means sanding. Even some of the better boatbuilders sometimes deliver boats with trim that is only as smooth-or as rough-as it comes out of the planer. Others may simply have a helper give the interior trim a swipe or two withapieceof sandpaper thedaybefore theboat is delivered. Well-finished joinerwork apparently costs more in labor than can be added to the price of some boats.
Fortunately, the boatowner can often take up where the builder left off with a minimum of difficulty. Before applying oil or varnish, sand the wood in the direction of the grain with the finest sandpaper that smooths it with a reasonable amount of effort; 120-or 150-grit should be about right. Oiled wood that is rough will take coarser paper and more work, since the oil both darkens and hardens the surface of the wood.
Avoid the use of power sanders, except possibly a high-speed palm sander, in order to prevent scars and swirl marks. Finish sanding should always be done by hand with 220-or even 240-grit paper for a first-class job. Again, be careful to sand in the direction of the grain and to get into tight corners.
At this point, your investment may be such that you actually consider a varnish finish (but sleep on the notion). Preparation of the wood is more than half the work of applying an oiled finish, but this preparation is only just the first step for a varnished interior.
Varnishing Interior Trim If you do decide to varnish, give the wood a final sanding with fresh 240-grit paper (or whatever is specified on the varnish can> for an extra measure of satisfaction and smoothness. Then, give the wood at least three coats of varnish; five is better, especially in high-traffic areas.
Belowdecks, there is no need to use a marine varnish with an ultraviolet inhibitor. We suggest a good-quality polyurethane varnish such as ZipGard. We have found that polyurethane varnishes are durable, economical, easy to apply, and fast drying. A second coat can often be applied in two to three hours.
Varnish with a high gloss shows every surface irregularity, tends to hide the grain of the wood, and sometimes reflects light in an objectionable manner. For these reasons, we prefer a semi-glossor satin-finish varnish which simulates a hand-rubbed surface. The traditional method for producing a hand-rubbed finish is to first rub down the final coat with powdered pumice applied with rubbing felt and water. This is followed by rubbing with rottenstone and linseed oil applied with a soft cotton cloth. Some of the modem rubbing compounds available at your local hardware store are considerably easier to use, however. We have used Duffy’s Elbow Grease with good results. This is a Vaseline-like grease which is used with 0000 bronze wool. (The instructions call for steel wool, but tiny bits of steel wool inevitably end up rusting in a marine environment.)
Whether using pumice and rottenstone or one of the newer greases, the object of hand-rubbing is to rub out all the dust sediment, brush strokes, rough spots, and hairs. Hand rubbing produces a beautiful finish, but it is a lot of work. Try it on a small piece like a sextant box before deciding to hand-rub the entire interior. Better yet, use a satin-finish varnish.
If you choose to varnish interior wood, we suggest that you avoid the use of waxes and furniture polishes on the finish. Modern polyurethane varnishes are so hard they do not need the additional protection of wax. Moreover, wax complicates any future recoating with varnish, in that all traces must be sanded or washed off in preparation for revarnishing. With a thick enough varnish finish, only a damp cloth should be needed for routine maintenance and cleaning.
Oiling Interior Trim If inclination and inertia tell you not to varnish but rather to finish the wood with an oil or dressing, choose a top-quality furniture oil. These are usually linseed oil- or tung oil-based, both of which seal the grain of the wood and harden the surface over time. One major difference between linseed oil and tung oil is that linseed oil tends to darken more than tung oil as it oxidizes; otherwise they share essentially the same virtuous characteristics. Incidentally, we would not use any of the teak dressings (including Deks Olje) intended for on-deck use. Most are high in penetrating solvents and low in oils and are not intended to produce a smooth surface on the wood.
Wipe on the oil liberally and rub it into the wood thoroughly. Use a polyfoam brush to apply the oil and a soft terrycloth pad to rub. A small amount of turpentine added to the oil (for the first coat only) should increase penetration. All traces of excess oil should be rubbed off; rub well into corners and crevices. Let the first coat dry for a day or two and follow up with subsequent coats. No excess oil should remain on the wood surface after the rubbing is completed; it will remain sticky, collect dirt, and may stain clothes and upholstery. After a day or so, if you find that the surface feels oily, give the whole surface a final hard rub with a clean piece of terrycloth dampened with turpentine.
Treatments for exterior teak are usually only available from marine outlets, but most neighborhood hardware stores carry a number of oils that are suitable for interior trim. We have used both Min-wax “hand-rubbed” effect oil and Watco Danish Teak Oil in the “original” finish on belowdecks teak, and have found them both to produce a pleasing and long-lasting finish. Both can also be used on interior mahogany trim if it is unvarnished. Lighter oils such as Scott’s Liquid Gold produce a nice finish and are easier to apply, but do not last nearly as long. These oils are better for an occasional sprucing up, rather than an original finish. A light coat of Liquid Gold, incidentally, does wonders for the appearance of bulkheads covered with the “wood-grain” plastic laminates such as Formica.
If you want an absolutely smooth finish, let the first few coats of oil harden for a few weeks, then apply another coat of oil and rerub. This time, however, use 600-grit wet-or-dry sandpaper or fine bronze wool rather than a terrycloth pad. Use the oil instead of water with the sandpaper as a “wetting agent” and continuously wipe away the residue with a clean cloth as you work.
Since wax will not adversely affect future coats of oil the way it would with varnish, you may want to apply wax or furniture polish to an oiled surface. A good quality carnauba paste wax such as Butcher’s Wax gives the surface a glowing patina that rivals a hand-rubbed varnish finish, and protects the wood from grease and dirt.
A Few Words About Other Woods Some of the most impressive-looking modem yacht interiors use light-colored woods such as ash, butter nut, spruce, and white oak for bulkheads and cabinetry. These woods pose problems that teak does not. Specifically, they are more liable to damage and discoloration from water. As a result, they must be well finished to prevent moisture from soaking into the wood.
Ash and oak are especially sensitive to water, almost instantly turning gray where they are exposed to a combination of air and water. This gray may be bleached out, but bleaching is a frustrating job and not likely to restore the wood to its original light yellow color. From the outset, even with a brand new boat finished in one of these woods, we would add a couple of coats of varnish wherever there is a chance that the wood may get wet. These areas include the area around the companionway, the deck hatches, the galley countertop, and berth risers close to the cabin sole. Also, plan to revarnish every couple of years or whenever there are signs of moisture penetrating into the wood.
Smooth, well-finished wood is easier to keep up than wood treated with low-effort finishes. An annual wipe-down with furniture polish should be enough, but watch for worn spots and water stains that may need some special attention.
Care of a Teak And Holly Cabin Sole The combination of teak “planks” and strips of holly has become a favorite of boatbuilders for cabin soles. The combination is handsome and looks “traditional,” even if its place in traditional boatbuilding is questionable.
Most teak and holly soles are just a thin veneer on a sheet of plywood. Left unprotected, the sole won’t last long, nor can it be easily restored. The thinness of the veneer and its location inside the cabin usually precludes the use of either a liquid teak cleaner or a power sander.
Unfortunately, there is no simple way to both assure protection for the wood, and to give a secure footing when the cabin sole is wet. Varnish suitable for protection does not have good nonskid characteristics.
Faced with this dilemma, we would use a satin-finish polyurethane floor varnish with just a small amount of nonskid grit (usually pumice or finely ground sand) added in areas such as the base of the companionway and outside the head, where wetness is apt to be a problem. And then don’t ignore the wear on the sole during annual maintenance; it may need an annual touching up with varnish.
RELATED ARTICLES MORE FROM AUTHOR
Leave a reply cancel reply.
Log in to leave a comment
Latest Videos

Island Packet 370: What You Should Know | Boat Review

How To Make Starlink Better On Your Boat | Interview

Catalina 380: What You Should Know | Boat Review
- Privacy Policy
- Do Not Sell My Personal Information
- Online Account Activation
- Privacy Manager

- Boat Repair
- Fiberglassing Tools and Supplies
- Woodworking
- Random Posts
- Shop Our Amazon Store For Fiberglass Materials And Supplies!
- Check Out Our Fiberglass Guides Here!
How To Refinish Your Teak Decks
- 0 Shares Share 0
Here I describe the process of extracting the old caulk, adding new caulk and refinishing the deck!
Please ‘Like’ or ‘Share’ above and join the discussion below in our comments section!! Also, please remember that there are extended ad-free versions of these video’s available for Patreon supporters! Please click below to find out more.
Materials, Tools, & Suppliers
- Knives, Scrapers & Extraction Tools
Join the discussion 8 Comments

Good Morning Andy,
That is a great tip with the fine line tape, I had to do my sailboat pilot house deck twice ( poor choice of caulking— silicone) and it was a bitch getting it off the bottom. Thanks for the tip, I will use it on the swim step on the Cruise a Home. I agree sanding the cured caulk is much faster than taping, and I don’t care how careful you are, that goo on the tape gets every were when you pull it.
Thanks Allen

Andy… Just became a Patreon! Question about refinishing my teak deck. Boat is 38 years old, I have a LOT of screws showing, and my teak appears thin. Thinking of extracting the screws — or drilling thru them — and plugging holes with bungs. I just don’t think there’s enough wood left to sink the screws deep enough for the bung to go above them. Any advice?

Hi, Thank you so much for all your time and craftsman ship, teaching and sharing your wisdoms.
I am replacing around a dozen teak planks on my Swan 431, Re- seeming and replacing old plugs in the TEAK Deck
1, How do I go about replacing the curved teak planks? (Do I need to steam, the planks ?).
2, I am in Sthrn California , Do you have any suggestions where I buy and what type /specs of Teak I should be buying for the replacement planks?
3, I am thinking about replacing the most outside plank with a slightly raised teak plank, and then varnishing it . Do you have any thoughts ?
I have been watching your video for a few years now, and your knowledge and craftsmanship have helped me so much.
Also, just wondering why you don’t use the Teak Decking systems “sausage” and the pneumatic gun?

I have been injecting CPES into each slot and let dry then add thin tape proir to fill. Do your think this is a good benefit to holding water out.?

That was beautifully done. Once the sanding was done, did you oil the deck or stain it?

Hi Andy: Are you selling your sanding tool to refinish teak decks? Thanks and great video.

How big a compressor do I need in terms of CFM to spray on All Craft?
Leave a Reply Cancel Reply
Recent videos.

Recent Blog Posts
- There’s been a lot of changes with Boatworks Today over the past year!! November 28, 2022
- Getting your boat ready for Fall? Get a 5% discount on Totalboat products! September 21, 2019
- A New Fiberglass Guide And New Website! October 2, 2017
- Applying Gelcoat, Spray or Brush? November 18, 2013
- What’s been going on?? April 16, 2013
Legal Disclaimer
Because Boatworks Today, its owners or partners cannot control how the information provided through these videos is applied, we will not be held liable for any damages; incidental or consequential.
© 2024 Boatworks Today. | Developed by Fortiris Group LLC
I AM NOW AN ONLINE RETAILER FOR ALEXSEAL OFFERING SALES AND SUPPORT! HTTP://WWW.MILLERBOATWORKS.COM Dismiss
MiG 3 main list +

Mikoyan Gurevich MiG 3 172IAP For the Party of Bolsheviks with Nikolai Sheyenko May 1942 01
Mikoyan-Gurevich MiG-3
National origin:- Soviet Union Role:- Fighter Interceptor Manufacturer:- Mikoyan-Gurevich Designer:- First flight:- 29th October 1940 Introduction:- 1941 Status:- Retired 1945 Produced:- 1940-1941 Number built:- 3,422 Primary users:- Soviet Air Forces (VVS); Soviet Air Defence Forces (PVO); Soviet Naval Aviation Developed from:- Mikoyan-Gurevich MiG-1 Variants:- Mikoyan-Gurevich I-211 Operational history MiG-3s were delivered to frontline fighter regiments beginning in the spring of 1941 and were a handful for pilots accustomed to the lower-performance and docile Polikarpov I-152 and I-153 biplanes and the Polikarpov I-16 monoplane. It remained tricky and demanding to fly even after the extensive improvements made over the MiG-1. Many fighter regiments had not kept pace in training pilots to handle the MiG and the rapid pace of deliveries resulted in many units having more MiGs than trained pilots during the German invasion. By 1 June 1941, 1,029 MIG-3s were on strength, but there were only 494 trained pilots. In contrast to the untrained pilots of the 31st Fighter Regiment, those of the 4th Fighter Regiment were able to claim three German high-altitude reconnaissance aircraft shot down before war broke out in June 1941. However high-altitude combat of this sort was to prove to be uncommon on the Eastern Front where most air-to-air engagements were at altitudes well below 5,000 metres (16,000 ft). At these altitudes the MiG-3 was outclassed by the Bf 109 in all respects, and even by other new Soviet fighters such as the Yakovlev Yak-1. Furthermore, the shortage of ground-attack aircraft in 1941 forced it into that role as well, for which it was totally unsuited. Pilot Alexander E. Shvarev recalled: "The Mig was perfect at altitudes of 4,000 m and above. But at lower altitudes it was, as they say, 'a cow'. That was the first weakness. The second was its armament: weapons failure dogged this aircraft. The third weakness was its gunsights, which were inaccurate: that's why we closed in as much as we could and fired point blank." On 22 June 1941, most MiG-3s and MiG-1s were in the border military districts of the Soviet Union. The Leningrad Military District had 164, 135 were in the Baltic Military District, 233 in the Western Special Military District, 190 in the Kiev Military District and 195 in the Odessa Military District for a total of 917 on hand, of which only 81 were non-operational. An additional 64 MiGs were assigned to Naval Aviation, 38 in the Air Force of the Baltic Fleet and 26 in the Air Force of the Black Sea Fleet. The 4th and 55th Fighter Regiments had most of the MiG-3s assigned to the Odessa Military District and their experiences on the first day of the war may be taken as typical. The 4th, an experienced unit, shot down a Romanian Bristol Blenheim reconnaissance bomber, confirmed by postwar research, and lost one aircraft which crashed into an obstacle on takeoff. The 55th was much less experienced with the MiG-3 and claimed three aircraft shot down, although recent research confirms only one German Henschel Hs 126 was 40% damaged, and suffered three pilots killed and nine aircraft lost. The most unusual case was the pair of MiG-3s dispatched from the 55th on a reconnaissance mission to PloieÅŸti that failed to properly calculate their fuel consumption and both were forced to land when they ran out of fuel. Most of the MiG-3s assigned to the interior military districts were transferred to the PVO where their lack of performance at low altitudes was not so important. On 10 July 299 were assigned to the PVO, the bulk of them belonging to the 6th PVO Corps at Moscow, while only 293 remained with the VVS, and 60 with the Naval Air Forces, a total of only 652 despite deliveries of several hundred aircraft. By 1 October, on the eve of the German offensive towards Moscow codenamed Operation Typhoon, only 257 were assigned to VVS units, 209 to the PVO, and 46 to the Navy, a total of only 512, a decrease of 140 fighters since 10 July, despite deliveries of over a thousand aircraft in the intervening period. By 5 December, the start of the Soviet counter-offensive that drove the Germans back from the gates of Moscow, the Navy had 33 MiGs on hand, the VVS 210, and the PVO 309. This was a total of 552, an increase of only 40 aircraft from 1 October. Over the winter of 1941-42 the Soviets transferred all of the remaining MiG-3s to the Navy and PVO so that on 1 May 1942 none were left on strength with the VVS. By 1 May 1942, Naval Aviation had 37 MiGs on strength, while the PVO had 323 on hand on 10 May. By 1 June 1944, the Navy had transferred all its aircraft to the PVO, which reported only 17 on its own strength, and all of those were gone by 1 January 1945. Undoubtedly more remained in training units and the like, but none were assigned to combat units by then.

Send Mail Please help us to improve these articles with any additional information or photo's. If you should encounter any bugs broken links, or display errors just email us.
If you love our website please add a like on facebook
Please donate so we can make this site even better !!
This webpage was updated 2nd August 2021
- Popular Professionals
- Design & Planning
- Construction & Renovation
- Finishes & Fixtures
- Landscaping & Outdoor
- Systems & Appliances
- Interior Designers & Decorators
- Architects & Building Designers
- Design-Build Firms
- Kitchen & Bathroom Designers
- General Contractors
- Kitchen & Bathroom Remodelers
- Home Builders
- Roofing & Gutters
- Cabinets & Cabinetry
- Tile & Stone
- Hardwood Flooring Dealers
- Landscape Contractors
- Landscape Architects & Landscape Designers
- Home Stagers
- Swimming Pool Builders
- Lighting Designers and Suppliers
- 3D Rendering
- Sustainable Design
- Basement Design
- Architectural Design
- Universal Design
- Energy-Efficient Homes
- Multigenerational Homes
- House Plans
- Home Remodeling
- Home Additions
- Green Building
- Garage Building
- New Home Construction
- Basement Remodeling
- Stair & Railing Contractors
- Cabinetry & Cabinet Makers
- Roofing & Gutter Contractors
- Window Contractors
- Exterior & Siding Contractors
- Carpet Contractors
- Carpet Installation
- Flooring Contractors
- Wood Floor Refinishing
- Tile Installation
- Custom Countertops
- Quartz Countertops
- Cabinet Refinishing
- Custom Bathroom Vanities
- Finish Carpentry
- Cabinet Repair
- Custom Windows
- Window Treatment Services
- Window Repair
- Fireplace Contractors
- Paint & Wall Covering Dealers
- Door Contractors
- Glass & Shower Door Contractors
- Landscape Construction
- Land Clearing
- Garden & Landscape Supplies
- Deck & Patio Builders
- Deck Repair
- Patio Design
- Stone, Pavers, & Concrete
- Paver Installation
- Driveway & Paving Contractors
- Driveway Repair
- Asphalt Paving
- Garage Door Repair
- Fence Contractors
- Fence Installation
- Gate Repair
- Pergola Construction
- Spa & Pool Maintenance
- Swimming Pool Contractors
- Hot Tub Installation
- HVAC Contractors
- Electricians
- Appliance Services
- Solar Energy Contractors
- Outdoor Lighting Installation
- Landscape Lighting Installation
- Outdoor Lighting & Audio/Visual Specialists
- Home Theater & Home Automation Services
- Handyman Services
- Closet Designers
- Professional Organizers
- Furniture & Accessories Retailers
- Furniture Repair & Upholstery Services
- Specialty Contractors
- Color Consulting
- Wine Cellar Designers & Builders
- Home Inspection
- Custom Artists
- Columbus, OH Painters
- New York City, NY Landscapers
- San Diego, CA Bathroom Remodelers
- Minneapolis, MN Architects
- Portland, OR Tile Installers
- Kansas City, MO Flooring Contractors
- Denver, CO Countertop Installers
- San Francisco, CA New Home Builders
- Rugs & Decor
- Home Improvement
- Kitchen & Tabletop
- Bathroom Vanities
- Bathroom Vanity Lighting
- Bathroom Mirrors
- Bathroom Fixtures
- Nightstands & Bedside Tables
- Kitchen & Dining
- Bar Stools & Counter Stools
- Dining Chairs
- Dining Tables
- Buffets and Sideboards
- Kitchen Fixtures
- Wall Mirrors
- Living Room
- Armchairs & Accent Chairs
- Coffee & Accent Tables
- Sofas & Sectionals
- Media Storage
- Patio & Outdoor Furniture
- Outdoor Lighting
- Ceiling Lighting
- Chandeliers
- Pendant Lighting
- Wall Sconces
- Desks & Hutches
- Office Chairs
- View All Products
- Side & End Tables
- Console Tables
- Living Room Sets
- Chaise Lounges
- Ottomans & Poufs
- Bedroom Furniture
- Nightstands
- Bedroom Sets
- Dining Room Sets
- Sideboards & Buffets
- File Cabinets
- Room Dividers
- Furniture Sale
- Trending in Furniture
- View All Furniture
- Bath Vanities
- Single Vanities
- Double Vanities
- Small Vanities
- Transitional Vanities
- Modern Vanities
- Houzz Curated Vanities
- Best Selling Vanities
- Bathroom Vanity Mirrors
- Medicine Cabinets
- Bathroom Faucets
- Bathroom Sinks
- Shower Doors
- Showerheads & Body Sprays
- Bathroom Accessories
- Bathroom Storage
- Trending in Bath
- View All Bath
- How to Choose a Bathroom Vanity

- Patio Furniture
- Outdoor Dining Furniture
- Outdoor Lounge Furniture
- Outdoor Chairs
- Adirondack Chairs
- Outdoor Bar Furniture
- Outdoor Benches
- Wall Lights & Sconces
- Outdoor Flush-Mounts
- Landscape Lighting
- Outdoor Flood & Spot Lights
- Outdoor Decor
- Outdoor Rugs
- Outdoor Cushions & Pillows
- Patio Umbrellas
- Lawn & Garden
- Garden Statues & Yard Art
- Planters & Pots
- Outdoor Sale
- Trending in Outdoor
- View All Outdoor
- 8 x 10 Rugs
- 9 x 12 Rugs
- Hall & Stair Runners
- Home Decor & Accents
- Pillows & Throws
- Decorative Storage
- Faux Florals
- Wall Panels
- Window Treatments
- Curtain Rods
- Blackout Curtains
- Blinds & Shades
- Rugs & Decor Sale
- Trending in Rugs & Decor
- View All Rugs & Decor
- Pendant Lights
- Flush-Mounts
- Ceiling Fans
- Track Lighting
- Wall Lighting
- Swing Arm Wall Lights
- Display Lighting
- Table Lamps
- Floor Lamps
- Lamp Shades
- Lighting Sale
- Trending in Lighting
- View All Lighting
- Bathroom Remodel
- Kitchen Remodel
- Kitchen Faucets
- Kitchen Sinks
- Major Kitchen Appliances
- Cabinet Hardware
- Backsplash Tile
- Mosaic Tile
- Wall & Floor Tile
- Accent, Trim & Border Tile
- Whole House Remodel
- Heating & Cooling
- Building Materials
- Front Doors
- Interior Doors
- Home Improvement Sale
- Trending in Home Improvement
- View All Home Improvement
- Cups & Glassware
- Kitchen & Table Linens
- Kitchen Storage and Org
- Kitchen Islands & Carts
- Food Containers & Canisters
- Pantry & Cabinet Organizers
- Kitchen Appliances
- Gas & Electric Ranges
- Range Hoods & Vents
- Beer & Wine Refrigerators
- Small Kitchen Appliances
- Cookware & Bakeware
- Tools & Gadgets
- Kitchen & Tabletop Sale
- Trending in Kitchen & Tabletop
- View All Kitchen & Tabletop
- Storage & Organization
- Baby & Kids

- View all photos
- Dining Room
- Breakfast Nook
- Family Room
- Bed & Bath
- Powder Room
- Storage & Closet
- Outdoor Kitchen
- Bar & Wine
- Wine Cellar
- Home Office
- Popular Design Ideas
- Kitchen Backsplash
- Deck Railing
- Privacy Fence
- Small Closet
- Stories and Guides
- Popular Stories
- Renovation Cost Guides
- Fence Installation Cost Guide
- Window Installation Cost Guide
- Discussions
- Design Dilemmas
- Before & After
- Houzz Research
- View all pros
- View all services
- View all products
- View all sales
- Living Room Chairs
- Dining Room Furniture
- Coffee Tables
- Home Office Furniture
- Join as a Pro
- Interior Design Software
- Project Management
- Custom Website
- Lead Generation
- Invoicing & Billing
- Landscape Contractor Software
- General Contractor Software
- Remodeler Software
- Builder Software
- Roofer Software
- Architect Software
- Takeoff Software
- Lumber & Framing Takeoffs
- Steel Takeoffs
- Concrete Takeoffs
- Drywall Takeoffs
- Insulation Takeoffs
- Stories & Guides
- LATEST FROM HOUZZ
- HOUZZ DISCUSSIONS
- SHOP KITCHEN & DINING
- Kitchen & Dining Furniture
- Sinks & Faucets
- Kitchen Cabinets & Storage
- Knobs & Pulls
- Kitchen Knives
- KITCHEN PHOTOS
- FIND KITCHEN PROS
- Bath Accessories
- Bath Linens
- BATH PHOTOS
- FIND BATH PROS
- SHOP BEDROOM
- Beds & Headboards
- Bedroom Decor
- Closet Storage
- Bedroom Vanities
- BEDROOM PHOTOS
- Kids' Room
- FIND DESIGN PROS
- SHOP LIVING
- Fireplaces & Accessories
- LIVING PHOTOS
- SHOP OUTDOOR
- Pool & Spa
- Backyard Play
- OUTDOOR PHOTOS
- FIND LANDSCAPING PROS
- SHOP LIGHTING
- Bathroom & Vanity
- Flush Mounts
- Kitchen & Cabinet
- Outdoor Wall Lights
- Outdoor Hanging Lights
- Kids' Lighting
- Decorative Accents
- Artificial Flowers & Plants
- Decorative Objects
- Screens & Room Dividers
- Wall Shelves
- About Houzz
- Houzz Credit Cards
- Privacy & Notice
- Cookie Policy
- Your Privacy Choices
- Mobile Apps
- Copyright & Trademark
- For Professionals
- Houzz vs. Houzz Pro
- Houzz Pro vs. Ivy
- Houzz Pro Advertising Reviews
- Houzz Pro 3D Floor Planner Reviews
- Trade Program
- Buttons & Badges
- Your Orders
- Shipping & Delivery
- Return Policy
- Houzz Canada
- Review Professionals
- Suggested Professionals
- Accessibility
- Houzz Support
- COUNTRY COUNTRY
Furniture Upholstery Shops in Lyubertsy
Location (1).
- Use My Current Location
Popular Locations
- Albuquerque
- Cedar Rapids
- Grand Rapids
- Indianapolis
- Jacksonville
- Kansas City
- Little Rock
- Los Angeles
- Minneapolis
- New Orleans
- Oklahoma City
- Orange County
- Philadelphia
- Portland Maine
- Salt Lake City
- San Francisco
- San Luis Obispo
- Santa Barbara
- Washington D.C.
- Lyubertsy, Moscow Oblast, Russia
Featured Reviews for Furniture Upholstery Shops in Lyubertsy
What types of services do furniture repair companies offer, find lyubertsy furniture repair companies on houzz., business services, connect with us.

EUROINTECH LTD
Contact Information
Company name: EUROINTECH LTD
Company address: OFFICE 016 26 YUBILEINAYA STR 140011 LYUBERTSY , RUS
Website: http://eurointech.ru
Partner Highlights
We offer only that what we would prefer to operate! We make emphasis on excellent service, that results in increased customer base, customer’s satisfaction and loyalty. Today we have a lot of customers throughout Russia: many universities, research institutes and factories. Government companies as well as private business collaborate with us.

Reselling, Implementation, and Training
Explore partners solutions, explore customer and partner stories, more partners.
IMAGES
VIDEO
COMMENTS
Simply wet down an area with water, clean with the detergent solution, rinse with fresh water, and let it dry. If the wood comes out a nice, even light tan, youre in luck.
Ultraviolet light can bleach the color, persistent deck leaks can delaminate plywood, and sustained humidity can foster mildew and add to that old boat smell. The best defense is a durable finish. An inch of teak is a terrible thing to waste You have a lot of options to choose from for a finish.
0:00 / 4:55 How to Refinish Teak Wood on a Boat | Restoring Teak Wood on a Boat | Boats.net Boat Parts 41.2K subscribers Subscribe Subscribed 198 43K views 2 years ago See how to restore...
When cleaning teak, scrub across the grain of the wood with a 3M Scotch-Brite pad. A soft, polypropylene bristle brush will do in a pinch — just remember to scrub lightly and never with the grain. Badly worn teak should be lightly sanded to smooth the wood's surface.
Cleaning If the teak of your boat got dark brown because of age or got weathered grey due to negligence, then the first thing necessary is to clean it thoroughly. The severity of the discoloration of your teak will tell the restoration method required.
Our sailboat restoration continues as we completely restore the teak wood in our cockpit (and eventually all the wood on deck). We have a friend a few boats ...
Smooth sailing with sanding. Most boaters with a teak deck consider it a standard practice to sand the surface once a year before the start of a season. Sandpapers come in various grits—for a teak deck, between 80 and 120-grit is the ideal level. The higher the number of grit, the more slippery the deck will be, so a medium level is suitable ...
One thing that will help preserving the teak imo is a canvas snap on cover over the cabin. A moth-eaten one came with the boat from the PO, so snaps are already installed from front lip of cabin top, along both sides and down aside the crib boards covering nearly all the teak on the boat.
For boats like a C-22, two quarts of varnish would last a lifetime. I used most of one 500 ML can for this project, which can be found for under $30. The oxalic acid crystals were only a few bucks and I already had some teak oil from the Refinish Your Interior Teak to Better Than New project. The hatch lock was the highest cost item but is ...
Step 1. Use 80-grit sandpaper to sand off a teak wood nameplate that has weathered sun-bleached wood and/or shadows of letters. NOTE: In the second photo above, you can see beyond the sander at the result of pulling all of that worn surface off the wood: no shadows from the letters and a deeper color on the wood itself. Step 2.
DIY: Refinishing Wood on a Boat Often the hardest part of refinishing wood on a boat is getting the old finish off. Unfortunately, there is no magic solution. It usually takes a combination of methods, all involving a large tub of elbow grease and a bucket of patience. Pip Hurn Updated: Nov 30, 2022 Original: Apr 21, 2013
Step 1: How to Clean Teak Wood Start by soaking the teak with fresh water. Use a sponge to apply Part A, then use a soft bristle brush or a Scotch-Brite® pad to scrub lightly across the grain - not with the grain.
With resistance to weathering as its primary virtue, however, teak makes less sense for use as trim below. Nevertheless, the simplicity of finishing teak, the economy of a single variety of wood in inventory, and the ready acceptance by boat buyers, are all attractive reasons why boatbuilders use the wood for interior decor.. Typically, only the most expensive boats have interior teak that is ...
Subscribe!! https://www.youtube.com/user/boatworkstoday?sub_confirmation=1An overview and step by step of how to refinish / re-seam the teak decks on your bo...
June 2, 2016 at 4:39 pm Good Morning Andy, That is a great tip with the fine line tape, I had to do my sailboat pilot house deck twice ( poor choice of caulking— silicone) and it was a bitch getting it off the bottom. Thanks for the tip, I will use it on the swim step on the Cruise a Home.
To refinish teak on a boat, you need to clean, sand, and apply a wood finisher to it. This restoration does not take long and can be done in a couple of days. If you have weathered teak on your boat, this article will talk about how to refinish teak.
Sanding staining and refinishing teak handrails on your sailboat
Get directions to 3rd Pochtovoye Otdeleniye Street, 65 and view details like the building's postal code, description, photos, and reviews on each business in the building
Mikoyan-Gurevich MiG-3. MiG-3s were delivered to frontline fighter regiments beginning in the spring of 1941 and were a handful for pilots accustomed to the lower-performance and docile Polikarpov I-152 and I-153 biplanes and the Polikarpov I-16 monoplane. It remained tricky and demanding to fly even after the extensive improvements made over ...
Furniture refinishing primarily applies to wooden furniture pieces, and involves stripping furniture pieces of their finish and applying a new stain, lacquer and/or varnish. Furniture restoration consists of minor cleaning and cosmetic fixes; restoration is primarily about maintaining a piece's general design and cleaning up the exterior so ...
Eurointech Ltd. is a supplier of equipment, materials and EDA software for microelectronic industry in Russia. Foundation: 2007 year. Location: Lyubertsy, Moscow region.