Refastening a Wooden Hull - Season 4, Episode 1 Now Available!

How to Build a Wooden Mast
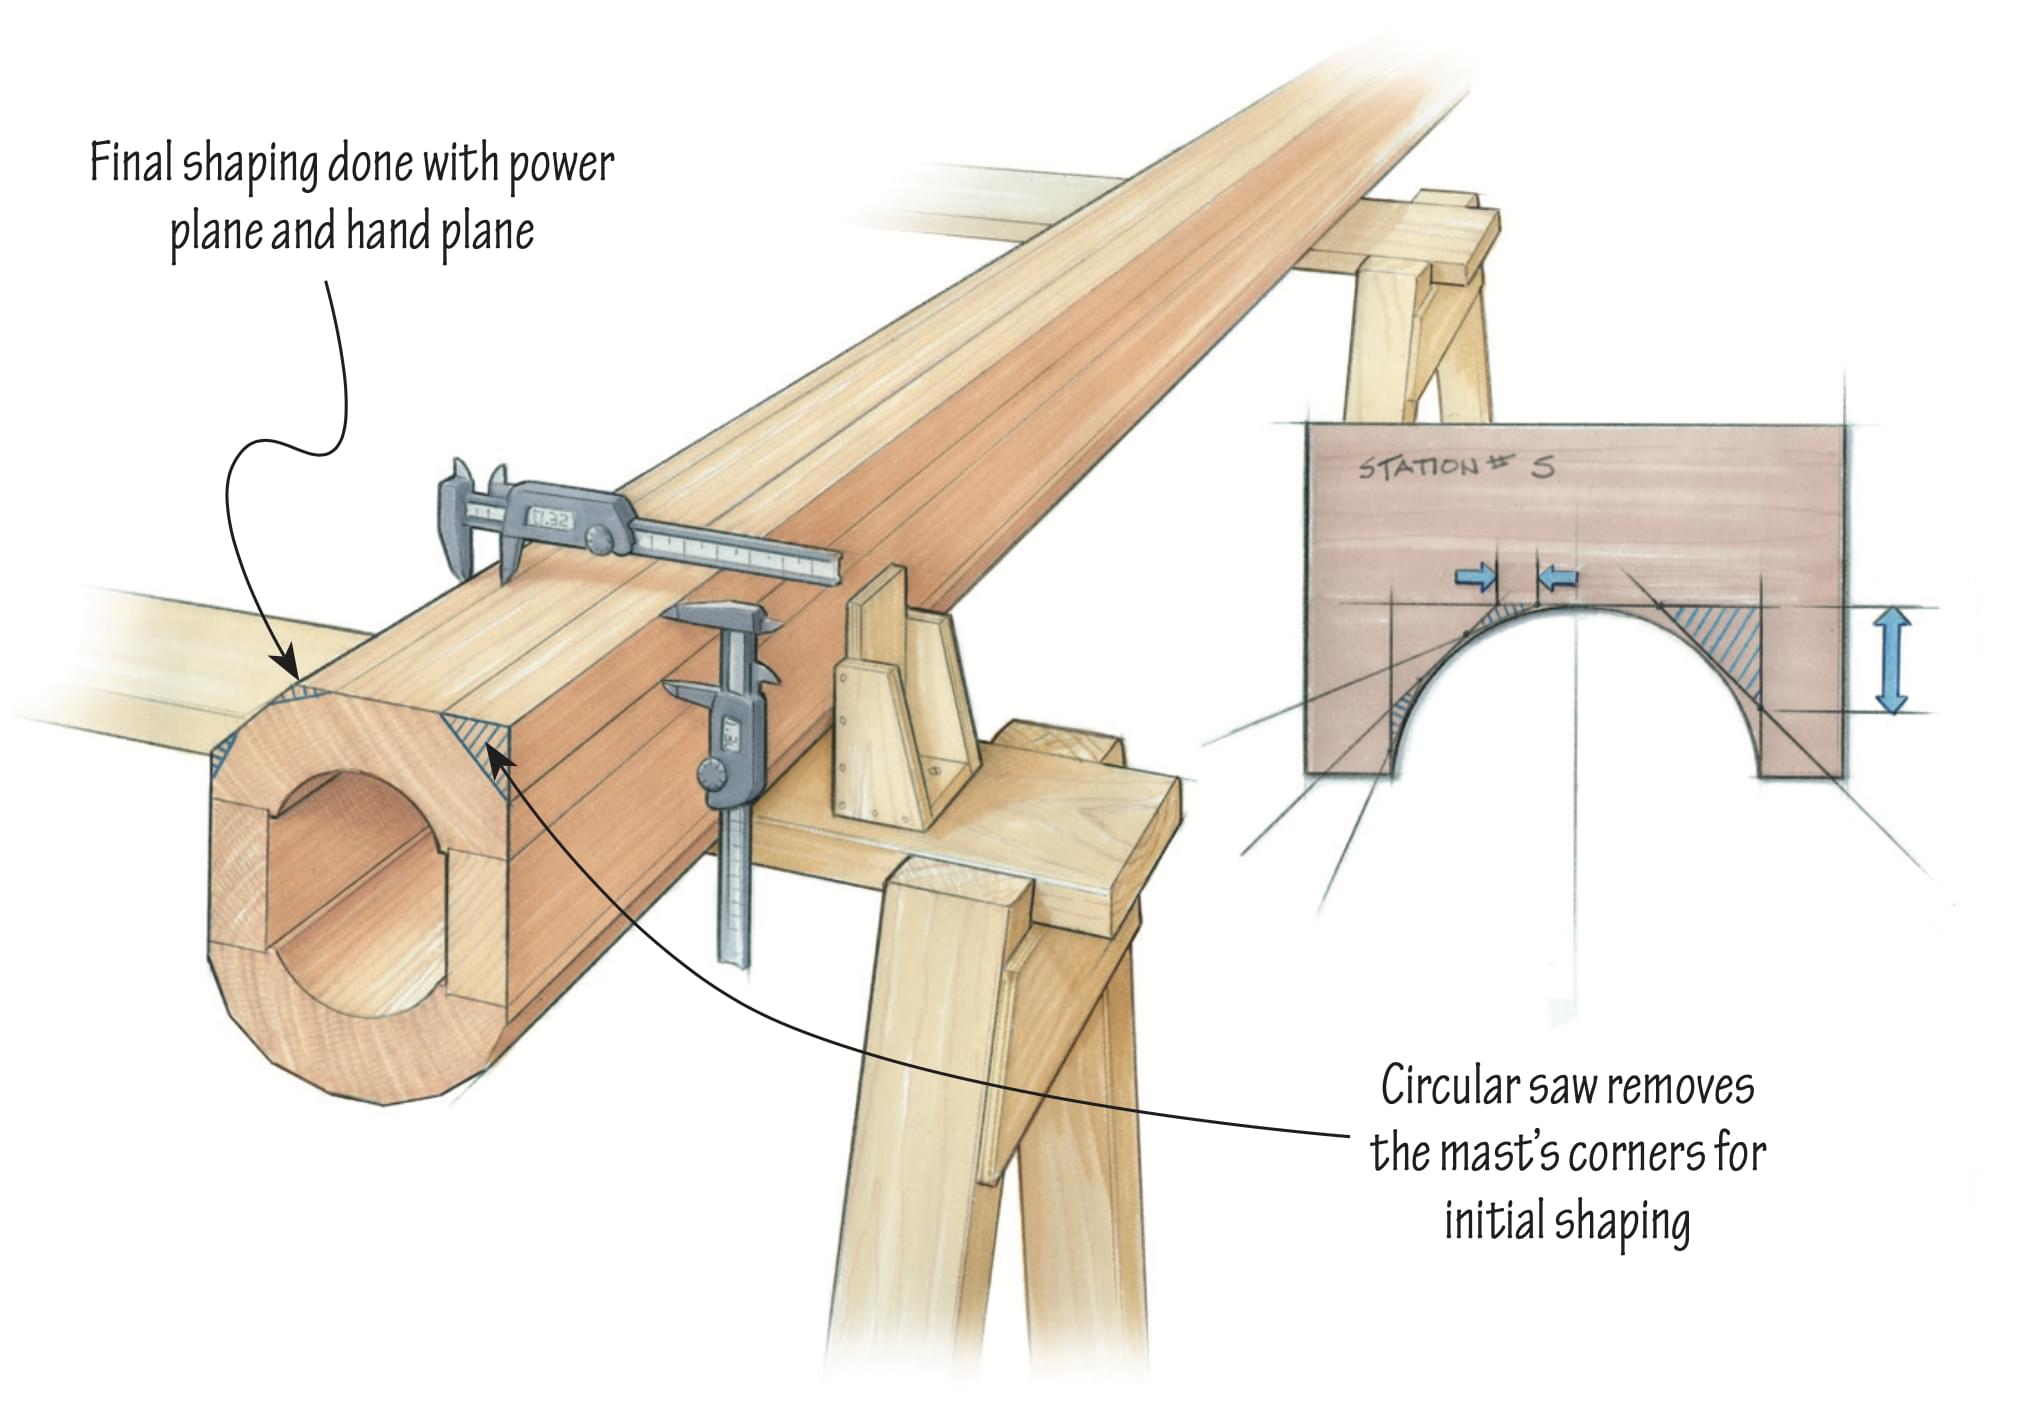
A tapered, oval new york 32 spar from the original plans.
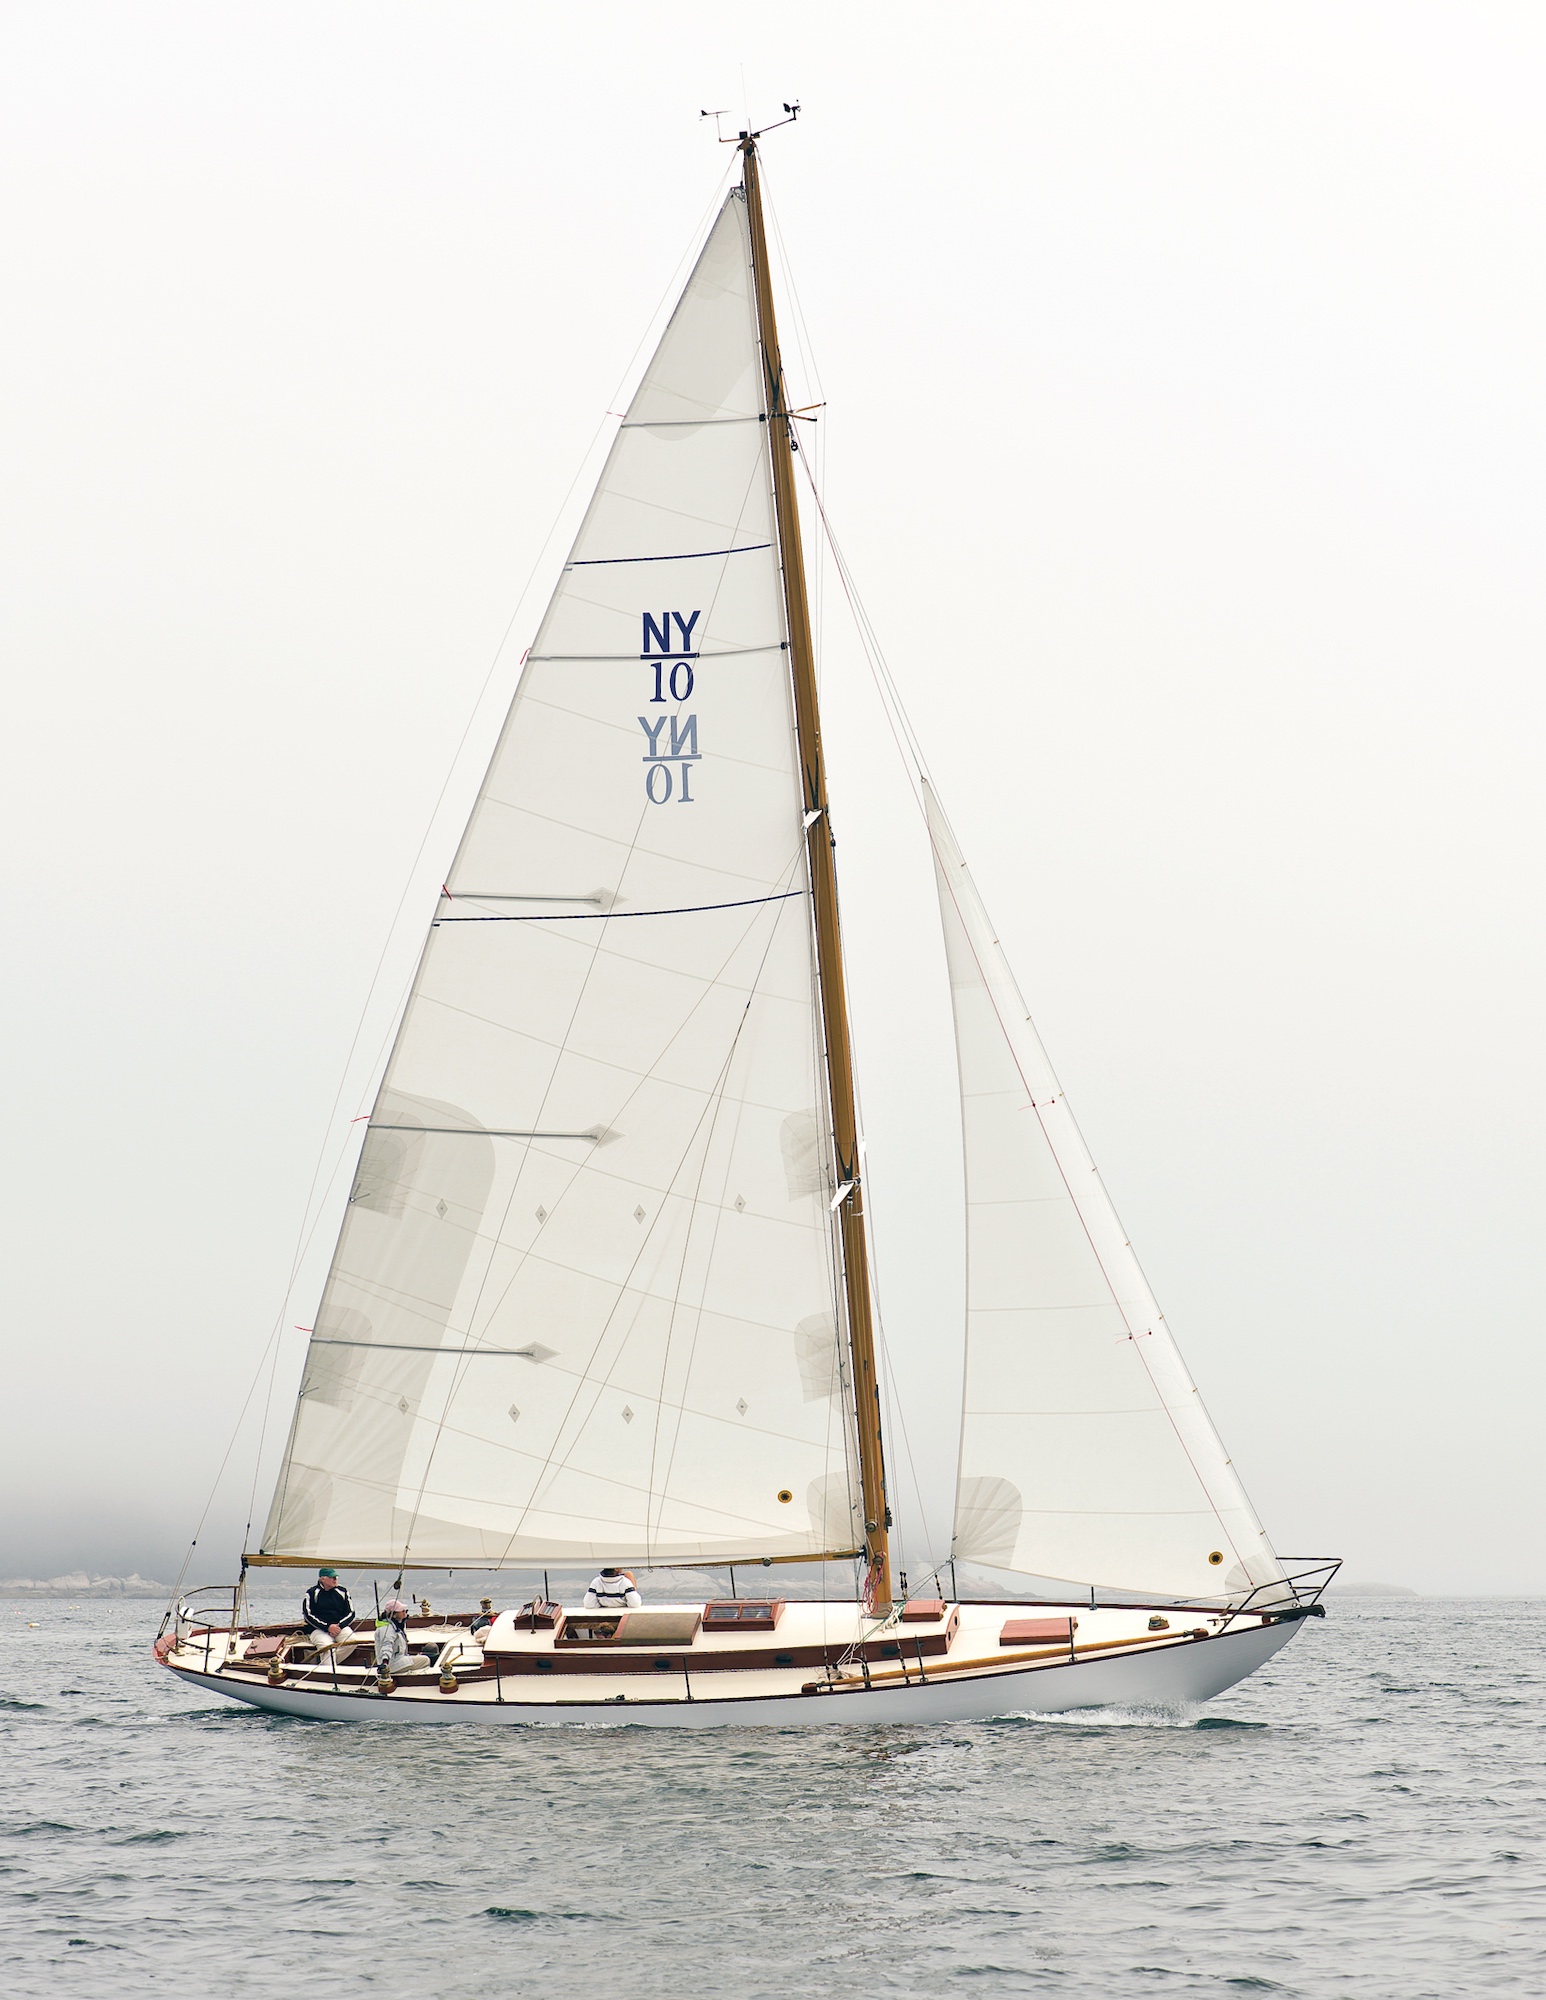
ISLA, New York 32 No.10 (of a total of 20), was thoroughly rebuilt last year by Buzzards Bay Yacht Services of Mattapoisett, Massachusetts. The job included a new mast, whose construction is detailed on the following pages.
W hen my company was hired to restore New York 32 No. 10, ISLA, in 2008, the boat had been out of service for over 25 years. The 20-boat New York 32 fleet was designed by Sparkman & Stephens in 1935 and built over the winter of 1935–36 by Henry B. Nevins of City Island, New York. When we found her, ISLA was a virtual time capsule, with an intact original interior and a complete set of original hardware. But the hull and deck were tired, to say the least, and the spars were beyond repair. So, included in the work list were a new mast and boom.
The New York 32 carries a hollow, oval mast measuring 63′ 5″. The owners were committed to maintaining ISLA’s originality, so we acquired the original spar drawings from the S&S plan collection at Mystic Seaport. These included ample detail: spreaders, tangs, boom, and masthead, along with the overall mast plan. The following steps describe how we turned those drawings into a new mast for ISLA.
Ordering and Preparing Lumber ISLA’s mast is built of Sitka spruce, which has long been prized by sparmakers for its long, clear lengths, light weight, and impressive strength for that weight. From the plans we developed a lumber list for the mast, boom, and spreaders. While it is still possible to acquire excellent-quality Sitka spruce, it takes some searching and a keen eye for defects. We required at least 12/4 stock to fashion the forward and after staves.
For spars, it’s imperative that the wood be dry (below 15 percent moisture content) and free of defects. The grain must be vertical. Our first attempt to procure lumber for this mast resulted in us receiving a batch of 12/4 Sitka spruce that was case-hardened. It was dry to both the touch and to the moisture meter, but once milled and its center exposed, its moisture content went off the scale. When we tried to rip it on the tablesaw, it pinched the saw’s blade and stopped the saw. We replaced that batch of wood with properly dried material, and learned a lesson in the process.
We ran the rough-sawn boards we had purchased through the thickness planer to take “fur” off of each one, allowing for a better inspection of the surface of the wood. When doing so, we kept in mind the minimum thickness of the staves, so we wouldn’t carelessly plane off too much. With this done, we examined each board, measuring its usable portion, marking visible defects, and labeling each piece for its intended location in the mast. A board with tight grain is slightly denser and thus heavier than one with wider ring spacing; we strived to locate these heavier pieces toward the bottom of the spar. If another board had slight grain runout, we’d consider using it in the mast’s heel where it is under less stress and is backed by solid blocking. It’s also important to keep in mind the locations of the scarfs when selecting the lengths of stock that will compose each stave, for the scarfs must be staggered.
Utilizing the Drawing
The drawing shown here is an illustration of the original Sparkman & Stephens mast plan for the New York 32, whose vertical scale was compressed in order to fit the mast’s dimensions onto a single sheet of paper. From the drawing we created a table of offsets for the mast. To do this we drew a series of stations, 5′ apart, perpendicular to the mast’s centerline. We did this for both the side and forward views of the mast.
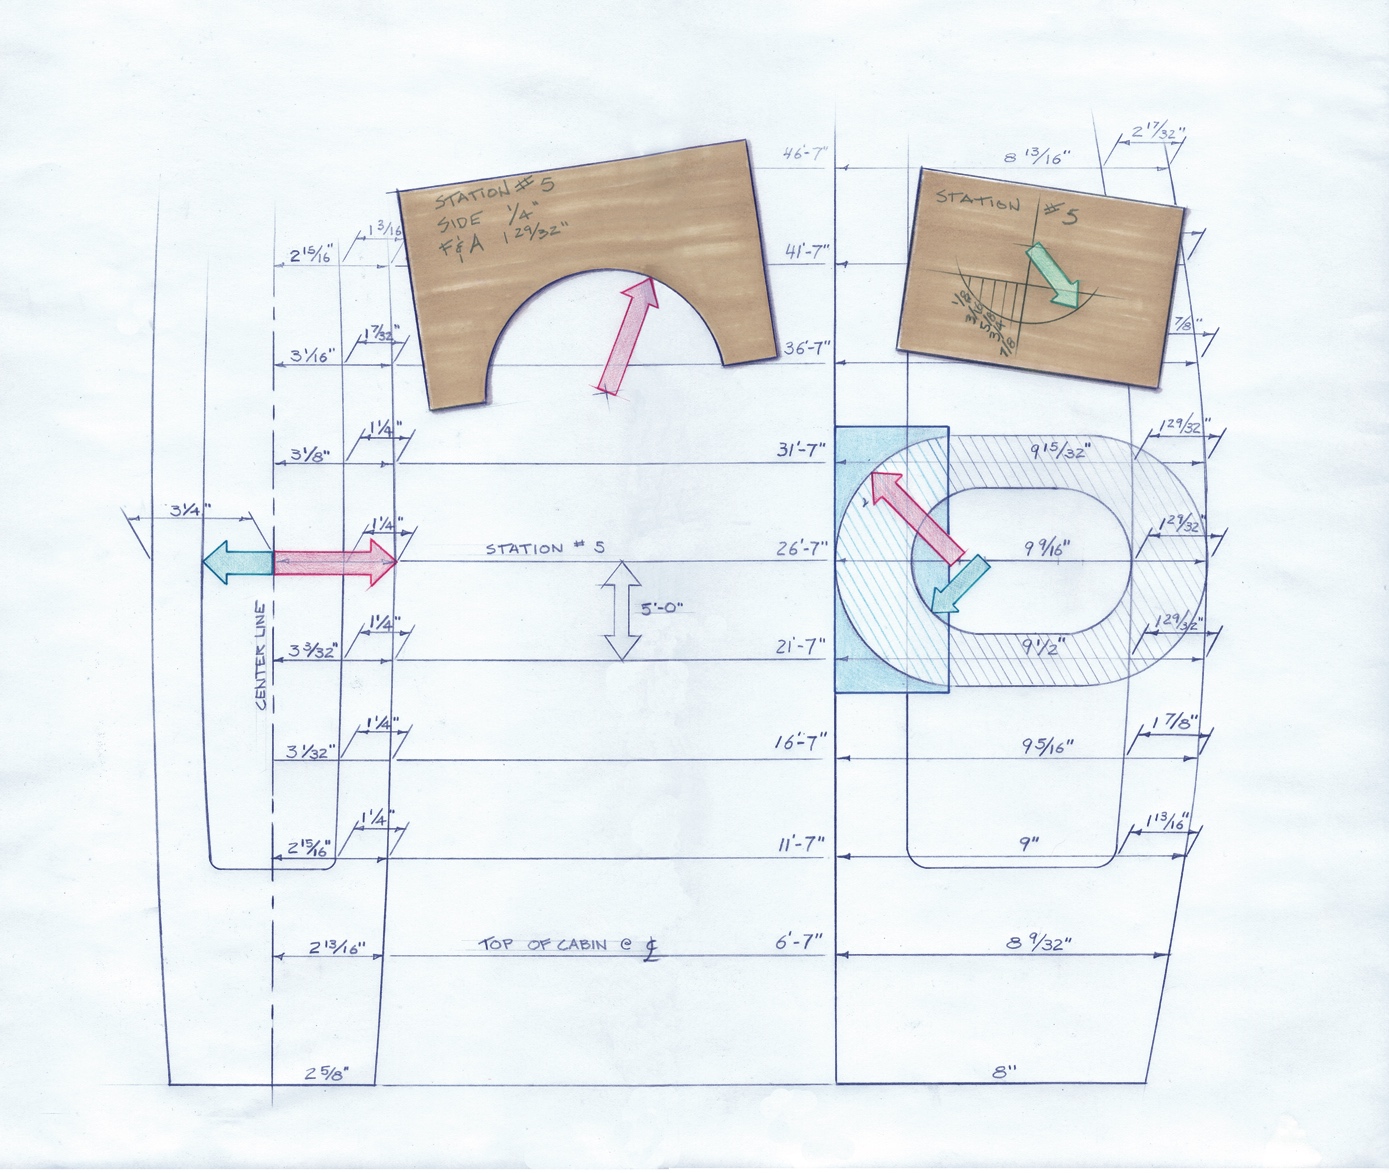
The drawing shown here is an illustration of the original Sparkman & Stephens mast plan for the New York 32
For the forward and after staves, we recorded the overall thickness of the stave (that is, its thickness before hollowing) and its half width. For the side staves, we recorded the thickness and width at each station. We converted the mast plan drawing from 32nds of an inch to decimal units, which I find best when working to close tolerances using digital calipers. We then made up 10″ × 10″ lauan templates on which to draw the sectional shape of the mast at each station. Since the forward and after profiles are arcs of a circle, we transferred these shapes from the drawing to the lauan with the aid of a compass. After each shape was transferred we cut out these lauan templates with a bandsaw. On each template, we also recorded the sidewall thickness, forward and after wall thicknesses, and distance from the heel of the mast. Building this New York 32 mast as was done originally requires hollowing out the thick forward and after staves in order to lighten their weight. So, once again using the mast plan, we made templates for the mast’s inside shape at each section.
The Spar Bench
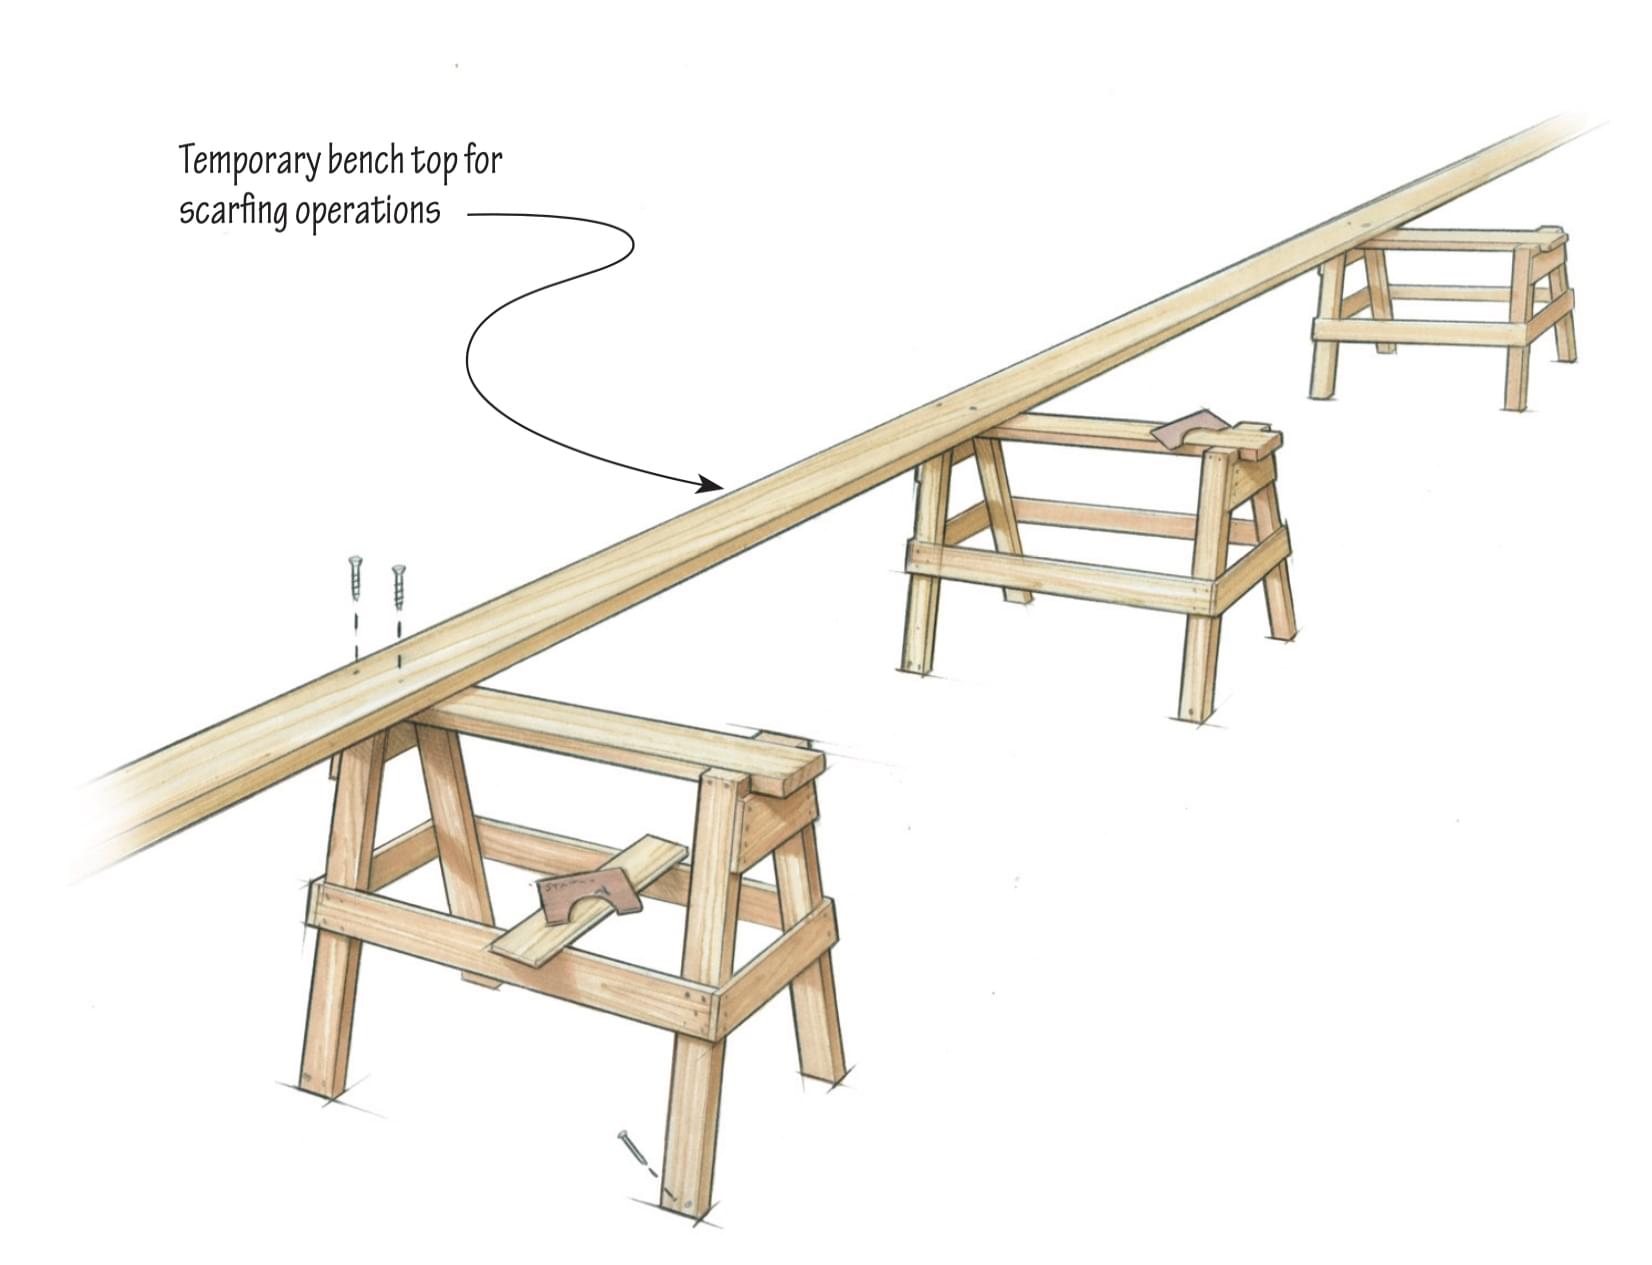
The first step in building the mast is to construct a spar bench. We wanted a sturdy bench that was straight and set at a good working height. Typically, a spar bench comprises a series of sturdy sawhorses spaced 5′ apart and fastened securely to the shop floor. Identical wooden sawhorses work well for this; once they were secured to the floor, a mason’s string was run to assure that the tops were all in the same plane; the tops were then shimmed as needed to achieve this. The 2 × 10 plank seen here being screwed to the sawhorses is to support the staves during the scarfing operation, and will later be removed.
Gluing Up Full-Length Staves
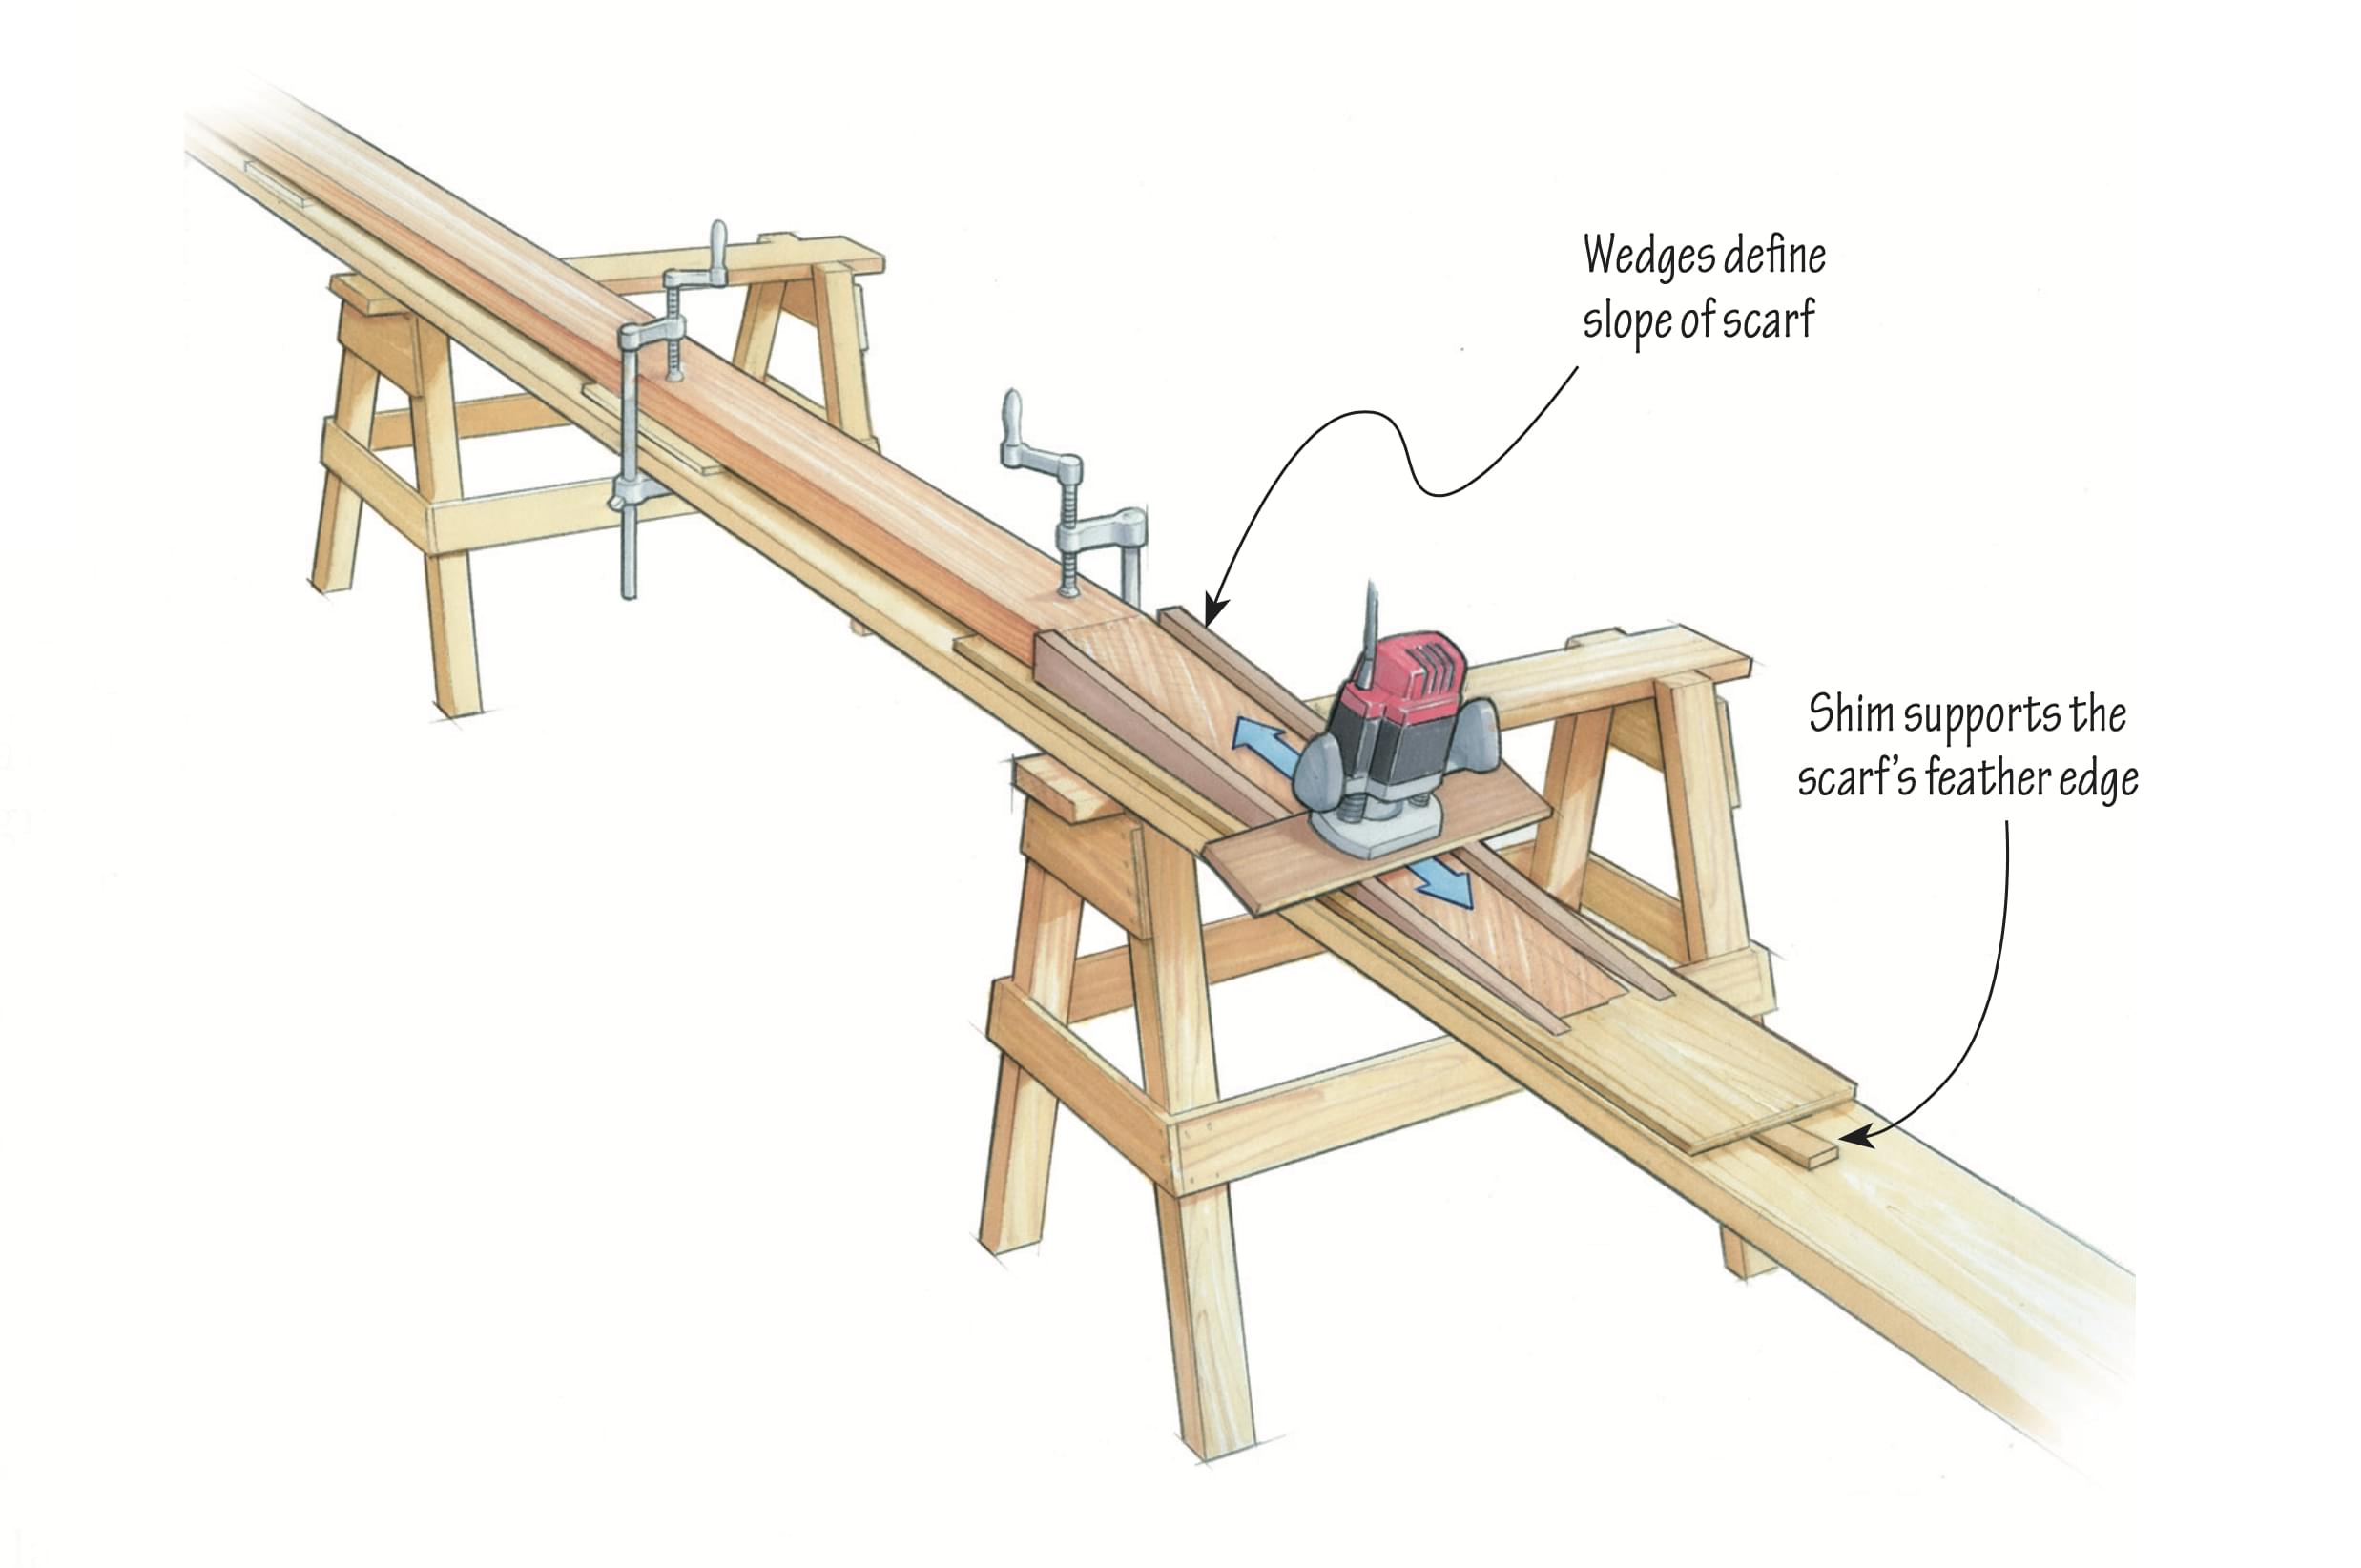
On our nice, solid bench, we laid out the wood for each of the mast’s four staves end-to-end and developed a final scarf plan. We planed the stock to the maximum designed thickness for the forward and after staves (2.875″) and for the side staves (1.25″). Then we scarfed the stock together to create the full-length staves. Careful layout and labeling were required for this step. We examined the stock and put the most visually pleasing sides facing out, and we spread out the scarf locations to avoid clustering them. Scarfs were cut to a slope of 12 to 1, with their lines drawn onto the edges of each piece. They were rough-cut on the bandsaw, and then finished with a jig and a router. With the scarfs cut, we assembled the pieces dry and ran a string down each of their centerlines to confirm that each of the four full-length staves, once glued, would be straight.
When we were certain that the staves would be straight and true, we screwed blocks to the spar bench to chock them in place. The individual pieces could then be removed from the bench, turned over for gluing, and placed back in their precise positions. The final step in preparing the scarf for epoxy glue was to rough up the surface of the glue joint. Eighty-grit sandpaper backed by a long block works well for this, as does the technique we used: a Japanese pull saw drawn across the grain so its teeth combed the surface. (This process is for epoxy gluing only; resorcinol and other glues rely on smooth mating surfaces.)
Once the surface was roughed up, we vacuumed both faces of the joint and then wiped them with a clean rag and denatured alcohol until the rags came up clean. We then wet out both gluing surfaces with straight epoxy and allowed that to stand for several minutes while it penetrated the wood. Dry spots were wetted a second time. We then applied epoxy thickened with colloidal silica to one face of the joint. Using large bar clamps and modest pressure, we clamped the joints, making sure we had a nice, even glue squeeze-out.
Tapering the Staves
Once the staves were glued full-length, we selected the aft stave, blocked it straight on the spar bench, and snapped a centerline. Then, using the information from the lauan templates and the offset table, the points representing the stave’s profile were laid out and connected with a long, limber batten. One of the side staves was marked similarly.
We rough-cut the profiles with a worm-drive circular saw being careful to leave the lines intact. We then cut closer with a power plane, and then shaved precisely to the lines with an appropriate hand plane, making sure that the edges stayed perfectly square. With one stave of each profile now complete, we used each as a template for its mirroring stave, making the final cuts with a router and bearing bit to complete the second pair of staves.
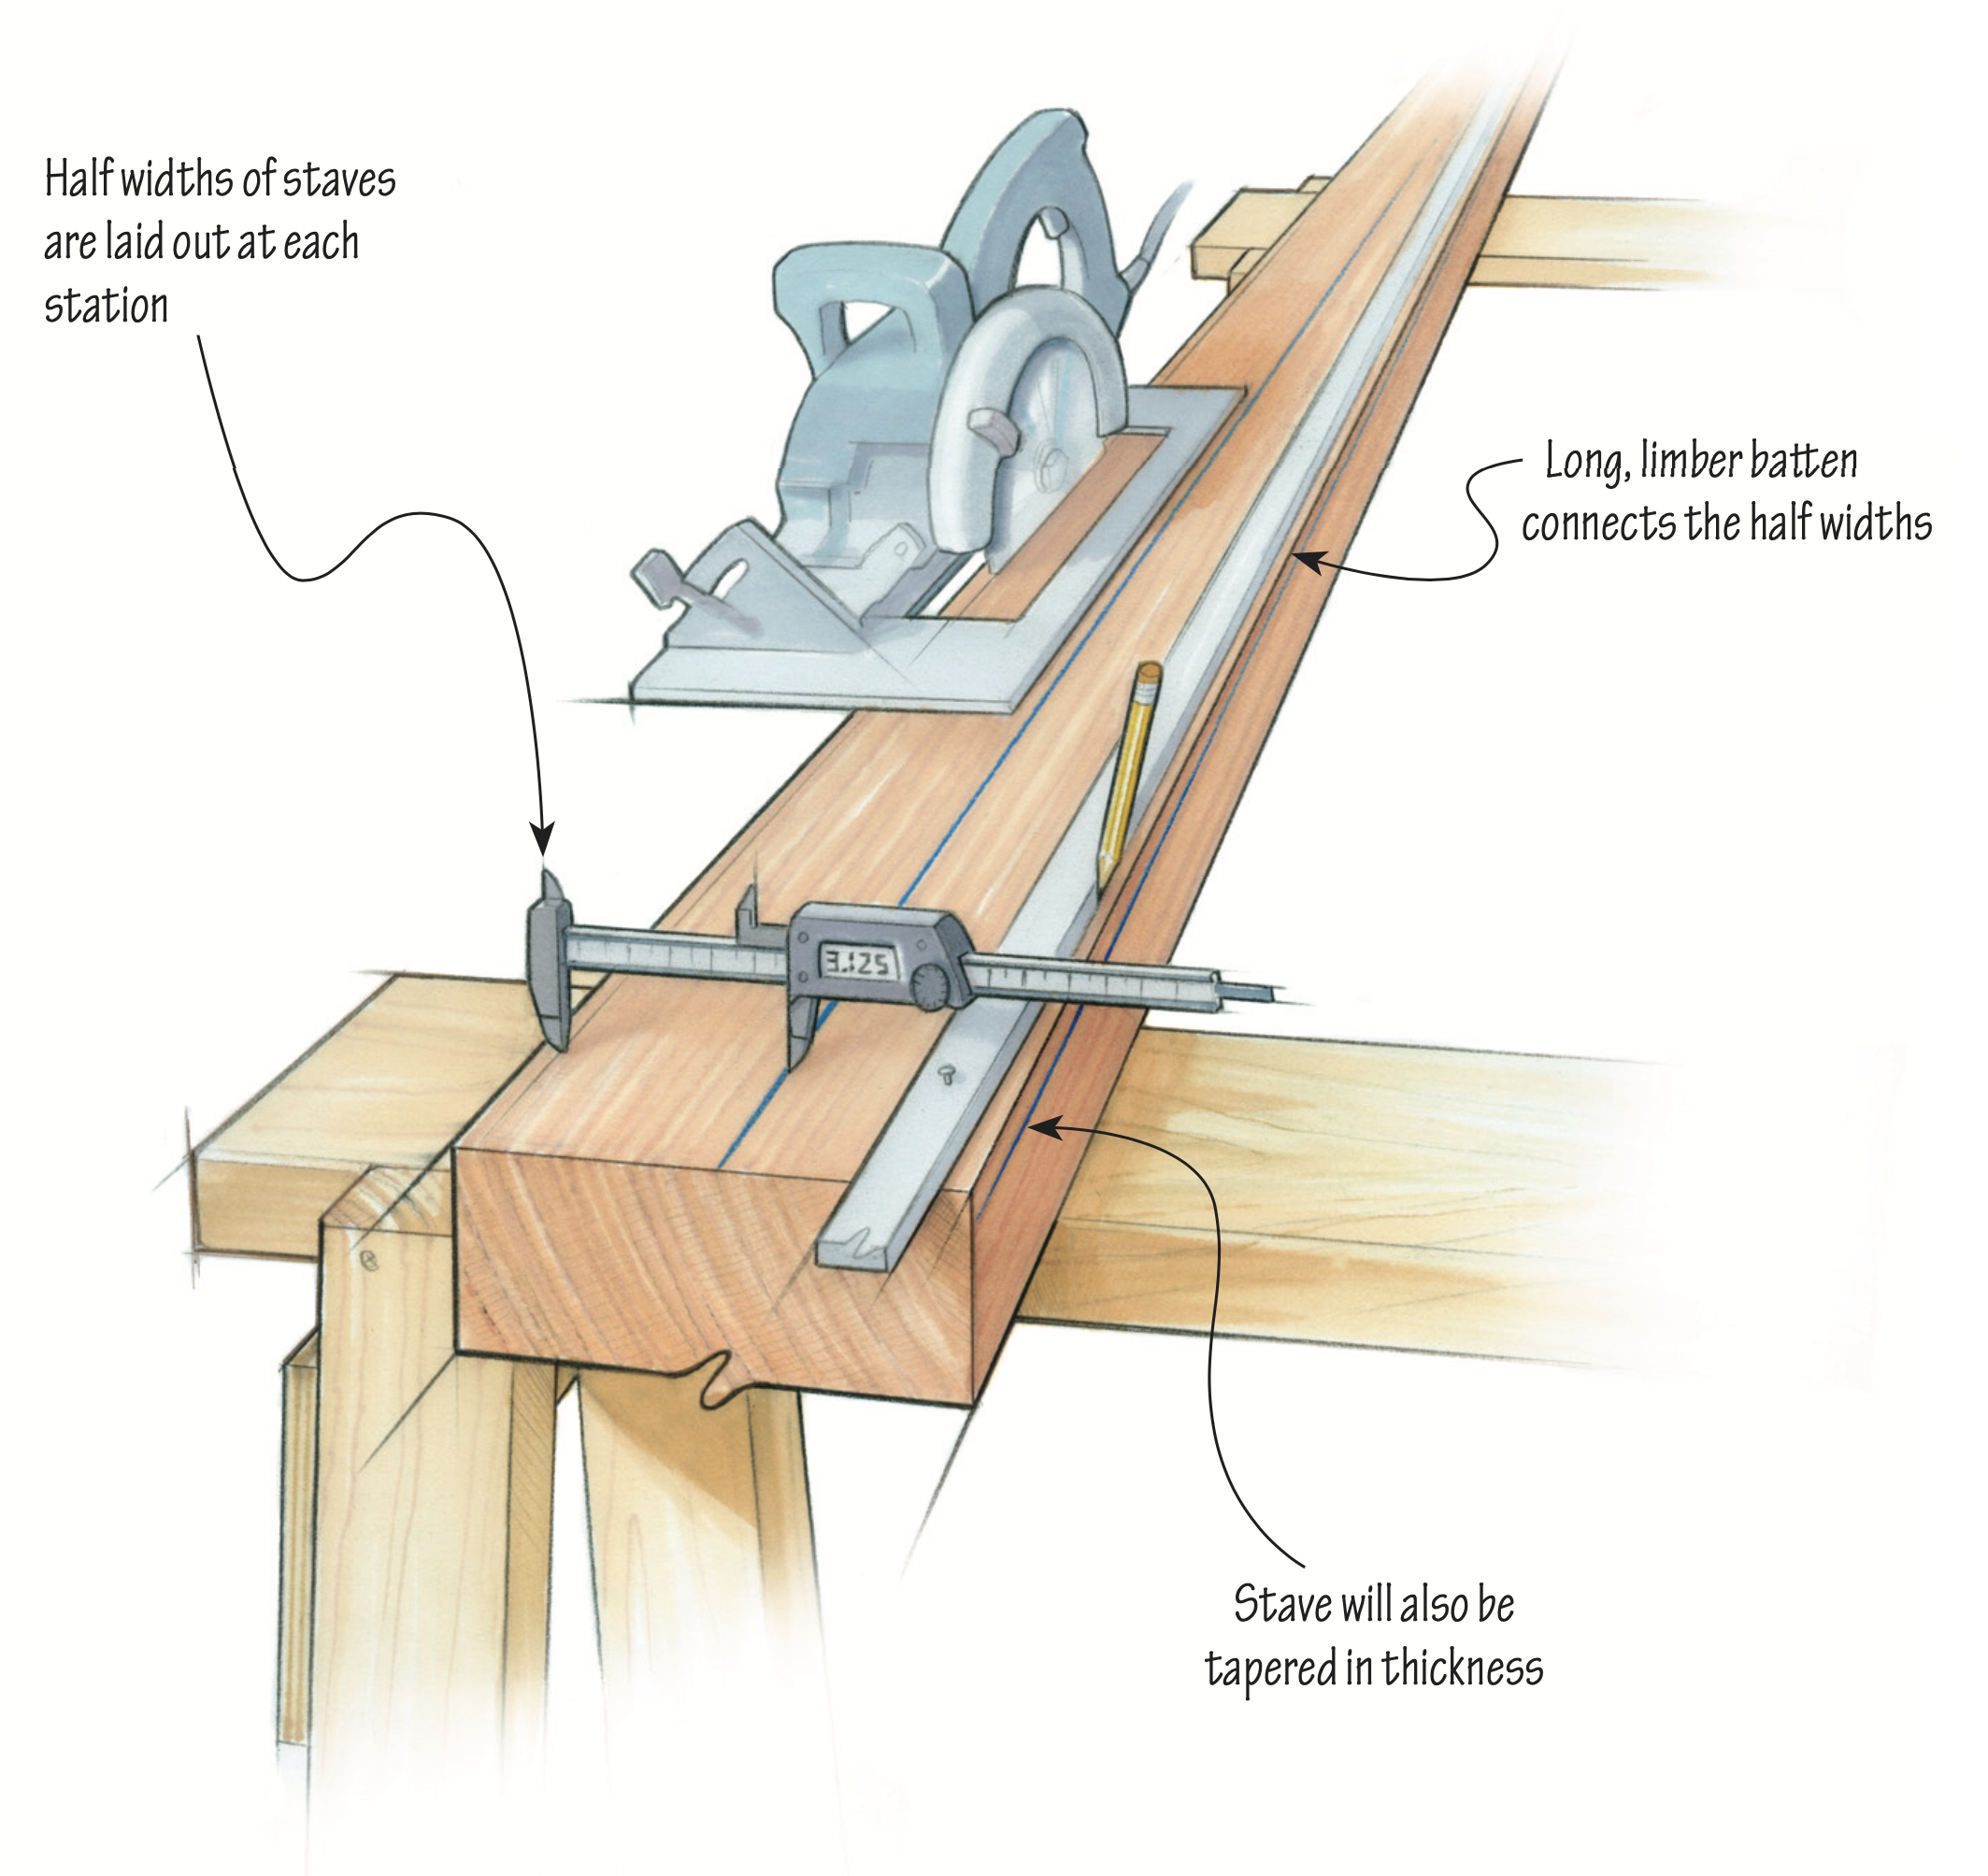
To minimize weight aloft, the wall thickness diminishes as we progress up the mast. Once again we turned to the lauan templates on which we’d recorded the wall thickness at each station. Using digital calipers, we recorded on both edges of each stave the wall thickness at each station and connected the dots with our long batten.
This line, yet to be cut, is shown in the drawing. The stock was removed from the outside faces of the staves, the bulk of it with a power plane. The final cleanup was completed with a bench plane.
Rabbeting the Forward and After Staves
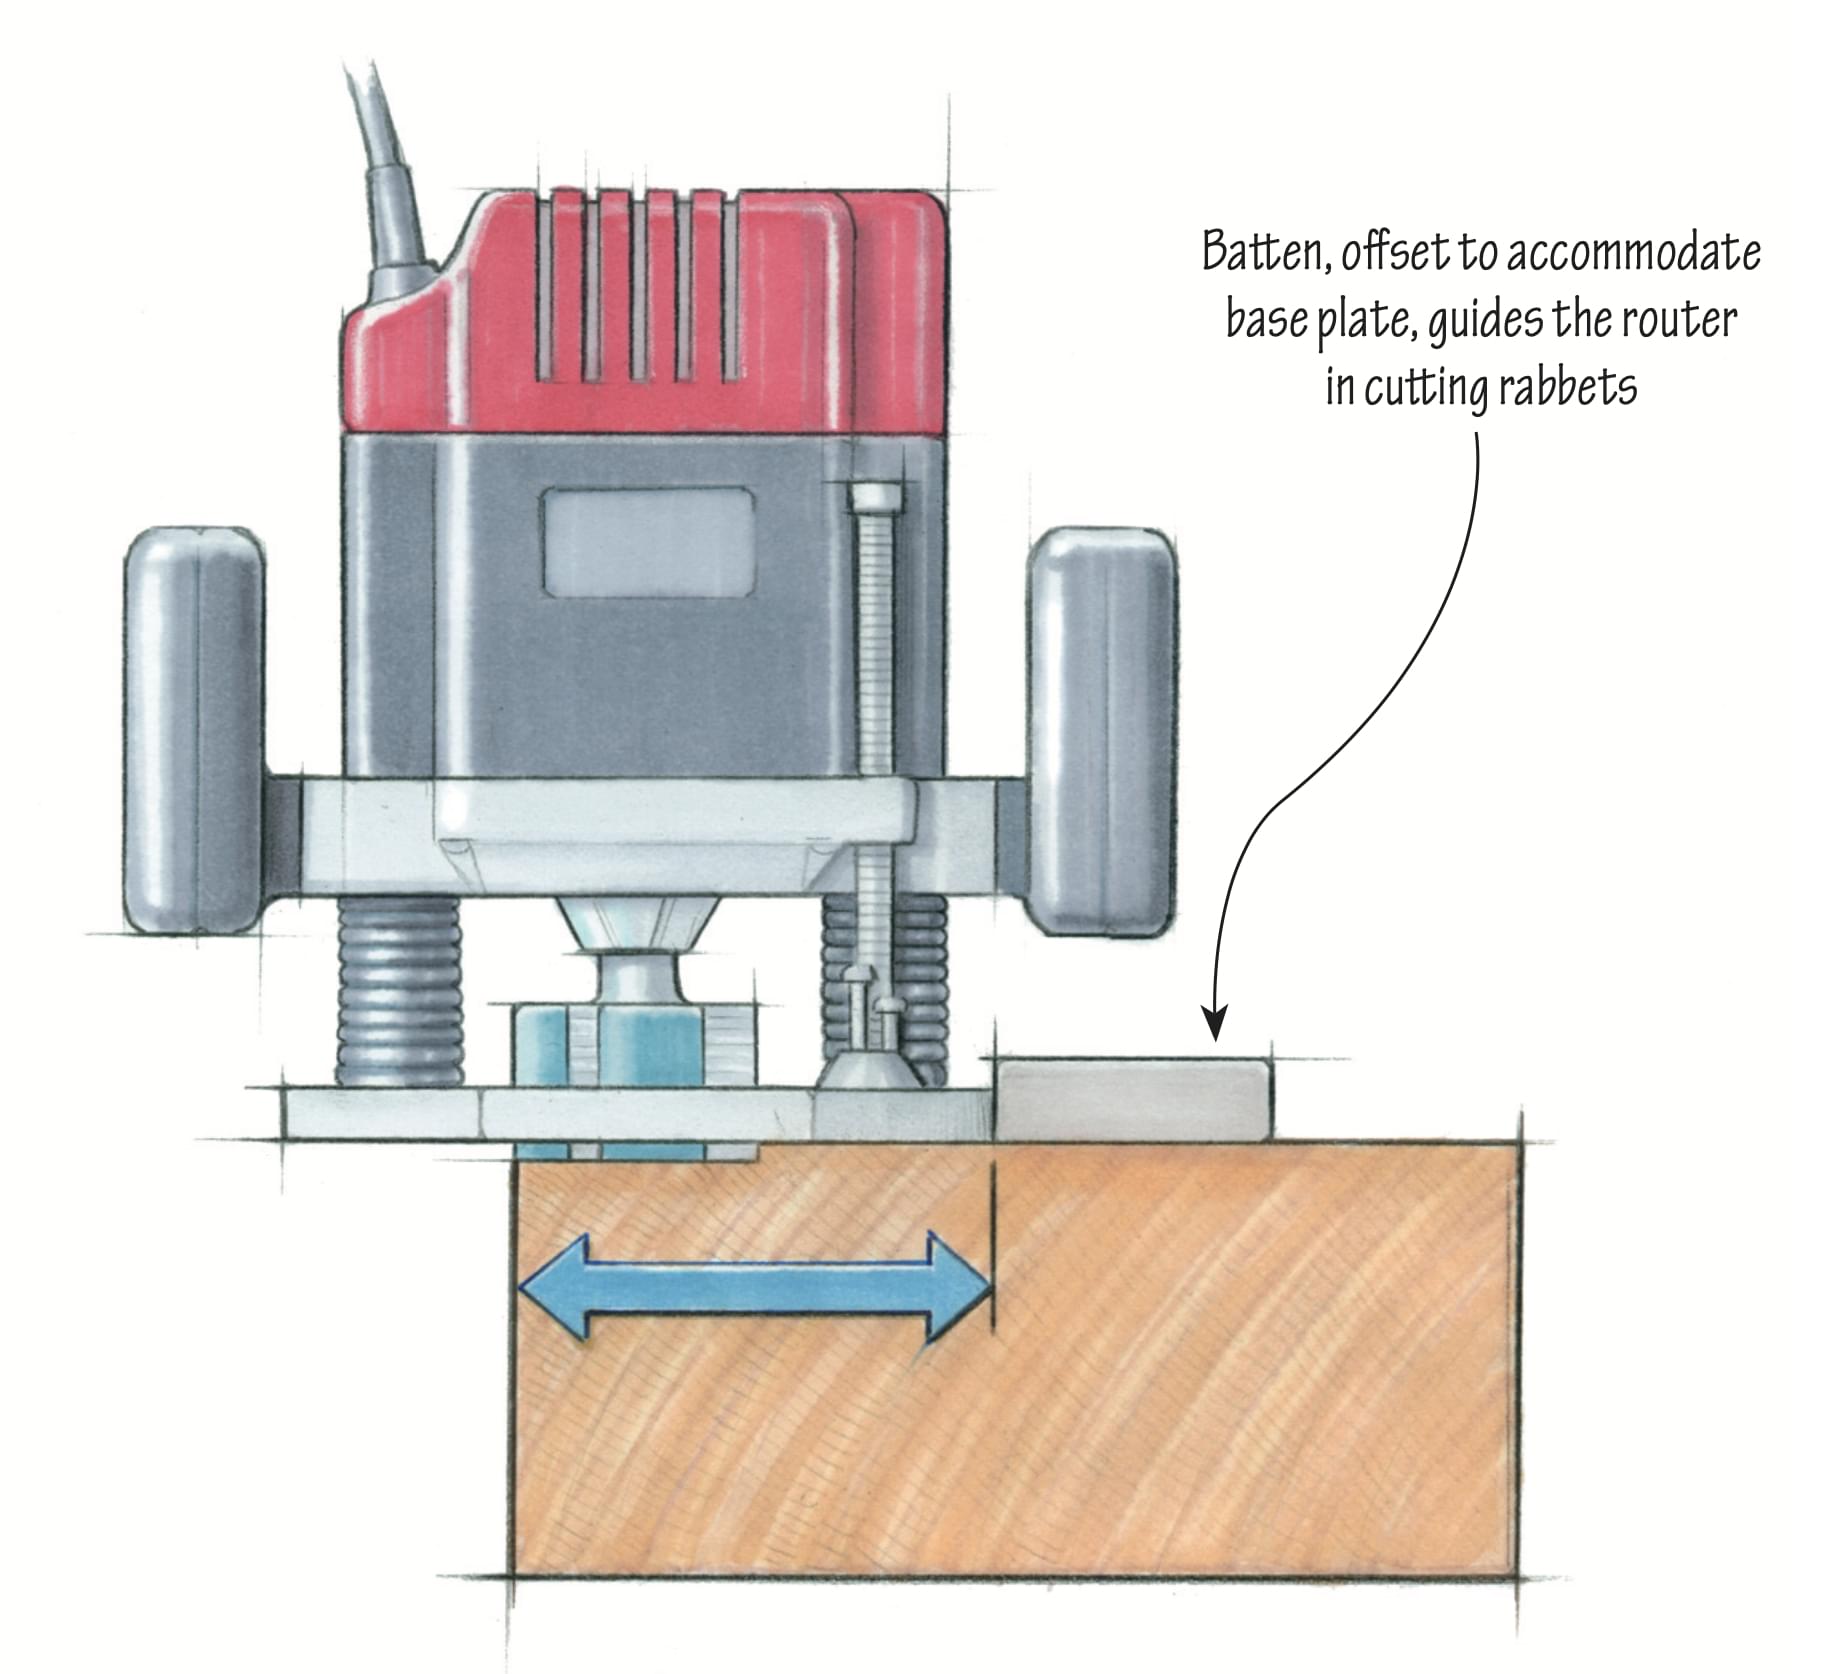
Hollowing the Forward and After Stave
The final step before gluing the staves together was to hollow out the forward and after staves. On the lauan templates we referred to the inside profile shapes we had recorded from the mast drawing. Dividing the inside profile into 1⁄4″ sections, we measured and recorded the depth at each section. We did this at each station. The inside face of the stave was thus lined off in 1⁄4″ increments.
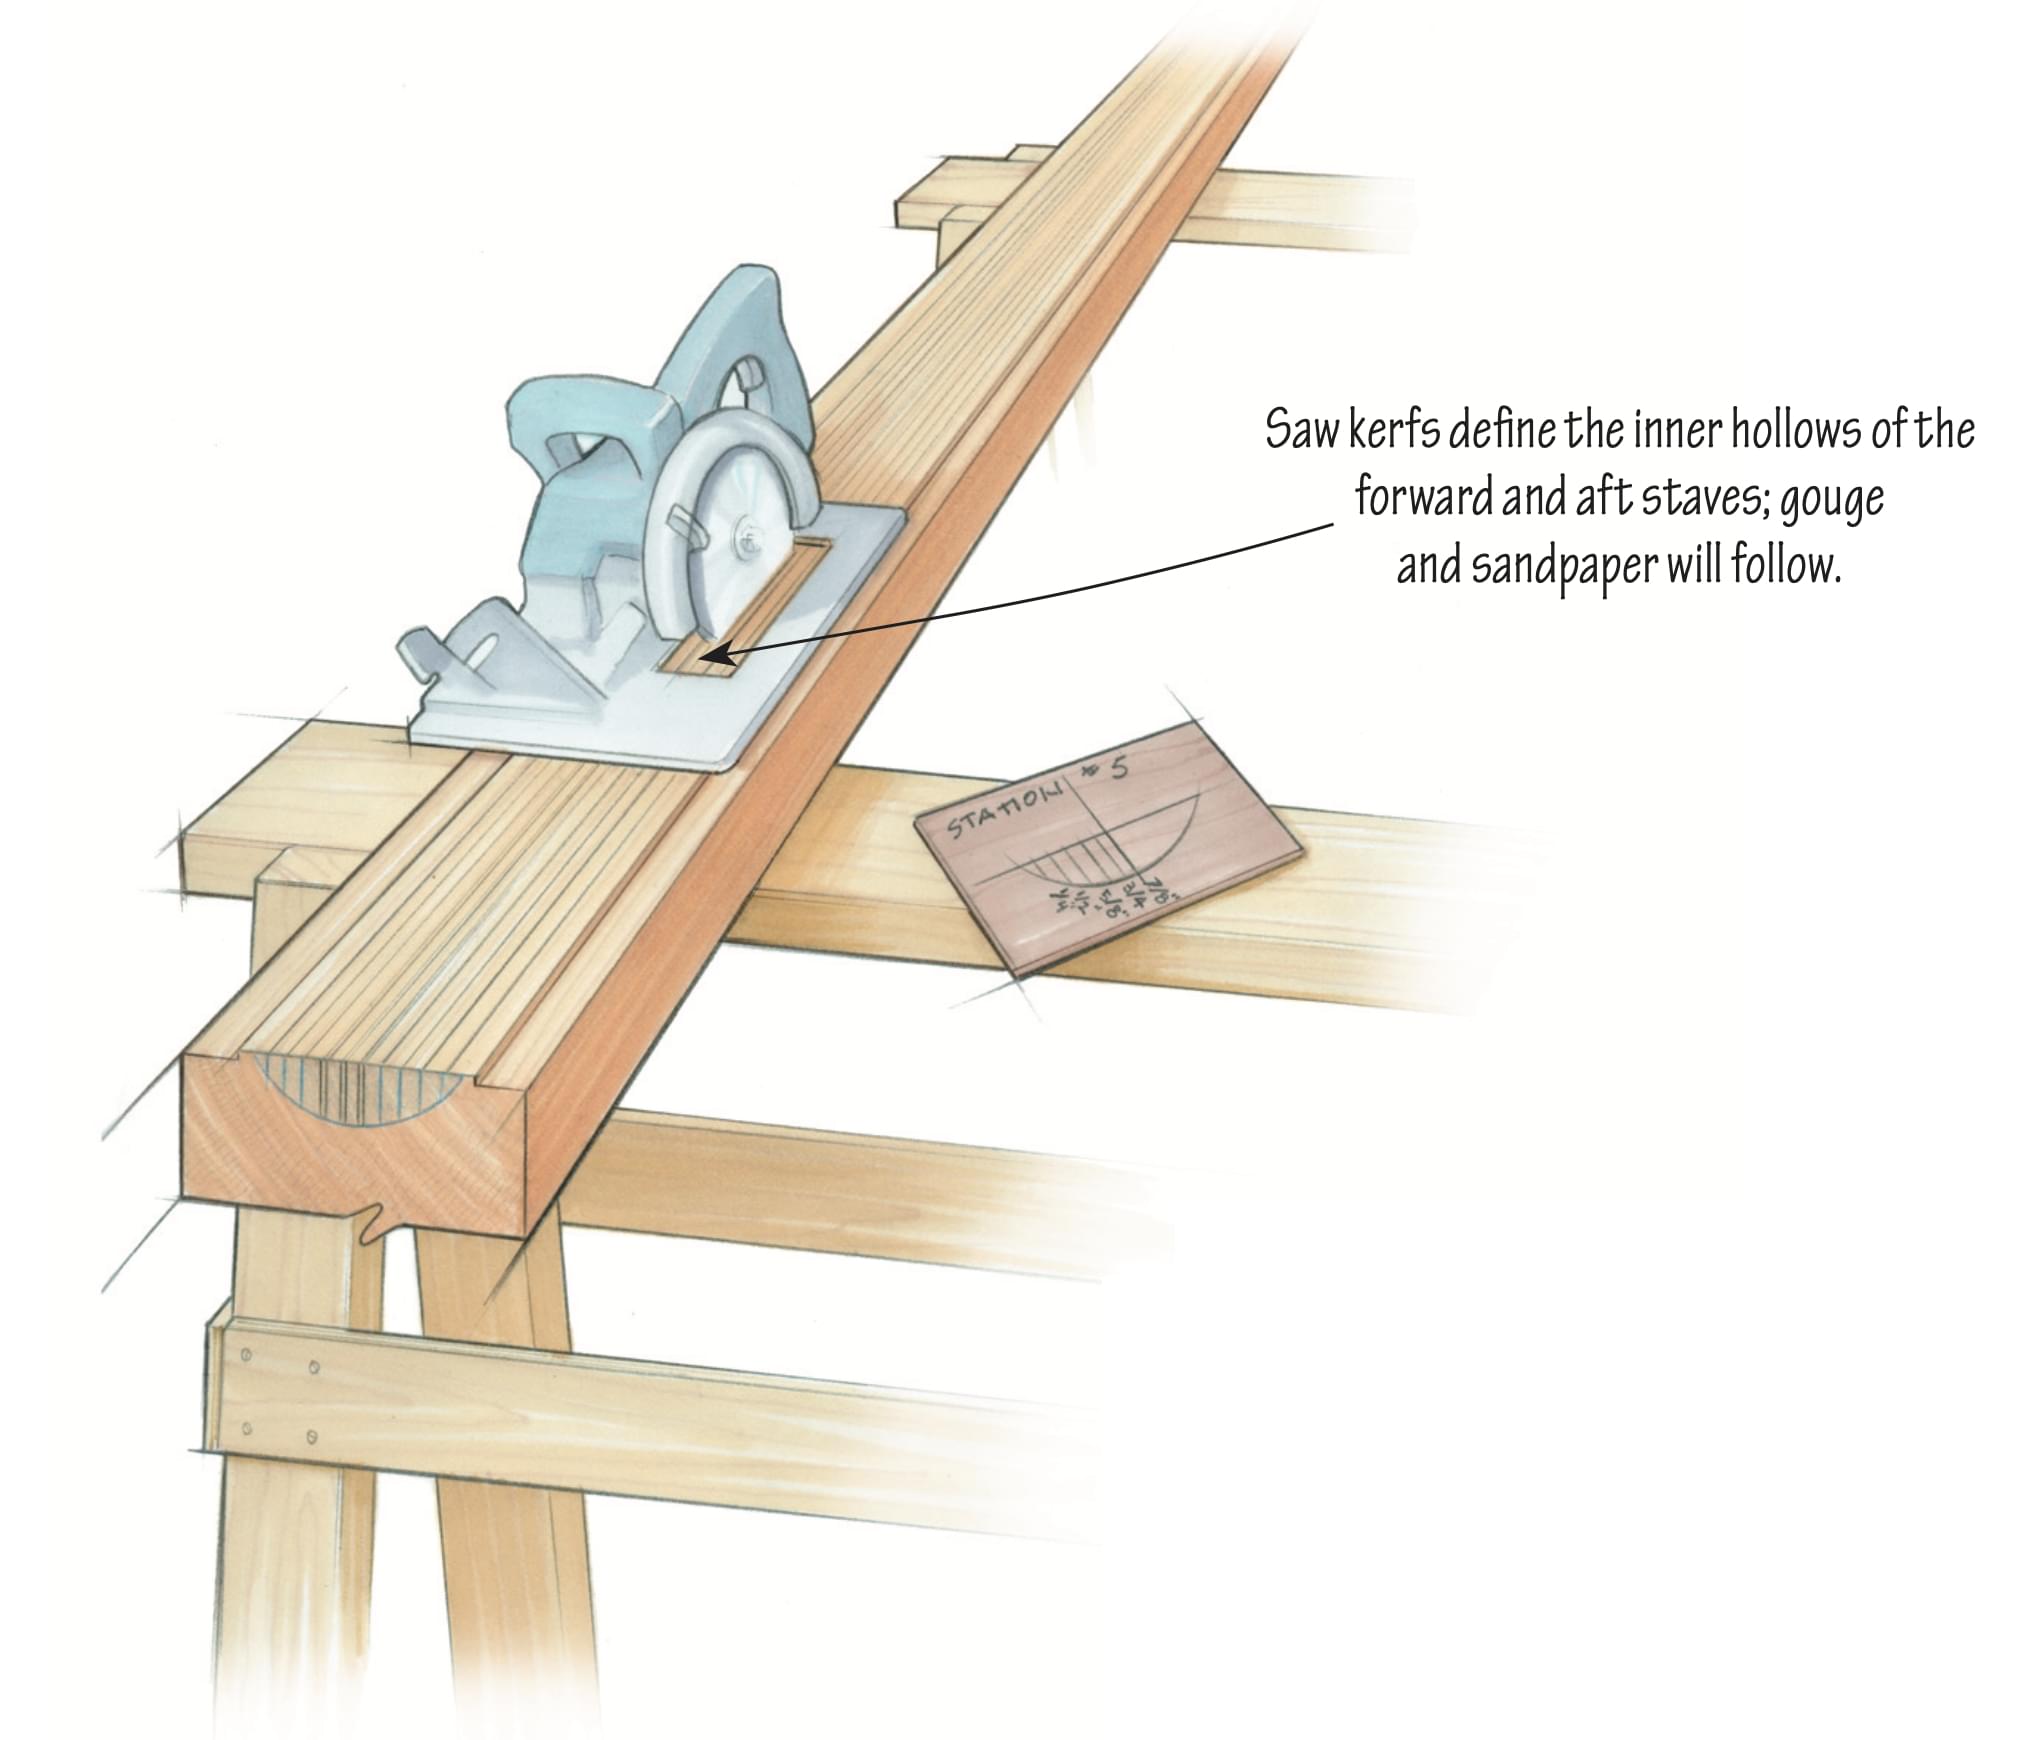
Then, using a circular saw set at the depth indicated by the lauan template, we cut kerfs in the inside face of the stave. With each pass of the saw, we reduced the depth of the cut as we moved toward the masthead and farther from the center of the stave. With the kerfs completed, we used a gouge to scoop out the waste. We arrived at the final shape by using a backing-out plane followed by 80-grit sandpaper on a round sanding block.
With the staves cut to their profiles and tapered in thickness, and the forward and after staves rabbeted and hollowed, we double checked that the spar bench was still straight. The next step was to lay the after stave on the bench, sail-track side down, and hold it straight with blocks screwed to the bench so the spar could not move. We then did a final dry-fit of the three remaining staves to make sure all joints were tight.
When satisfied with the bench and the joints, we began mixing glue. A large spar such as this takes about four people to glue up; any fewer, and panic would certainly ensue. The glue-up seems to work best as a two-step process. The first step was to glue the side staves to the after stave, using the forward stave as a dry-fitted guide to ensure that the side staves remained parallel. We clamped the spar in 1′ increments, checking that it remained square along its entire length. Using the two-step process allows ample time to fit and install the solid blocking at the head and heel of the mast. The drawing calls for blocking in the bottom 11′ of the spar and in the top 2′ 6″.
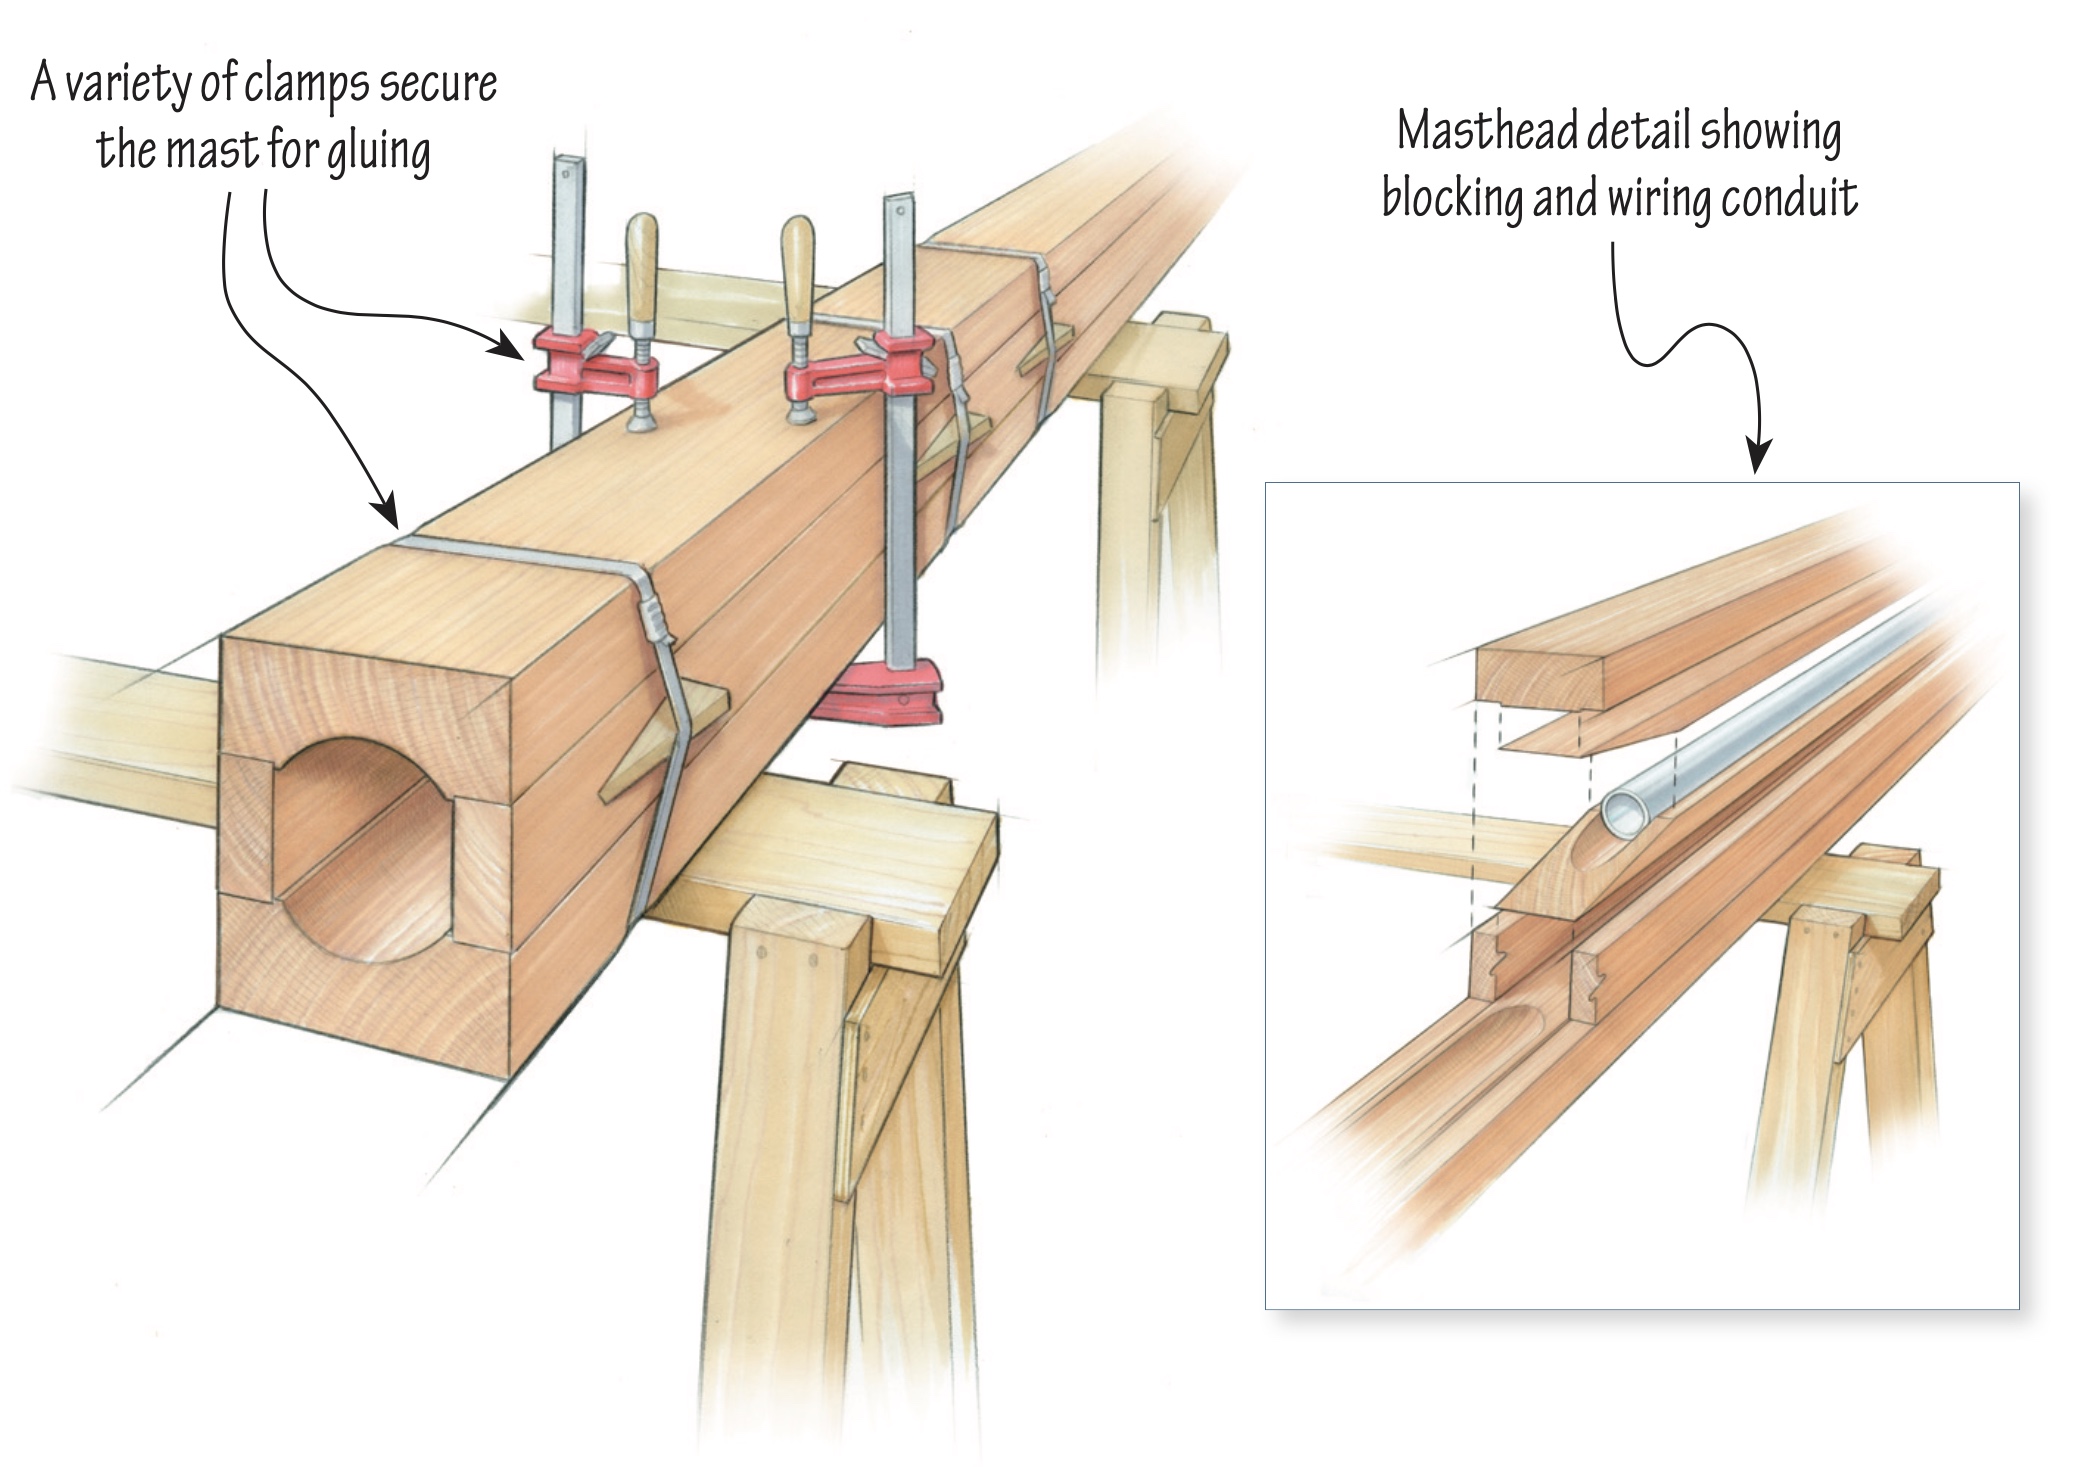
The blocking is solid until about the final foot, where it tapers to a feather edge on either side of the spar, forming a swallow-tail shape to avoid a hard spot. This heel blocking has a drain hole, in case of water intrusion. There is no blocking at the spreaders; instead, the spreaders have an external bracket and blocking system that transfers the load evenly to the spar.
We coated all interior surfaces with epoxy. At this stage, we also ran all of the wires inside the mast, securing them with large cable clamps. (Conduit fastened securely along the interior of the spar—and through the blocking—works well for this, too.) When everything was satisfactory inside the mast, the forward stave was glued to the side staves to cap the assembly. Several varieties of clamps can be used when gluing up a spar: spar clamps, bar clamps, C-clamps, or a banding tool. We used a combination of clamps and a banding tool supplemented with wedges to further tension the plastic band.
With the glue cured and the clamps off, it was time to begin the shaping process. The first step was to plane off the excess glue. With that done, we again turned to our handy lauan templates and began the process of eight-siding the spar. Using the exterior cross-section drawn on each template, we found where a 45-degree line would be tangent to the mast’s outside surface at each station. We transferred these points to the spar, and with the long batten connected them with fair lines.
We then set our circular saw to 45 degrees and made a cut, just leaving the line. Repeating this on all four sides of the mast, and then fairing up the saw cuts with a power plane followed by a hand plane, yielded an eight-sided spar. We then lined the spar off again to 16 sides, but this time we omitted the circular saw and removed the waste with only a power plane. When we had the spar 16-sided, we finished the rounding and fairing with hand planes and a custom-built concave fairing board. Once again our lauan templates came into play, as we used them to confirm the correct shape at each station. Two other details that had to be considered at this stage were the shape of the heel of the spar, and the masthead detail.
With the mast now shaped and sanded, we broke out the varnish and applied 10 coats before installing the track and hardware. We were fortunate to have all of the original tangs and other fittings for this spar, because fabricating them would have required quite a bit more work. With the spar varnished the hardware was installed, carefully bedded in soft compound. We were very careful in fastening into the Sitka spruce, as it is quite soft. We chose machine screws rather than wood screws for mounting the winches and the boom gooseneck track—after testing these fastenings on offcuts to find the best pilot-hole diameters.
This article was originally published in WoodenBoat No. 214, May/June 2010.
Related Articles
Laminating knees and frames for small craft, virginia park, a sliding tool tray, marine plywood – a consumers guide, related videos, interior joinery, scarf joints, refastening a wooden hull, making homemade boatbuilding tools, related book chapters, laying down, building the house, deck framing, laying the deck, subscribe for full access.
Flipbooks are available to paid subscribers only. Subscribe now or log in for access.
Shaw and Tenney Home
- Traditional Oars
- Sculls, Adirondack, Specialty and Large Oars
- Marine Hardware, Oarlocks, Leathers and Accessories
- Traditional Canoe Paddles
- Kayak Paddles
- SUP Paddles
- Artisan Canoe Paddles
- Paddling Accessories
Wooden Masts and Spars
- The Shaw & Tenney Whitehall
- Camp and Home
- Pack Baskets and Bags
- Miniature Paddles and Oars
- Custom Engraving
Shopping Cart
Shaw and tenney mobile nav.
- Gear & Apparel
- Awards & Engraving
Product Header Image

Our wooden masts and spars are made with the same uncompromising quality and attention to detail as our oars and paddles. We have made hundreds of masts and spars for boats as small as nutshell prams, for many Herreshoff designs, and numerous larger boats like Concordia yawls. Due to our shop size, 50 feet is our maximum length.
We offer solid and hollow masts in a variety of cross-sections. We typically require the original naval architects drawings or your old mast, but can assist you in dimensioning the mast if the aforementioned items are unavailable to you.
Most of our masts and spars are constructed from select Eastern red spruce. Ideal for mast making, it has the highest strength to weight ratio of all North American softwoods. We also offer Sitka spruce and Douglas fir as options.
Please call us to discuss your mast and spar needs.
Unfortunately, because of its length, this product cannot be shipped through our Online Store. Please call 800-240-4867 to place your order.
Select Your Wood

How to Size Your Oars
To determine the correct length oar for your boat measure the distance between the port and starboard oar sockets. Then apply the Shaw and Tenney oar length formula to determine the oar length that will provide the correct 7:18 leverage ratio. This length will provide an oar where 7/25 the length is inboard of the oarlocks and 18/25 of the oar is outboard of the oarlocks. It is the ideal ratio to row almost all boats. Sized correctly, when rowing your hands will be 1 to 3 inches apart and you will be pulling directly towards your abdomen. If you are popping out of your oarlocks when rowing your oars are far too short. If you prefer an overlapping grip, add 6” to the calculated oar length. If you have more than one rowing station in your boat, measure both. Typically they will require two different length oars which is fine if you’re going to be rowing tandem and need two sets. Otherwise you’ll need to compromise the correct length to work properly in both stations. If you are rowing more than 75% in one station size the oar to that length. As always feel free to call us and were happy to help you select the correct oar length and blade style for your boat.
The Original Shaw & Tenney Oar Length Formula
To help our customers size their oars correctly, we’ve been using the same formula since 1858: Measure the distance between the center of the port and starboard oar sockets, which hold the oar locks on each gunnel. This is called the “span” between the oarlocks. Divide the span by 2, and then add 2 to this number. The result is called the “inboard loom length” of the oar. Multiply the loom length by 25, and then divide that number by 7. The result is the proper oar length in inches. Round up or down to the closest 6” increment.
How to Size Your Paddle
For traditional wooden paddles the ideal length for the Stern paddler is the bridge of your nose or 6 inches less than your height. For the bow paddler the paddle reaching the cleft of your chin or 9 inches less than your height is correct.
For our Racine paddle if you are over 5’6” tall select the 63-1/2” length and the shorter paddle if you are under5’-6”tall.
When paddling solo we typically recommend a bow length paddle. For Canadian style solo most paddlers prefer an even shorter paddle.
For paddling canoes when standing (yes our mother let us do this) a 69 inch or 72 inch paddle is usually about right.
Additional Views

You Might Also Be Interested In:

Shaw and Tenney
Toll Free: 800-240-4867 207-866-4867 20 Water Street, PO Box 213, Orono, Maine 04473
Shop Shaw & Tenney
More information.
- Privacy Policy
- Terms & Conditions
Stay In Touch with Shaw & Tenney
© 2021 Shaw & Tenney, Inc.
Have a question or need some help?
Call us at 800-240-4867 or click here to send us an email . Thanks!
- New Sailboats
- Sailboats 21-30ft
- Sailboats 31-35ft
- Sailboats 36-40ft
- Sailboats Over 40ft
- Sailboats Under 21feet
- used_sailboats
- Apps and Computer Programs
- Communications
- Fishfinders
- Handheld Electronics
- Plotters MFDS Rradar
- Wind, Speed & Depth Instruments
- Anchoring Mooring
- Running Rigging
- Sails Canvas
- Standing Rigging
- Diesel Engines
- Off Grid Energy
- Cleaning Waxing
- DIY Projects
- Repair, Tools & Materials
- Spare Parts
- Tools & Gadgets
- Cabin Comfort
- Ventilation
- Footwear Apparel
- Foul Weather Gear
- Mailport & PS Advisor
- Inside Practical Sailor Blog
- Activate My Web Access
- Reset Password
- Pay My Bill
- Customer Service

- Free Newsletter
- Give a Gift
How to Sell Your Boat

Cal 2-46: A Venerable Lapworth Design Brought Up to Date

Rhumb Lines: Show Highlights from Annapolis

Open Transom Pros and Cons

Leaping Into Lithium

The Importance of Sea State in Weather Planning

Do-it-yourself Electrical System Survey and Inspection

Install a Standalone Sounder Without Drilling

Rethinking MOB Prevention

Top-notch Wind Indicators

The Everlasting Multihull Trampoline

In Search of the Snag-free Clew

What’s Involved in Setting Up a Lithium Battery System?

Reducing Engine Room Noise

Breaking Point: What Can Go Wrong With Your Yanmar?

Mildew-resistant Caulks for Boats

Can We Trust Plastic Boat Parts?

Repairing Molded Plastics

Mailport: Marine plywood, fuel additives, through bolt options, winch handle holders

The Day Sailor’s First-Aid Kit

Choosing and Securing Seat Cushions

Cockpit Drains on Race Boats

Rhumb Lines: Livin’ the Wharf Rat Life

Resurrecting Slippery Boat Shoes

Shoe Goo’s Gift to Sailors

Tricks and Tips to Forming Do-it-yourself Rigging Terminals

Marine Toilet Maintenance Tips

Learning to Live with Plastic Boat Bits

The Ultimate Guide to Caring for Clear Plastic
- Inside Practical Sailor
Pondering Options for Varnishing a Mast

As a mast and rigging overhaul creeps toward the top of the refit list on my 1971 Yankee 30, Opal , I’m thankful I’m no longer the custodian of wooden spars, as I was on my old Atkin ketch, Tosca . It’s not that a wooden spar is any less capable than an aluminum one, and a well-kept wooden spar is far more lovely to look at, in my view. However, wooden spars have gone the way of the Walker taffrail log for a reason.
In the tropics at least, taking wood out of the equation offers some relief from the unending battle against the elements. In short, aluminum does not rot. The best weapon against mast rot is to truck the boat off to Sedona, AZ or some other arid place where each exhalation turns instantly into dust. Since the name of this publication suggests we are supposed to offer practical solutions for sailors, this clearly is not an option.
In the “ Exterior Wood Finish Update ” in the July 2021 issue of Practical Sailor, we revisit clear wood finishes, looking specifically at ease of application, gloss, color retention, and durability after two years. If you have questions about which varnish looks great after two years in the sun, that’s the place to look. Another important factor to consider is hardness—a feature that is particularly important for those areas that see a lot of foot traffic, abrasion, or impact from halyards or shackles. Masts, spars, tillers, and classic wood blocks and cleats probably see the most banging out of any wood component on the boat. As anyone who has decided to refinish their spars will tell you: there is no shortage of opinions on what product to use.
Last month’s report on reviving aluminum masts also revived one of the most common questions we get regarding marine varnish: What kind of finish is best for a wood mast? Even though aluminum has long since replaced Sitka spruce as the material of choice for a sailboat mast, there are plenty of wooden masts still in service. Many of the Taiwanese-built boats of the 70s and 80s had wooden masts, and of course, a wide range of U.S.-built classics still have their original wooden masts. And there are plenty of aluminum masts with spruce spreaders—my Yankee 30 among them.

Why Not Paint?
Clear-coating wood is more than an aesthetic preference. One of the main reasons a sailor would choose to clear-coat a wood component is to make any potential rot visible as soon as possible. Warding off fungus becomes particularly important in your spars, where any significant weakening could have disastrous consequences.
Although a high-quality paint will provide excellent protection to a wooden mast or boom, the paint can often hide cracks and seams where water is penetrating, creating a fertile ground for rot to take hold. Without frequent, careful inspections, these seemingly harmless dings and chips in your coating can open the door to more serious damage that can go unseen.
By comparison, when moisture penetrates a clear coating, the wood usually darkens, making any failures in the coating more obvious, allowing you to quickly head off more serious damage.
The most persuasive argument in favor of a painted mast is the ease of maintenance — but this, too, is based on some common misconceptions. Yes, it is generally easier to slap on another coat of alkyd enamel paint than it is to apply another varnish top-coat, but the time and effort advantage is not so significant once one adopts a clear-coat maintenance regimen. In both cases, re-coating generally means going aloft with a can and a brush, so the pace of application is already handicapped.
Depending on where you are cruising, both coatings will need a new top coat every three years at least. With today’s easy-flowing, quick-drying varnishes, you can refinish a spar with varnish at nearly the same pace as you can with paint.
If you are refinishing your spar “from scratch” (removing hardware, stripping down to bare wood, etc.), spray coating can further close the ease-of-application gap between paint and varnish. In the end, they are both coatings, and the prep work required of a quality finish is not much different. And when it comes time to recoat, varnish’s tendency to be less forgiving of application flaws works in its favor during annual inspections.
Sealing with Epoxy
Undoubtedly, when you begin any wood refinishing project—especially one involving a mast, spar or caprail — someone will tell you that they had great results sealing the wooden member with epoxy before recoating with varnish. While we do not doubt that the initial results from this application can be impressive, we are not big fans of sealing wood with epoxy. Here’s the gist of a previous PS Advisor that we wrote on this topic.
For those who have read our in-depth report on epoxy finishes “Stuck Like Glue” , it would seem that epoxy would be a logical choice for keeping moisture at bay and dealing with abrasion from halyards. But there’s more to this question than simply finding a material with good adhesion and a durable, abrasion-resistant bright finish.
Soft woods see a lot of moisture-induced surface movement, so coatings must be able to cope with the physical surface changes linked to dry, hot weather and the wet, cooler times of the year. That is why many people prefer relatively flexible spar varnishes for such applications. Although they’re less durable from an abrasion-resistance perspective than hard coatings like epoxy, they do give the wood that elegant amber look.
Epoxy resin is the vise-grip of all coating materials, but it has poor handling characteristics (flow, leveling, brushability) and no UV inhibitors. Mas Epoxies, however, are less viscous than most epoxies and tend to penetrate the substrates surface, making their flow out a little easier to control.
Using any epoxy as a base for an attractive wood finish is tricky. For one thing, its hard to sand without burning through, which will cause noticeable color changes when the topcoat is applied. And when the surface does fail, 85 percent of it will still be solidly stuck to the soft wood, and its removal or repair will be a major pain.
In our opinion, coating a mast with epoxy prior to varnishing and then topping off with a two-part coating is asking for more work down the road. The epoxy’s best attribute, its adhesive tenacity, is also its bane.
We recommend sticking with a good spar varnish. In our upcoming report in the July 2021 issue, testers noted that after two years of direct exposure, three traditional spar varnishes faired extremely well, showing exceptional gloss, and little signs of weathering. Testers also observed that three of the top-shelf synthetic acrylic urethane, and polyurethane finishes looked almost as good as new.

Doubling-up Protection
The most recent round of woodfinish testing did not combine different products (although some products were multi-component), so it did not look at the multi-product method many pros use to protect spars. This two-product method, which we’ve discussed previously, entails first applying a penetrating phenolic tung-oil based varnish (usually one-part) and then following it with a clear acrylic urethane, or polyurethane (usually two-part). This two-product approach results in a flexible clear coating that provides three layers of protection: sealing the wood from water penetration, providing UV protection, and enhancing the finish hardness. All of the major marine coating manufacturers, including Pettit, Epiphanes and International (Interlux), offer products that adapt well to this two-step method protection.
A classic example of this approach is Interlux’s Awlspar/Awlbrite system still used by many pros: Apply a few coats of Awlgrip’s Awlspar, an amber-hued phenolic tung-oil varnish, and then overcoat with Alwgrip Awlbrite, a clear acrylic urethane with three-component (base, converter, activator). Given the outstanding results of our most recent testing with newer, easier to apply products (including Interlux’s relatively new line of Awlwood products), this approach might not be best for the do-it-yourselfer, but it has a long track record among professionals.
In addition to our most recent report in the soon-to-be published July issue, Practical Sailor subscribers can see results of our long-term test of varnishes and other wood finishes in the May 2009 , January 2011 , and September 2011 issues. Our initial reports on one-part varnishes and two-part varnishes that appeared the August 2007 and December 2007 issues are available to all sailors, as is our January 2011 guide to selecting varnish types and December 2009 guide to maintaining varnish . To search our complete archives for past reports on varnishes and clear wood coatings, search under wood coatings, wood finish, or specific product names like Cetol.
And if varnish is just part of a more extensive cosmetic overhaul for your boat, then our four-volume series “ Painting Your Boat from Bottom to Top ,” offers details on every aspect of a complete makeover–from stripping old paint or varnish, to choosing new coatings and applying them for a professional finish.
RELATED ARTICLES MORE FROM AUTHOR
I have a Atkin schooner with 2 sitka spruce masts and the two gaffs that are both varnished. I agree that annual inspections are critically required. (I have a self climbing system). Maybe 15 years ago, I stripped the masts when they were on the ground and put on 12 coats of varnish. After that I put one coat of Epifanes’s Woodfinish gloss then 1 coat of their traditional clear varnish. I follow Rebecca Wittman “The Brightwork Companion” for instructions on what to do when going up and back down the masts. The main mast takes a beating especially during panic reefing. But the varnish is flexible and you can monitor the damage. The main negative is you need a few days temperature to be over 70 F.
You mentioned Awlspar/Awlbrite with an overcoat with Alwgrip Awlbrite. What are your thoughts on Awlwood?
Awlwood did very well in our testing, earning a Recommended product rating. We’ve not used it — yet — on spars. https://www.practical-sailor.com/boat-maintenance/diy-projects/exterior-wood-finish-update-at-2-years
I have a Friendship Sloop and use Awlwood on everything, including spars (clear primer, then yellow primer added to gloss, then gloss), dug out all checks and filled with Sikaflex 201, tan, which is hard to see from 10′ and cures with the same chemistry as Awlwood, so no problems with adhesion of finish. Stuff lasts forever — 8 years and counting on lazarette hatches, horizontal to sun and never covered, looks brand new. I built roller sawhorses to ease spar finishing, cutting a slot in the top and fitting small (8″) rubber wheels on 1/2″ axles which are fastened to the top with 1/2″ copper plumber’s pipe fasteners and a small piece of 1/2″ copper pipe into which the axle fits. Made working on mast and finishing easy, just roll the mast which sits on two wheels per sawhorse. I would send a picture of mast and sawhorses, but can’t figure out how to.
LEAVE A REPLY Cancel reply
Log in to leave a comment
Latest Videos

How To Make Starlink Better On Your Boat | Interview

Catalina 380: What You Should Know | Boat Review
- Privacy Policy
- Do Not Sell My Personal Information
- Online Account Activation
- Privacy Manager
WOODEN BOW TIES
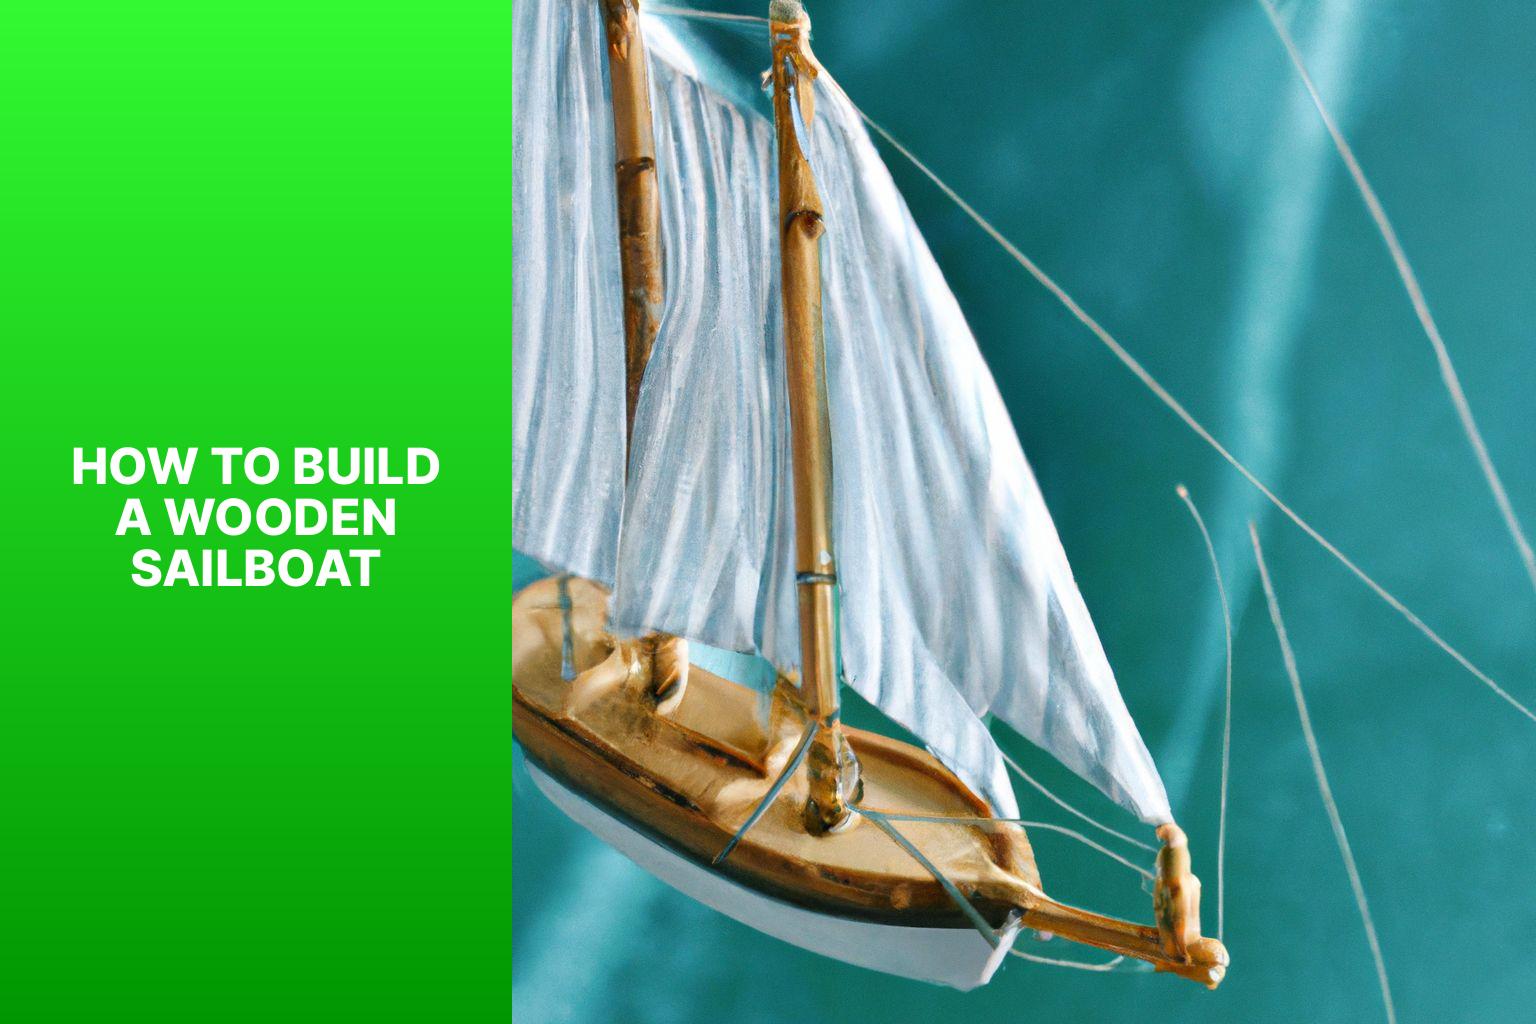
How to build a wooden sailboat: a beginner's guide.
Are you interested in building your own sailboat? If so, building a wooden sailboat can be a rewarding and fulfilling experience. Not only will you have a unique vessel to call your own, but you’ll also learn valuable woodworking skills along the way.
To get started, you’ll need to gather the necessary materials and tools. This may include oak plywood, epoxy resin and hardener, thickener, brad nails, masking tape, a pull-saw, and a table saw. Once you have everything you need, you can begin the process of building your sailboat. From creating a jig and frame assembly to making the mast, there are many steps involved in building a wooden sailboat. But with patience and attention to detail, you can create a beautiful and functional vessel that will bring you joy for years to come.
Understanding the Basics of a Wooden Sailboat
If you are interested in building a wooden sailboat, it’s important to understand the basics of how a sailboat is constructed. In this section, we’ll cover the parts of a wooden sailboat and the different types of wooden sailboats.
Parts of a Wooden Sailboat
A wooden sailboat is made up of several parts, each with its own unique function. Here are some of the most important parts:
- Hull : The hull is the main body of the boat. It is the part of the boat that sits in the water and provides buoyancy.
- Keel : The keel is a long, narrow fin that extends down from the bottom of the hull. It helps to keep the boat from capsizing by providing stability.
- Rudder : The rudder is a flat piece of wood or metal that is attached to the back of the boat. It helps to steer the boat.
- Mast : The mast is a tall, vertical pole that supports the sails.
- Sails : The sails are large pieces of fabric that are attached to the mast and other parts of the boat. They catch the wind and propel the boat forward.
- Boom : The boom is a horizontal pole that is attached to the bottom of the mast. It helps to control the shape of the sail.
Types of Wooden Sailboats
There are many different types of wooden sailboats, each with its own unique characteristics. Here are some of the most common types:
- Dinghy : A dinghy is a small sailboat that is typically used for recreational sailing or racing.
- Sloop : A sloop is a sailboat with a single mast and a fore-and-aft rig.
- Ketch : A ketch is a sailboat with two masts, with the main mast taller than the mizzen mast.
- Yawl : A yawl is a sailboat with two masts, with the mizzen mast located aft of the rudder post.
When choosing a type of wooden sailboat to build, it’s important to consider your needs and experience level. A dinghy is a good choice for beginners, while a ketch or yawl may be more suitable for experienced sailors.
By understanding the basics of a wooden sailboat and the different types available, you can make an informed decision about which type of boat to build.
Choosing the Right Materials
When building a wooden sailboat, choosing the right materials is crucial to ensure the boat’s durability and performance. In this section, we will discuss the two most important materials you’ll need to choose: wood and sails/rigging materials.
Selecting the Right Wood
Choosing the right type of wood for your sailboat is critical. You want a wood that is strong, lightweight, and resistant to rot and decay. Some of the most popular types of wood used in sailboat building include:
- Cedar: Lightweight and easy to work with, cedar is an excellent choice for planking and decking.
- Mahogany: Strong and durable, mahogany is often used for building frames and keels.
- Oak: A dense and hard wood, oak is commonly used for building frames and planking.
When selecting your wood, make sure it is free of knots, cracks, and other defects that could weaken the boat’s structure. You should also consider the wood’s grain pattern, as this can affect the boat’s strength and appearance.
Choosing Sails and Rigging Materials
The type of sails and rigging materials you choose will depend on the type of sailboat you’re building and your sailing needs. Some of the most common materials used in sail and rigging construction include:
- Dacron: A strong and durable synthetic material, dacron is commonly used for sailcloth.
- Nylon: Lightweight and flexible, nylon is often used for spinnaker sails.
- Stainless Steel: Strong and corrosion-resistant, stainless steel is commonly used for rigging hardware.
When selecting your sails and rigging materials, consider the conditions you’ll be sailing in and the type of sailing you’ll be doing. For example, if you’ll be racing, you may want to choose lightweight sails and rigging materials that will help you achieve maximum speed. On the other hand, if you’ll be cruising, you may want to choose more durable materials that can withstand rougher conditions.
By choosing the right materials for your wooden sailboat, you can ensure that your boat is strong, durable, and performs well on the water.
Designing Your Sailboat
Before you start building your wooden sailboat, you need to design it. This will involve creating a blueprint and determining the size and shape of your boat.
Creating a Blueprint
Creating a blueprint is an essential step in designing your sailboat. It will help you visualize your boat and ensure that you have all the necessary components in place. You can create a blueprint using software such as AutoCAD or SketchUp, or you can draw it by hand.
When creating your blueprint, consider the following:
- The length, width, and height of your boat
- The position of the mast and sails
- The location of the rudder and keel
- The number of cabins and their layout
- The placement of any storage compartments or equipment
Determining the Size and Shape
The size and shape of your sailboat will depend on several factors, including your budget, the type of sailing you plan to do, and the number of people who will be on board.
Consider the following when determining the size and shape of your sailboat:
- The type of sailing you plan to do (coastal cruising, racing, etc.)
- The number of people who will be on board
- The amount of storage space you will need
- The amount of deck space you will need
- Your budget
Once you have determined the size and shape of your sailboat, you can start gathering materials and building your boat.
Building the Hull
When building a wooden sailboat, the hull is the most important part of the boat. It is the main structure that holds everything together and keeps the boat afloat. Building the hull requires cutting and assembling the wooden frame.
Cutting the Wood
To begin building the hull, you will need to cut the wood into the appropriate sizes and shapes. The wood should be cut according to the plans or blueprints that you have created. You can use a saw or a jigsaw to make the cuts.
It is important to use high-quality wood that is free of knots or other defects. The wood should be strong enough to withstand the pressure and weight of the water. Common types of wood used for building a wooden sailboat include cedar, oak, and mahogany.
Assembling the Frame
Once you have cut the wood, you can begin assembling the frame of the hull. The frame is made up of vertical pieces of wood called frames, which hold the shape of the boat. The frames are attached to the keel, which is the main structure that runs down the center of the boat.
To assemble the frame, you will need to use a sawhorse or other support to hold the lumber in place. You can then use screws or bolts to attach the frames to the keel. It is important to ensure that the frames are level and straight.
After the frames are attached to the keel, you can add the planks to the hull. The planks are attached to the frames and keel using screws or nails. It is important to ensure that the planks are properly aligned and spaced.
Once the planks are attached, you can sand and finish the hull to give it a smooth and polished look. This will also help to protect the wood from the elements.
Building the hull of a wooden sailboat requires patience and attention to detail. With the right tools and materials, you can create a strong and beautiful hull that will last for years to come.
Installing the Deck and Cabin
Installing the deck and cabin of your wooden sailboat is a crucial step in the construction process. It not only adds to the aesthetics of your boat but also provides structural support. Here are some tips to help you through the process.
Deck Installation
The deck of your wooden sailboat should be installed after the hull has been completed and before the cabin is built. It is important to ensure that the deck is watertight to prevent any leaks. Here are the steps to follow when installing the deck:
- Cut the deck to fit the hull and sand the edges to ensure a tight fit.
- Apply a layer of epoxy to the hull and deck joint to seal it.
- Secure the deck to the hull using screws or bolts.
- Apply a layer of fiberglass cloth and epoxy to the deck to make it watertight.
- Sand the surface of the deck to prepare it for painting or varnishing.
Cabin Installation
The cabin of your wooden sailboat provides shelter and storage space. It is important to ensure that it is properly installed to prevent any leaks. Here are the steps to follow when installing the cabin:
- Build the cabin on a flat surface using marine-grade plywood.
- Cut the cabin to fit the deck and hull and sand the edges to ensure a tight fit.
- Apply a layer of epoxy to the cabin and deck joint to seal it.
- Secure the cabin to the deck using screws or bolts.
- Apply a layer of fiberglass cloth and epoxy to the cabin to make it watertight.
- Install any windows, hatches, or doors in the cabin.
- Sand the surface of the cabin to prepare it for painting or varnishing.
By following these steps, you can ensure that your wooden sailboat’s deck and cabin are properly installed and watertight. This will not only make your boat look great but also ensure that you have a safe and enjoyable sailing experience.
Setting Up the Mast and Sails
Now that you have built your wooden sailboat, it is time to set up the mast and sails. This process may seem daunting, but with a little patience and attention to detail, you can have your boat ready to sail in no time.
Step 1: Install the Mast
The first step is to install the mast. Depending on the design of your boat, the mast may be a single piece or assembled from multiple sections. Make sure the mast is secured properly and is straight. Use a level to ensure the mast is vertical in both directions.
Step 2: Prepare the Sails
Next, prepare the sails. Make sure the sails are clean and free of any debris or damage. Attach the sail to the mast using the halyard, which is a rope used to raise and lower the sail. Make sure the sail is hoisted all the way to the top of the mast.
Step 3: Attach the Boom
Attach the boom to the mast and secure it with a boom vang, which is a rope used to control the angle of the boom. The boom is the horizontal spar that holds the bottom edge of the sail.
Step 4: Set the Sail
Once the boom is attached, set the sail. Adjust the angle of the boom and the sail to catch the wind and start moving. You can use the main sheet to control the angle of the sail and the boat’s speed.
Step 5: Trim the Sail
Finally, trim the sail to optimize its performance. This involves adjusting the sail’s shape and position to maximize its power and minimize drag. Use the sail controls, such as the cunningham and outhaul, to adjust the sail’s shape. Use the main sheet to control the sail’s position relative to the wind.
Congratulations! You have successfully set up the mast and sails of your wooden sailboat. Now it’s time to hit the water and enjoy the thrill of sailing.
Applying Finishing Touches
When it comes to building a wooden sailboat, applying the finishing touches is a crucial step that can make all the difference in the final product. Here are some tips and tricks to help you get the perfect finish.
Sanding and Finishing
Before you can apply any finish, you need to make sure the surface is smooth and free of imperfections. This means sanding the wood with progressively finer grits of sandpaper until you achieve the desired smoothness. Once you’ve finished sanding, you can apply a wood conditioner to help the wood absorb the finish more evenly.
When it comes to choosing a finish, you have several options. Some popular choices include varnish, paint, and oil. Varnish is a popular choice for wooden boats because it provides a durable, glossy finish that can withstand the harsh marine environment. Paint is another option, but it requires more maintenance than varnish and may not provide as much protection against the elements. Oil is a good choice if you want a more natural look, but it may not provide as much protection as varnish or paint.
Painting and Varnishing
If you decide to go with paint or varnish, there are a few things to keep in mind. First, make sure you apply the finish in a well-ventilated area to avoid inhaling fumes. Second, make sure you apply thin, even coats and allow each coat to dry completely before applying the next. This will help prevent drips and ensure a smooth finish.
When it comes to varnishing, it’s important to use a high-quality brush and work quickly to avoid brush marks. You may also want to consider using a foam brush for hard-to-reach areas. Once you’ve applied the final coat of varnish, you can buff the surface with a soft cloth to achieve a high-gloss finish.
Painting requires a different approach. You’ll need to choose the right type of paint for your boat and make sure you apply it evenly. If you’re painting a large area, you may want to consider using a paint sprayer to achieve a smooth, even finish. Once the paint has dried, you can apply a clear coat to protect the paint and give it a glossy finish.
In conclusion, applying the finishing touches to your wooden sailboat is an important step that requires careful attention to detail. By following these tips and using the right tools and materials, you can achieve a beautiful, long-lasting finish that will protect your boat and make it stand out on the water.
Safety Measures
When building a wooden sailboat, safety should always be your top priority. Here are some safety measures you should take to ensure a safe and successful build.
Installing Safety Equipment
Before you start building, make sure you have all the necessary safety equipment installed in your workshop. This includes fire extinguishers, smoke detectors, and first aid kits. You should also have a clear and unobstructed path to the exit in case of an emergency.
When working with power tools, always wear eye and ear protection, as well as a dust mask to protect your lungs. If you are using chemicals, make sure you are working in a well-ventilated area and wear gloves and a respirator if necessary.
Conducting a Safety Check
Before you start working on your sailboat, conduct a safety check to make sure everything is in order. Check that all tools and equipment are in good working order and that there are no loose or damaged parts. Make sure your work area is clean and free of clutter, and that all cords and cables are properly secured.
When working with wood, be aware of any knots or cracks in the wood that could weaken the structure of your sailboat. Use only high-quality marine-grade wood and be sure to follow the plans carefully to ensure a strong and safe boat.
By following these safety measures, you can ensure that your wooden sailboat build is a safe and enjoyable experience.
Maintaining Your Wooden Sailboat
Congratulations on building your own wooden sailboat! Now that you have a beautiful vessel, it’s important to keep it well-maintained to ensure its longevity and safety on the water.
Regular Maintenance
Regular maintenance is essential to keep your wooden sailboat in top condition. Here are some tips to keep in mind:
- Clean your boat regularly with a mild soap and water to prevent dirt and grime buildup.
- Check for any signs of damage, such as cracks, rot, or loose fittings, and address them promptly.
- Apply a fresh coat of varnish or paint every few years to protect the wood from the elements.
- Keep your boat covered when not in use to protect it from the sun and rain.
Seasonal Maintenance
In addition to regular maintenance, there are also some seasonal tasks that you should perform to keep your wooden sailboat in top condition:
- At the beginning of the season, inspect the hull for any damage or wear and make any necessary repairs.
- Check the rigging and sails to make sure they are in good condition and make any necessary repairs or replacements.
- Before storing your boat for the winter, make sure to properly winterize it to protect it from the cold and moisture.
Additional Tips
Here are some additional tips to keep in mind when maintaining your wooden sailboat:
- Use high-quality marine-grade products when cleaning and maintaining your boat.
- Avoid using harsh chemicals or abrasive materials that can damage the wood.
- Regularly check the bilge for any water buildup and pump it out as needed.
- Keep your boat well-ventilated to prevent moisture buildup and mold growth.
By following these tips, you can keep your wooden sailboat in top condition and enjoy many years of safe and fun sailing.
Leave a Reply Cancel reply
You must be logged in to post a comment.
March / April Issue No. 297 Preview Now
Rotating Wing Masts—Part I
By reuel parker.

Conch 32 Sail Plan
In the late 1990s it occurred to me to design a trailerable one-design racer. I was living in Key West, and I also saw this as a way to get involved in Key West Race Week, a fairly major event in the world of fast sailboats.
Most small one-design racers have fin keels and require custom trailers, necessitating the use of a crane or Travel Lift to launch and haul them. Without very much knowledge or experience with one-design classes or rating rules, I simply dove into the project. I figured that one-design boats primarily race against each other, so I could design what I wanted… and I had a lot of ideas I wanted to try.
I designed the boat and rig during winter of 1997-8, but didn’t get around to designing the mast until early 1999. I named my design CONCH 32, after the giant, tasty undersea snails indigenous to most tropical and subtropical waters (including the Florida Keys). “Conch” (pronounced “Konk”) is also the knick-name for people born and raised in the lower Keys. Long-term transplants, like myself, who become faux “natives” are referred to as “fresh-water conchs”. The name seemed appropriate for a one-design class designed specifically to be raced in the Florida Keys. Also, my office and boat shop were located in the old Singleton sea food packing plant, which had recently been sold, and re-named The Conch Farm. We built a number of boats there, including the prototype Commuter 36 MAGIC, the three 28′ Swansea Pilot Schooners GLANCE, FRANK and SYLVIA, plus numerous small dinghies and sharpies.
I was hoping that the new owners of the property would endorse my new one-design class as a promotional gambit—perhaps even to the extent of financing one or two boats. Although they seemed excited about it at first, nothing ever happened.

Plan & Construction Sections for the Conch 32.
To make the boat as light as possible, I incorporated polystyrene insulation foam in the hull and decks (Dow “blue-board”, which glues well with epoxy). The hull bottom is tortured marine plywood, arc-bottomed aft and V-bottomed forward. Beam is 8′ 6″ and displacement is 4,400 lbs, making this a trailerable boat. The NACA 0009 foil-shaped centerboard contains lead shot and polyester resin, and becomes a ballasted fin keel in the down position. The twin rudders are also foil-shaped.
The most unusual feature of new my hot-rod sailboat design was her mast. Rotating wing masts are very common in Key West, which is populated by a large number of charter catamarans (called “cattlemarans” locally). From studying and sailing on the big cats, I was intrigued by their rotating wing masts, and wondered why you never see them employed on mono-hulls… so I decided to try it myself.

Construction Details for the Conch 32 lower mast.
Part of my concept for the Conch 32 was that she be easy and inexpensive to build—no exotic hardware! The few stainless steel components required can be made by a resourceful home-builder with a mini-grinder and bench vise. Mast track, sail-slides and sail battens can be made from standard PVC plumbing pipe and aluminum flat stock. The mast step ball joint employs a standard trailer hitch (a method used by several of the big charter cats). Sheaves use standard Schaefer Delrin replacement parts available from any chandlery or catalogue.
The idea behind rotating wing masts is that the mast fairs into the sail, like a real wing, instead of the sail coming off what is frequently the wrong part of the mast. Visualize a mains’l attached to a mast track on an oval-shaped mast while beam-reaching, and you get the picture. The mast becomes a flat block, contributing nothing but turbulence to overall sail shape. With a teardrop-shaped wing mast that is free to rotate, the mast acts like the foremost bones in a bird’s wing, or the leading edge of an airplane wing. It contributes to sail shape, rather than detracting from it. Many racing multihulls employ a “mast tiller” to further control the juxtaposition of mast to sail. This device is attached to the mast base, with control lines leading to the cockpit, allowing fine-tuning of mast/wing shape.

Construction Details for the Conch 32 upper mast.
This gave me the bright idea to put the mast tiller at the head of the mast, allowing the sail to automatically orient the mast optimally to the sail. I named my invention the “L-HEAD MAST”. I was also aware of a relatively new trend in sail shape, employing full-length sail battens near or even in the head of the sail. This creates a “Bat-Wing” effect, a trend which has become even more common today, fifteen years later. Some of these new sails even look suspiciously like gaff-riggers, although they aren’t! I might mention here that bat-wing sails have been commonly used on canoes, kayaks and wind surfers for many years.
I wanted my new mast to be as simple as possible, but I had to find a way to make a structural bend near the top, to form the “L-head”… this I achieved with a stepped laminated nose stringer, and pie-shaped skin sections in way of the bend. I designed a mast core consisting of an internal plywood web frame coupled to solid stringers fore & aft. The mast can be made using nothing more exotic than a table saw. I used the web frame compartments for internal halyards, mounting sheaves in integral boxes. I eliminated the infamous “Jesus Shackle” (responsible for numerous dismasting accidents) in favor of standard SS eyebolts and a custom-made tang.

Rig details for the Conch 32.
I also designed a pivoting “bow sprit/spinnaker pole” for attaching a spinnaker tack, allowing the spinnaker to be shifted to windward on a broad reach, out from behind the mains’l.
Despite all the thought and design work I put into this project, it went over like a lead balloon! I have never sold a set of plans for the Conch 32, and one has never been built. I later designed a Conch 19 (a smaller version of the 32), and that one, also, vanished without a trace.
During this time I was avidly studying the Chinese Junk rig, which is where full-length battens for sails originated, and I began to see correlations between Junk sails, lug-rigged sails, full-length battens and multiple sheet leads. My sail plan for the Conch 32 combines various techniques from various rig types spanning centuries of time, all blended together to make something new.
In Part Two on this subject, I will address larger rotating wings employing more modern techniques and hardware, as applied to both monohulls and multihulls.
Jan 12, 2014, Saint Lucie Village
ACCESS TO EXPERIENCE
Subscribe today.
Publishing dynamic editorial content on boat design construction, and repair for more than 40 years.
1 YEAR SUBSCRIPTION (6 ISSUES)
Print $39.95, digital $28.00, print+digital $42.95, from online exclusives.
Blacksmithing at the WoodenBoat School
Extended content.

MAUD Returns Home

From Lobsterboat to Lobster Yacht
From the community.

1968 Chris Craft Custom
1968 Chris Craft has been updated and customized for the classic boat lover.
50 years of WB, Sails, more
All original issues of WB, $375; Sails for sloop rig, new condition, luff 29’5” 2 jibs, bagged, $

1941 36' Stephens motor yacht
She's FREE to anyone who can take on the project.
Register of Wooden Boats

I aquired Maverick in November of 2023 for $1.

Step-By-Step Guide: How to Build a Wooden Sailboat – Complete DIY Tutorial
Alex Morgan
Building a wooden sailboat is a rewarding and fulfilling endeavor that allows you to create your own vessel for sailing adventures. Whether you’re a seasoned sailor or a woodworking enthusiast, constructing a wooden sailboat requires careful planning, attention to detail, and a love for craftsmanship. This comprehensive guide will take you through the step-by-step process of building a wooden sailboat, from choosing the right design and gathering the necessary materials to assembling the framework, building the deck and cabin, and installing the sails and rigging. We will also discuss the finishing touches and regular maintenance required to keep your wooden sailboat in optimal condition for years of enjoyment on the water. Let’s dive into the world of wooden sailboat construction and embark on this exciting journey together.
Key takeaways:
Key takeaway:
- Choosing the right design and plans is crucial: Research different sailboat designs and select suitable plans based on your skill level to ensure a successful project.
- Gather the necessary materials and tools: Pay attention to wood selection and preparation, as well as acquiring the tools and equipment needed for building your wooden sailboat.
- Attention to detail in the construction process is important: Prepare and assemble the framework carefully, focusing on lofting, laying out the keel, constructing the ribs, and the hull structure to ensure a sturdy and reliable sailboat.
Choosing the Right Design and Plans
When it comes to building a wooden sailboat, one of the crucial steps is choosing the right design and plans. In this section, we’ll take a deep dive into the world of sailboat designs and explore the vast array of options available. From researching different sailboat designs to selecting plans that match your skill level, we’ll guide you through the exciting process of bringing your wooden sailboat dream to life. So, hop aboard and let’s set sail on this exhilarating journey of craftsmanship and adventure.
Researching Different Sailboat Designs
When conducting research on sailboat designs, it is important to take into account a variety of factors in order to select the most suitable design. One of the primary considerations is whether you prefer a monohull or a multihull sailboat. Monohulls are more commonly found and offer superior performance when sailing upwind, whereas multihulls provide both stability and speed.
Another aspect to consider is your level of sailing experience. If you are a beginner, it is advisable to seek out designs that are easier to handle and forgiving. On the other hand, experienced sailors may gravitate towards performance-oriented designs that are ideal for racing or long-distance cruising.
It is crucial to think about how you intend to use the sailboat. Are you looking for a day sailer , a cruiser , or a racing boat ? Each design comes with its own set of distinctive features and characteristics.
Determining the appropriate size of the sailboat is another crucial step, which should be based on the number of people and activities you plan to have on board. You must also decide whether you prefer an open cockpit or an enclosed cabin .
To find the perfect sailboat design that aligns with your sailing goals and preferences, it is imperative to thoroughly research various options and take into consideration all of these factors. By doing so, you will be able to make an informed decision and select the ideal sailboat design.
Selecting Suitable Plans for Your Skill Level
When it comes to building a wooden sailboat, it is crucial to select suitable plans that match your skill level. This is important as it ensures that you have the necessary knowledge and expertise to effectively complete the construction. In order to help you with this, here is a table that outlines the different skill levels and the corresponding plans:
Choosing the right plans for your skill level is essential as it enables you to navigate the construction process smoothly, avoid any complications, and ultimately achieve the desired result. It is crucial to honestly evaluate your woodworking skills and then select plans that align with your abilities. Keep in mind that building a wooden sailboat demands patience , attention to detail , and a willingness to learn and improve your woodworking skills.
As a pro tip, if you are a beginner, it is advisable to start with simpler plans and gradually work your way up to more complex projects. This allows you to gain experience and confidence in your woodworking abilities over time. So always remember to select suitable plans for your skill level and enjoy the process of building your wooden sailboat.
Gathering the Necessary Materials and Tools
When it comes to building a wooden sailboat, gathering the necessary materials and tools is key . In this section, we’ll dive into the exciting world of selecting and preparing the right wood for your sailboat, as well as the essential tools and equipment you’ll need to bring your project to life. So, start sharpening your creativity and let’s sail away into the realm of wooden boat construction!
Wood Selection and Preparation
Incorporating the provided keywords naturally in the provided text:
1. Conduct research on the different types of wood used in boatbuilding, such as mahogany , teak , or oak . This will help you make an informed decision regarding the most suitable wood for your sailboat.
2. Determine the specific requirements of your sailboat design in order to guide your wood selection process. Each design may have different needs and preferences when it comes to the type of wood to be used.
3. Take into consideration the durability and resistance to rot of the wood options available. This is crucial to ensure the longevity and overall quality of your sailboat. Choosing a wood that can withstand exposure to water and other elements is essential.
4. Look for straight , dry , and defect-free wood. This will contribute to the structural integrity of your sailboat. Any defects or irregularities in the wood may compromise its strength and performance.
5. Calculate the amount of wood needed based on the specific design and measurements of your sailboat. This will help you estimate the quantity of wood required for the construction process.
6. Mill or cut the wood into the required dimensions and shapes as outlined in the sailboat design. This step is crucial for achieving the desired structure and appearance of your sailboat.
7. Prior to assembly, it is important to sand the wood surfaces thoroughly. This will remove any rough edges or splinters, ensuring a smooth and safe finish.
8. Apply a protective coating or sealant to the wood in order to prevent water damage. This will help preserve the wood and extend its lifespan .
By following these steps, you can ensure that the wood selected and prepared for your sailboat construction is suitable and of high quality.
Tools and Equipment Needed for the Project
When embarking on the construction of a wooden sailboat, it is crucial to have the appropriate tools and equipment to ensure successful completion.
To accurately measure and obtain precise alignment and dimensions, essential measuring tools such as a tape measure , combination square , and level are indispensable.
For shaping wooden components, cutting tools like a circular saw or table saw , jigsaw , and hand saw are necessary.
Joinery tools, including a chisel set , mallet or hammer , and drill with different-sized bits, are vital for smoothly joining parts together.
To achieve a polished finish, sanding and finishing tools such as sandpaper with varying grits, sanding blocks , and a random orbital sander are crucial.
Additionally, brushes and rollers are required for the application of finishes.
When it comes to safety, it is imperative to prioritize the use of safety goggles , ear protection , a dust mask , and work gloves to ensure personal protection during the construction process.
When selecting tools and equipment, it is essential to invest in high-quality items that are specifically designed for the tasks involved in wooden sailboat building.
By doing so, not only will efficiency be maximized, but the overall quality of the finished boat will also be greatly enhanced.
Preparing and Assembling the Framework
As we delve into the world of building a wooden sailboat, we now find ourselves in the exciting phase of preparing and assembling the framework. In this section, we’ll discover the essential steps that go into setting up the lofting and laying out the keel , as well as the intricacies of constructing the ribs and hull structure. Get ready to immerse yourself in the hands-on process of bringing this magnificent vessel to life!
Setting Up the Lofting and Laying Out the Keel
To properly set up the lofting and lay out the keel for a wooden sailboat, it is important to follow these steps in a systematic manner:
- Firstly, prepare the lofting area by clearing a large, flat space where the plans and measurements will be placed.
- Next, securely attach the keel stock to the lofting platform, making sure it is both level and aligned with the boat’s centerline.
- Using battens, rulers, and pencils, transfer the measurements and lines from the boat plans onto the lofting platform.
- Ensure the accuracy of the waterlines, buttock lines, and other reference lines on the lofting platform by drawing them according to the measurements provided in the boat plans.
- Utilizing the dimensions indicated in the plans, measure and mark the positions of the keel, stem, and transom on the lofting platform.
- Thoroughly examine and adjust all lines and measurements to guarantee their accuracy.
- Identify the locations where any additional frames, bulkheads, or structural elements will connect to the keel, by marking them accordingly.
- Prior to proceeding, double-check all marks and measurements to ensure their accuracy.
The process of setting up the lofting and laying out the keel is an integral step in the construction of a wooden sailboat. It serves as the foundation and reference points for the boat’s overall structure. It is crucial to pay close attention to detail and maintain accuracy throughout the build. By following these steps, you will be on your way to constructing your very own wooden sailboat.
Constructing the Ribs and Hull Structure
When constructing the ribs and hull structure of a wooden sailboat, follow these steps:
– Measure and cut the ribs: Use the plans as a guide to mark and cut the dimensions on the wood. Cut the ribs accurately.
– Attach the ribs to the keel: Position and attach the cut ribs evenly along the keel using marine epoxy and screws.
– Install chines and stringers: Attach the chines to the bottom edge of the boat and install the stringers along the sides for strength.
– Attach the planking: Cut and fit planks to cover the rib and stringer structure, securing them tightly.
– Reinforce the joints: Apply epoxy and fiberglass tape over the joints to strengthen the structure.
– Shape the hull: Use tools to shape and smooth the hull, paying attention to fairing for optimal hydrodynamics.
– Apply a protective finish: Coat the hull and ribs with marine-grade varnish or epoxy for durability.
– Perform a thorough inspection: Check for defects, cracks, or imperfections and make necessary repairs before moving forward.
The process of constructing wooden sailboats has evolved over time, combining traditional techniques with modern materials and tools. Craftsmanship, attention to detail, and an understanding of wood’s properties are still essential in constructing the ribs and hull structure. This blend of artistry and engineering ensures sailboats can withstand the demands of the sea while providing a smooth and enjoyable sailing experience.
Building the Deck and Cabin
Let’s dive into the exciting world of building a wooden sailboat! In this section, we’ll focus on the crucial element of constructing the deck and cabin. Get ready to explore the process of creating the deck framework and adding those essential interior features . From laying the foundation to crafting a cozy cabin space , we’ll uncover the key steps and considerations for bringing your wooden sailboat to life. So, grab your tools and let’s set sail on this exhilarating construction journey !
Creating the Deck Framework
When creating the deck framework for a wooden sailboat, follow these steps:
- Measure and mark the desired deck size and shape on the boat’s frame.
- Cut and shape the wooden planks or panels to match the marked measurements.
- Align the planks or panels horizontally across the frame, ensuring they are straight and evenly spaced.
- Secure the planks or panels to the frame using screws or nails, ensuring tight fastening.
- Add additional support beams or joists underneath the deck for added strength and stability.
- Sand the deck surface to create a smooth and even finish.
- Apply a weather-resistant sealant or paint to protect the deck from moisture and UV damage.
- Install necessary features or fixtures on the deck, such as hatches, cleats or railings.
Pro-tip: Enhance the deck’s strength and durability by adding epoxy or marine adhesive between the joints before securing the planks or panels.
Installing the Cabin and Interior Features
When building a wooden sailboat, it is important to pay attention to every step, including the installation of the cabin and interior features. To install these features, follow the following steps:
1. First, measure and cut the materials for the cabin walls, floor, and ceiling.
2. Next, securely fit the cabin walls in place.
3. Then, attach the floorboards to the cabin base using screws or nails.
4. Align and install the cabin ceiling.
5. If desired, add insulation for extra comfort.
6. Attach interior features such as cabinets, storage compartments, and seating areas.
7. Install windows and hatches to allow for natural light and ventilation.
8. Properly wire the cabin for electricity, ensuring that lights and outlets are installed and functioning.
9. Finish the interior by sanding and applying a protective coat of varnish or paint.
10. Ensure that all installations meet safety standards.
Precision and attention to detail are key when installing the cabin and interior features of a wooden sailboat. By carefully measuring, cutting, and fitting each component, you can ensure a secure fit. It is important to optimize the layout and functionality of the interior features to create a comfortable living space with ample storage. The addition of windows and hatches will enhance comfort and enjoyment by providing natural light and ventilation . If electricity is needed, proper wiring is essential to ensure necessary lighting and power outlets. Finishing the interior with a protective coat of varnish or paint will not only enhance aesthetics but also provide durability.
Remember, the goal is to create a cozy retreat for sailors, so it is important to put in the necessary effort to install the cabin and interior features correctly.
Installing the Sails and Rigging
Set sail with confidence as we dive into the exciting world of installing the sails and rigging for your wooden sailboat. Discover the key considerations in choosing the perfect sails and master the art of setting up and adjusting the rigging. With expert tips and tricks , this section will equip you with the knowledge to navigate the waters with ease and experience the thrill of sailing your wooden masterpiece .
Choosing the Right Sails
When choosing sails for your wooden sailboat, consider the following factors:
– Type of sailing: Determine if you plan to cruise , race , or do both. Different sails are designed for specific purposes.
– Boat size: The size of your sailboat determines the size and number of sails you need. Larger boats require bigger sails , while smaller boats may need fewer and smaller sails .
– Wind conditions: Consider the typical wind conditions in your sailing areas. Different sails perform better in light winds , heavy winds , or various wind conditions.
– Sail material: The material of the sails affects durability and performance. Material choices include Dacron , laminate , and nylon . Each material has different trade-offs between longevity, performance, and cost.
– Reefing options: If you sail in varied or unpredictable wind conditions, choose sails with reefing options. Reefing allows you to adjust the sail area for stronger winds, improving control and safety.
– Manufacturer reputation: Research sail manufacturers for their reputation and reliability. Read reviews, seek recommendations, and consider warranty and customer support.
By considering these factors, you can make an informed decision when choosing sails for your wooden sailboat. Remember, the right sails greatly impact your sailing experience, so take your time and choose wisely.
Setting Up and Adjusting the Rigging
When setting up and adjusting the rigging of a wooden sailboat, it is important to follow these steps to ensure proper and safe rigging.
To start, attach the mast to the deck using a mast step or mast partner for stability and support. This will provide the foundation for the rigging.
Next, secure the standing rigging , which includes the shrouds and stays , to the mast. This will help distribute the forces from the sails and ensure the stability of the mast.
Connect the forestay to the bow of the sailboat. This will keep the mast in line and control the position of the headsail.
To counteract forces from the headsail and maintain rigging tension, attach the backstay to the stern of the boat.
Use turnbuckles or rigging screws to adjust the tension in the standing rigging. This will ensure proper alignment and support of the mast.
Install the running rigging , including halyards and sheets , to control the position and tension of the sails.
Before and during sailing, it is important to regularly check the tension in the rigging to ensure performance and safety.
Make any necessary adjustments to the rigging during sailing in order to optimize the shape of the sails and enhance the performance of the boat.
By following these steps, you will be able to properly set up and adjust the rigging of your wooden sailboat, allowing for safe and enjoyable sailing experiences.
Finishing Touches and Maintenance
When it comes to completing your wooden sailboat and keeping it in top shape, this section has got you covered. We’ll dive into the art of applying exquisite finishes to the hull and deck, giving your sailboat a stunning appearance. And don’t worry, we won’t neglect the nitty-gritty details of regular maintenance and care, ensuring your wooden vessel remains seaworthy for years to come. So, let’s get ready to add those finishing touches and keep your sailboat sailing smoothly !
Applying Finishes to the Hull and Deck
When building a wooden sailboat, applying finishes to the hull and deck is crucial for durability and aesthetic appeal. Here are the steps to follow:
1. Prepare the surfaces: Sand down rough spots, fill in cracks and imperfections, and ensure a smooth and clean surface.
2. Choose the right finish: Consider the type of wood and desired look. Varnish provides a glossy and traditional appearance, while paint offers different colors and styles.
3. Apply the primer: Enhance adherence and create an even surface for the final coat by applying a primer.
4. Apply the finish: Use a brush or roller to apply the chosen finish coat to the hull and deck. Follow the manufacturer’s instructions for drying times and application techniques.
5. Allow for drying and curing: Follow the manufacturer’s instructions for drying and curing to ensure the finish is fully set and provides maximum protection.
6. Inspect and touch up: After drying, inspect the hull and deck for missed spots or imperfections. Touch up any areas that require additional finish for a seamless and polished look.
By following these steps and applying finishes properly, you can protect and enhance the hull and deck of your wooden sailboat, ensuring it looks beautiful and lasts for many years.
Regular Maintenance and Care for Your Wooden Sailboat
Regular maintenance and care for your wooden sailboat is crucial for its longevity and performance. Here are the steps to follow:
1. Inspect the hull and deck for damage like cracks or rot. Promptly repair any issues to prevent further damage.
2. Clean the boat regularly with mild detergent and freshwater to remove dirt, salt, and grime that can accumulate over time.
3. Apply a protective coating to the hull and deck using marine-grade varnish or paint to prevent water penetration and protect against UV damage.
4. Check the rigging and sails for wear or damage. Replace worn-out lines or rigging components for safe sailing.
5. Inspect wooden components such as the mast, boom, and rudder for rot or decay. Replace or repair as necessary to maintain structural integrity.
6. Keep the interior of the sailboat clean and dry to prevent mold and mildew growth. Use a dehumidifier if needed.
7. Regularly check and maintain the boat’s systems , including electrical, plumbing, and navigation equipment. Address any issues promptly.
8. Store the wooden sailboat in a suitable location, such as a covered boat dock or boatyard, when not in use. Protect it from extreme weather conditions.
Pro-tip: Establish a regular maintenance schedule and keep a detailed record of all maintenance and repairs. This will help you stay organized and ensure your wooden sailboat remains in optimal condition.
Some Facts About How To Build A Wooden Sailboat:
- ✅ Building a wooden sailboat can take approximately 100 hours over a span of 3 months. (Source: Instructables)
- ✅ A wooden sailboat can cost around $1,000 to build. (Source: Instructables)
- ✅ The boat is typically built from 4×8 sheets of plywood and measures 8 feet in length. (Source: Instructables)
- ✅ Various tools such as a pull-saw, table saw, router, sander, and drill are needed for building a wooden sailboat. (Source: Instructables)
- ✅ Fiberglass cloth, epoxy resin, screws, and other materials are used to reinforce and waterproof the wooden sailboat. (Source: Instructables)
Frequently Asked Questions
1. how long does it take to build a wooden sailboat.
Building a wooden sailboat typically takes about 100 hours spread over approximately 3 months.
2. What materials are needed to build a wooden sailboat?
To build a wooden sailboat, you will need 4×8 sheets of plywood, epoxy resin, oak plywood, various tools (such as a pull-saw, table saw, router, etc.), fiberglass cloth, screws, fasteners, and other supplies like glue, clamps, and mixing cups.
3. How much does it cost to build a wooden sailboat?
The estimated cost of building a wooden sailboat is around $1,000, including the materials and tools needed for the project.
4. Can I learn to build a wooden sailboat if I have no prior experience?
Yes, building skills can be learned gradually, and mistakes can be avoided along the way. With patience and guidance from boat building plans, even beginners can successfully build a wooden sailboat.
5. How long is the wooden sailboat described in the reference?
The wooden sailboat described in the reference is an 8-foot long pram, featuring classic lines and made from 4×8 sheets of plywood.
6. Can I launch the wooden sailboat in any body of water?
Yes, the wooden sailboat is designed to be light enough to fit in a small pickup truck or be rolled to a local lake on a dolly, making it suitable for various bodies of water.
About the author

Leave a Reply Cancel reply
Your email address will not be published. Required fields are marked *
Save my name, email, and website in this browser for the next time I comment.
Latest posts

The history of sailing – from ancient times to modern adventures
History of Sailing Sailing is a time-honored tradition that has evolved over millennia, from its humble beginnings as a means of transportation to a beloved modern-day recreational activity. The history of sailing is a fascinating journey that spans cultures and centuries, rich in innovation and adventure. In this article, we’ll explore the remarkable evolution of…

Sailing Solo: Adventures and Challenges of Single-Handed Sailing
Solo Sailing Sailing has always been a pursuit of freedom, adventure, and self-discovery. While sailing with a crew is a fantastic experience, there’s a unique allure to sailing solo – just you, the wind, and the open sea. Single-handed sailing, as it’s often called, is a journey of self-reliance, resilience, and the ultimate test of…

Sustainable Sailing: Eco-Friendly Practices on the boat
Eco Friendly Sailing Sailing is an exhilarating and timeless way to explore the beauty of the open water, but it’s important to remember that our oceans and environment need our protection. Sustainable sailing, which involves eco-friendly practices and mindful decision-making, allows sailors to enjoy their adventures while minimizing their impact on the environment. In this…
What is a Sailboat Mast?

Last Updated by
Daniel Wade
June 15, 2022
A sailboat mast is the towering pole mounted to the deck. It attaches the length of the sail to the boat and supports the shape of the sail.
Sailboat masts are the most distinct feature of sailing vessels, and they hold the sails in place. Masts are often taller than the length of the boat. Most modern sailboat masts are made of aluminum, though traditional boats use wood. Sailboat mast type varies based on what type of sail plan they support.
Table of contents
Parts of the Mast
The mast itself is simply a pole and won't function without several essential parts. Starting from the deck is the mast boot, which keeps water from draining down the mast and into the cabin. The long wires connected to the mast on each side are the stays, and they keep the mast upright under tremendous force. The boom connects to the mast using a gooseneck fitting. Halyard lines, which run to the top of the mast, are used to raise and lower the sail.
Single-Mast Rigs
Single mast sailboats are what most people picture when they think of modern sailing craft. Single mast boats are popular because they're inexpensive to produce and relatively easy to operate singlehanded. The most common kinds of single-mast rigs are sloops, cutters, and catboats.
Sloop rig boats are the most common kind of sailboat today. Sloops feature a single mast mounted somewhere on the forward 3/5 of the deck, but some boat designs differ slightly. Generally speaking, a sloop mast lies somewhere in the middle to the forward-middle of the deck.
Sloop masts are rigged for a large mainsail and a jib. Bermuda-rigged sloops utilize a tall single mast and triangular sail. Gaff-rigged sloops, which are less common, use a much shorter mast and a larger four-point mainsail.
Catboat Mast
Catboats are unique vessels common to New England and feature a forward-mounted single mast and a long boom. Unlike sloop-rigged boats, catboats are only rigged for a single sail. Catboat masts are generally mounted almost at the very front of the boat, and they're often short and quite thick.
Catboats are almost often gaff-rigged. Gaff-rigged sail plans make the most of short masts and are relatively easy to control in a single-mast configuration. Gaff-rigged catboat masts are shorter than Bermuda-rigged boats of similar size but generally taller than similar gaff-rigged craft.
Cutter Mast
Cutter-rigged sailboats feature a tall single mast and multiple headsails. Visually, cutters are easy to mistake for sloops. But the mast of a cutter is usually taller than a comparably-sized sloop, as it utilizes multiple headsails instead of a single jib.
Gaff-rigged cutters are much more common than gaff-rigged sloops in many areas. Cutters are easy to distinguish from sloops, even when the sails are stowed. This is because cutters often feature a long bowsprit and two front stays (forestay and jib stay).
Multi-Mast Rigs
Mult-mast rigs are less common than single-mast configurations. That said, multi-mast sailboats are often elegant and seaworthy. Though they offer more than just good looks—multiple masts offer speed and precise control for experienced sailors. Most of these vessels feature two masts, which are often shorter than masts on comparably-sized single-mast craft. The most common variations are yawl rigs, ketch rigs, and schooner rigs.
Yawls are robust multi-mast vessels that vary in length from 20 feet to well over 50 feet. A yawl features a long forward mainmast and a short mizzen mast located towards the back of the boat. Yawls are often gaff-rigged and were once used as utility boats.
Yawl rigged sailboats can use the mizzen mast and sail as a form of self-steering. The yawl is easy to distinguish from other two-masted vessels, as the mizzenmast is comparably short—often about half the size of the mainmast. Additionally, the mizzen mast is positioned aft of the rudder post.
Ketch Masts
At first glance, a ketch can be mistaken for a yawl. But the ketch features two similarly-sized masts and a much larger mizzen. The mizzen mast on a ketch is positioned forward of the rudder post. Ketch-rigged boats are often gaff-rigged as well, utilizing topsails on both masts. Some ketch-rigged boats have triangular sailplanes, mitigating the need for topsails.
Like the yawl, the ketch utilizes a headsail, a mainsail , and a mizzen sail, which is comparable in size to the mainsail. Ketch-rigged boats can be sailed with one or more aft sails stowed.
Schooner Masts
Schooners are among the most elegant multi-mast sailboat types. Schooners are visibly closer to ketches than yawls. But upon closer inspection, a schooner will have a shorter foremast and a longer (or almost equally-sized) mast behind it.
Schooner masts are tall and thick but usually shorter than similarly-sized single mast boats. This is because two-masted vessels distribute the sail plan over two masts and don't need the extra length to make up for lost sail area. Schooners are usually gaff-rigged and often utilize topsails and topmasts that extend the height of the mast.
Tall Ship Masts
Tall ships are the classic large sailing vessels that dominated the oceans for hundreds of years before the age of steam. Famous vessels such as the U.S.S. Constitution and the H.M.S. Victory feature this enormous and complex rig configuration.
Tall ships have three or more enormous masts, which are often made from entire tree trunks. Some of the largest tall ships have five or more masts. Tall ships are usually 100 feet in length or greater, as the size and complexity of these square-rigged ships make them only practical at scale. Tall ships utilize one or more mainmasts, mizzenmasts, a foremast, and a gaff-rigged jigger mast aft of the mizzenmast.
Sailboat Mast Materials
Sailboat masts are usually made out of aluminum or certain varieties of wood. Up to the 1950s, virtually all sailboat masts were made of wood. That changed around the same time that fiberglass boats became popular. Today, aluminum is the most common mast material.
Aluminum Sailboat Masts
The most common modern mast material is aluminum. Aluminum masts are lightweight, hollow, and easy to manufacture. These relatively inexpensive masts hold up well to salt water. Aluminum masts are also strong for their weight.
One downside to aluminum masts is galvanic corrosion, which occurs frightfully fast when saltwater comes into contact with aluminum and another metal (such as steel or copper). Aluminum masts are most common on Bermuda-rigged sloops.
Wood Sailboat Masts
Wood is the traditional material for sailboat masts, and it's still used today on many custom boats. Wood masts are heavy but strong, and a well-maintained wood mast can last over a hundred years. Wooden masts are common on gaff-rigged boats, as wood is an ideal material for shorter masts.
The most common mast wood comes from the Fir family. Douglas fir is common, but regional varieties (such as British, Columbian, and Yellow fir) are perfectly suitable. Some sailboats (particularly tall ships) use pine or redwood as a mast material. Some varieties of cedar (such as Port Orford cedar, Oregon cedar, and white cedar) are also excellent materials for building masts and spars.
Carbon Fiber Masts
Carbon fiber masts are a new arrival to boatbuilding, and they offer some advantages to wood and aluminum masts. Carbon fiber is lightweight and extremely strong, which makes it ideal for tall-masted racing sailboats. Vessels that compete in America's Cup races utilize the most premium carbon fiber masts in the industry.
Unlike wood (and aluminum to some extent), carbon fiber masts aren't particularly flexible. The rigidity of carbon fiber makes it strong, but stiffness is also a weakness. Under the right conditions, carbon fiber masts can break violently and are impossible to repair once broken.
Mast Maintenance
It's essential to maintain your mast and all of its accompanying hardware. Mast stays, lines, and halyards should be inspected regularly, adjusted, and replaced at regular intervals. Wooden masts should be varnished and checked for signs of rot.
Aluminum masts are generally low-maintenance, but signs of corrosion warrant immediate repair. Work with your local boat mechanic or sailing expert to develop a comprehensive maintenance plan. And remember, preventative maintenance is always cheaper and easier than repairs.
Related Articles
I've personally had thousands of questions about sailing and sailboats over the years. As I learn and experience sailing, and the community, I share the answers that work and make sense to me, here on Life of Sailing.
by this author
Sailboat Parts
Learn About Sailboats
Most Recent

What Does "Sailing By The Lee" Mean?
October 3, 2023

The Best Sailing Schools And Programs: Reviews & Ratings
September 26, 2023
Important Legal Info
Lifeofsailing.com is a participant in the Amazon Services LLC Associates Program, an affiliate advertising program designed to provide a means for sites to earn advertising fees by advertising and linking to Amazon. This site also participates in other affiliate programs and is compensated for referring traffic and business to these companies.
Similar Posts

Affordable Sailboats You Can Build at Home
September 13, 2023

Best Small Sailboat Ornaments
September 12, 2023

Discover the Magic of Hydrofoil Sailboats
December 11, 2023
Popular Posts

Best Liveaboard Catamaran Sailboats
December 28, 2023

Can a Novice Sail Around the World?
Elizabeth O'Malley

4 Best Electric Outboard Motors

How Long Did It Take The Vikings To Sail To England?

10 Best Sailboat Brands (And Why)
December 20, 2023

7 Best Places To Liveaboard A Sailboat
Get the best sailing content.
Top Rated Posts
Lifeofsailing.com is a participant in the Amazon Services LLC Associates Program, an affiliate advertising program designed to provide a means for sites to earn advertising fees by advertising and linking to Amazon. This site also participates in other affiliate programs and is compensated for referring traffic and business to these companies. (866) 342-SAIL
© 2024 Life of Sailing Email: [email protected] Address: 11816 Inwood Rd #3024 Dallas, TX 75244 Disclaimer Privacy Policy
How to Build a Wood Sailboat

Introduction: How to Build a Wood Sailboat

I've been wanting to combine my two favorite hobbies - woodworking and sailing for a long time, so I thought I'd build a boat. It's got classic lines and looks so dazzling in the sunshine that people constantly stop me at the boat ramp to ask me about it. There's something unbelievably rewarding about building something like this from scratch. This is definitely a boat that is much better built than bought . Here's how I did it.
The boat takes about 100 hours to build. I did it over 3 months, working a little bit just about every day and full days when my schedule permitted.
It will take about $1,000 in total to build if you buy everything at full retail cost (not including tools you might need to buy), but you can spread that across the length of the project. For example, you only need to buy one $30 sheet of plywood at a time, take it home, draw out the parts (loft) that fit on just that sheet and cut them out. That will take a couple of hours right there. Some boating supply stores (chandleries) might let you setup an account which might give you a discount if you tell them you're building a boat.
All of the skills needed to build a sailboat can be learned slowly, one step at a time. For example, if you've never fiber-glassed plywood before, just practice on a small piece first to get your confidence up. This was my first boat build, so I did a lot of learn as you go . Not only am I going to show you the right way to successfully build your own sailboat, but I'm going to share with you the mistakes I made along the way to hopefully save you from repeating them.
The end result will be a very attractive little 8 foot long pram, that is easily made out of 4x8 sheets of plywood that is light enough to put in the back of a small pickup truck or roll down to the local lake on the optional dolly. Anything longer would require you to either make a scarf joint (which is a bit tricky) or buy longer sheets of plywood (which is considerably more expensive).
What you will need:
Boat building plans
8 panels of 1/4" oak plywood 4'x8'
Pencil, Sharpie, ruler, tape measure, yard stick, etc.
Long flexible straight edge
Box of 1" brad nails
2 gallons of epoxy resin
1 gallon of epoxy hardener - SLOW
1 quart silica thickener
5 quarts wood flour thickener
1" masking tape
Japanese pull-saw
Table saw (helps, but optional)
Round-over router bit
Flush trim router bit
Palm/random orbital sander
220 sanding discs
Combination square
Drill bit set
Drill bit extension
Basic hand tools
Small diameter wire or zip ties
Wire cutter
12 C-clamps - 3"
Mixing cups, mixing sticks, rubber/nitrile gloves
16' x 60" of 6oz fiberglass cloth
2" plastic spreader
Gallon of waterproof glue
Glue roller
Silicone bronze screws
Stainless steel fasteners
Small blocks
Gudgeon & pintle - dinghy size
Patience - large
Elbow grease - large
For more detailed explanations on each step and more specific info/reviews on the materials and parts used, check out my boat build blog: www.Midnight-Maker.com
Step 1: Cutting Out the Parts...

First, you'll need boat building plans. I purchased some very nice ones from a popular boat building website because I had a specific style in mind to build, a "pram". It's a Norwegian design with lots of buoyancy in the bow and building a pointy boat is a little more difficult. There are a bunch of free boat building plans (search "dinghy") online. Also, I wanted my boat parts to fit in a standard (read cheap) 4'x8' sheet of plywood. It also had to be light enough for me to load/unload/move myself. This boat weighs in at about 70 pounds. When on the custom dolly I built, it's very easy to move from the parking lot to the lake.
Next, you'll need to draw out the parts of the boat full-sized onto the plywood (lofting). I actually did this step on hardboard/masonite because I wanted to make templates of all the parts in case I ever wanted to build another one.
This step requires you to be very meticulous. Carefully transfer the measurements (offsets). They may or may not look correct because it's very non-intuitive to look at curved boat parts that are laying flat. Some parts actually bend the opposite way you think they should. To make the curves, I nailed a bunch of 1" brads into the panel and used a long, flexible straight edge (yard stick, etc.) bent to follow the curve, then I traced the curve with pencil/Sharpie. Once I removed the brads, I had perfectly smooth curves. Keep in mind that with the side panels that are symmetrical to both sides of the boat, only draw out one version and cut two stacked sheets at a time. This ensures the boat will not be lop-sided. Make sure to immobilize the two sheets together with screws outside of the boat parts or use double-sided tape/clamps, etc. to keep the parts registered properly.
Using a Japanese pull-saw allows you to control the cuts very carefully and it can follow the graceful curves. They cut on the pull stroke which means they're very easy to control. Make sure you leave a bit of your cut line, meaning cut just outside the line. This allows you a bit of a safety margin and you can always sand to the line to sweeten it up. This is where the elbow grease really kicks in. It takes hours to cut out the hull panels by hand, but it's worth it. I tried cutting the first part out with the jigsaw and it wandered all over the place and quickly cut inside the line before I knew it. Also, a jig saw blade can lean to one side which could mean two panels might not be the exact same shape. Using hand tools is a classic way to do woodworking and is a very gratifying process. With hand tools, things happen slow enough for you to be in total control, whereas power tools can quickly do unexpected damage. With the understanding that you're building a classic boat, using hand tools wherever possible is part of the philosophy.
The plans I bought were in metric and called for 6mm (1/4") and 9mm (3/8") plywood, but I wanted to make everything out of 1/4" plywood so the thicker parts in the plans were glued together with two layers of 1/4" (so at 1/2" they were a bit thicker than designed). I actually liked this because it made the boat feel sturdier and of course it was cheaper that way. The trade-off was that the boat would be a bit heavier.
For any of the parts that need to be doubled-up/laminated (e.g. the transoms), now is a good time to do that. Make sure you use "waterproof" glue instead of "weatherproof" glue like I did...
Spread a thin layer of glue over one of the "bad" sides (plywood usually has a good side and a bad side, glue bad sides together so good sides show on both outside faces), making sure it's completely covered (I used a special glue roller), then carefully place the other half on top. Align all of the edges together, then clamp them in place. Now put heavy things carefully on top to press the parts together. The glue should be dry in about 6 hours.
NOTE: It's considerably easier and safer to do any woodworking processes to the parts before you assemble the boat. This way, you can safely clamp pieces to the work bench and cut out handle holes, etc. Since my boat is a "lapstrake" design, I had to route a rabbet (groove located on the edge) carefully on the bottom edge of each side panel. This creates a shoulder for the parts to sit on, positively locating them while you're stitching the panels together. Likewise, the grab handles in the transoms are much easier to cut out before putting the boat together.
Also keep in mind that any mistake will be considerably more painful the further you are along in the build. For example, if I biff cutting out the grab handle holes while they're just loose pieces rather than when they're a permanent part of the boat, it's much easier to recover - just make another transom. If you had to patch a hole in the boat, it would be difficult and possibly never look perfect. No pressure...
Step 2: Assembling the Hull...

Once you have the bottom and sides cut out, you can start to "stitch and glue" the hull together. This is a technique used usually for smaller boats to be able to pull the hull form together without the need to build a frame or mold (which can take almost as long and as much wood as the boat itself).
I built a gauge stick to make sure my holes were perfectly spaced at 4" at 1/2" in from the plywood edge. It was 1" wide so either edge was the required 1/2" from the centerline. I worked my way down one side of each of each mated seam and drilled all those holes at once while the panels could lay flat on the bench. Make sure to use a backer block to prevent tear out on the back side, even with such a small drill bit.
With one mating panel drilled with a 1/16" drill bit, hold the mating panel in it's relative position. I used some spare twine to wrangle my panels into the proper orientation as I was marking them. Make a pencil mark where the mating hole should be, remove the pre-drilled panel and drill the second set of holes 1/2" in from the edge. This makes sure there's enough strength to hold the boat together.
The first pass on the stitches is just to get the hull together structurally. You can always go back and make the stitches fancier/tighter and tweak the position of the panels.
The stitches go from the inside out. Cut 6" lengths of wire and bend them into long, narrow U's that are the width of the distance between the holes. Stick the ends through the holes and carefully twist the tails together on the outside of the hull, making sure not to damage the plywood. If you're using zip ties, then the holes you drill will need to be bigger and you'll have to start on the outside, go in, turn around, then back out, then "zip".
Make sure your panels' rabbet shoulders are resting securely on the mating panel and carefully tighten all the stitches. For my boat, once I had two panels stitched to the bottom panel on each side, it was time to attach the transoms (ends). Once all of the exterior parts are stitched together, you should have something that looks like a boat. It will be a little rickety at this stage, but that's okay.
NOTE: In the photos I took of my build, you'll notice that the transom doublers (reinforcers) aren't in place. That was because I was following the instruction manual, but I think that was a mistake, so I highly recommend laminating (gluing) the doublers to the transoms before you stitch the boat together.
Step 3: Reinforcing the Hull Joints...

Now that the hull is stitched together, flip it over upside down. You'll be surprised at how stiff it is, considering how difficult it was to wrangle all those panels into position. Be careful, there's lots of poky wire ends sticking out all over the place.
I used a technique called "tabbing", meaning I made small, structural tabs from thickened epoxy that fit between the stitches, then I removed the stitches and made one long, larger fillet to connect the hull panels together.
Make sure your panels are perfectly aligned and tightened. I used a nipper to lop off most of the tails so they wouldn't get in the way, but that left very sharp spikes.
Make sure your boat is square. Take diagonal measurements from corner to corner, make sure the boat parts are parallel to each other, etc. because if there's a twist in your boat, the next step will make it permanent, which will affect the boat's performance.
Now mix up a batch of epoxy and silica thickener according to the manufacturer's directions (meaning each type of epoxy has a different resin to hardener ratio) until it's between the consistency of thick ketchup, but runnier than peanut butter (make sure to mix the 2 parts of epoxy together first very well before adding a thickener). Too thick and it won't fill the void, too thin and it'll run down inside the boat. Both are bad. I used a small syringe to inject the mix into the V intersection between the panels and checked underneath/inside to see if there were any runs.
Once the epoxy has partially set, use a glove wet with denatured alcohol to smooth out the "tabs" so they fit inside the V groove and don't extend above the intersection between the panels. This will give you good practice for the seams that will show on the finished boat. Be careful of the wire spikes.
Repeat this process for every seam on the hull. Let it cure overnight.
Once the tabs have cured, carefully remove the stitches. If the wire seems to be epoxied permanently to the hull, heat the wire with a lighter. That will soften the epoxy enough to pull the wire out. Be careful not to scorch the boat (you don't want a Viking funeral). Now repeat the thickened epoxy process for each overlap, except this time each seam will need to be one long, smooth joint. Let it cure overnight. This goes a long way in making the boat hull structural.
Step 4: Fiberglassing the Hull...

Now that you've got a permanent hull shape, it's time to make it waterproof and rugged. Fiberglass and resin over plywood is a tried and true Do It Yourself boat building technique which makes it strong and light.
Mask off the bottom panel and roll out your fiberglass cloth. Smooth the cloth out very carefully so as not to snag or tweak the fibers' orientation. Mix up an unthickened batch of epoxy (it will be the consistency of syrup). Starting at the stern, pour a small puddle of epoxy and spread it out nice and thin. You should be able to squeeze most of the epoxy out of the cloth, leaving only saturated cloth with no dry spots (which will appear white) but the weave should still be showing (meaning no extra epoxy is pooling). You should easily be able to see the wood grain through the cloth now.
Let the epoxy partially cure and using a razor, slice the dry fiberglass cloth away on the taped seam. Then remove the masking tape. Let the epoxy cure overnight.
Flip the hull over and mix up a batch of epoxy that is the consistency of peanut butter. I masked off the joint, but this step is optional, but keep in mind that it will be visible if you plan on finishing the interior bright (varnished wood). It's not as critical if you're painting the interior. With a plastic spreader, carefully make a large radius transition (fillet) between the bottom panel and the first side panel (garboard). Remove the masking tape when the epoxy mixture is partially cured and carefully scrape/wipe any unwanted mixture. It's much easier to remove now than having to sand it all off later. At this point, it's also a good time to fillet the transoms to the sides using 3/4" radius tabs between stitches and 1" finished fillets after you've removed the stitches. Let the fillets cure overnight.
Now, repeat the entire fiberglassing process on the inside. Except instead of just doing the bottom panel, make sure both the bottom and the garboard are fiberglassed. This is basically the waterline of the boat. The fillet should allow the fiberglass cloth to smoothly make the bend between boards. Remove the excess cloth when partially cured and let sit overnight. Some people fiberglass up onto the transom at this stage which will make the boat stronger, but that means you have to have already filleted the transoms to the bottom.
Step 5: Installing Interior Parts...

The bulkheads get stitched in place just like the panels. They will make the already stiff (and much heavier boat) completely structurally sound and push/pull the sides into their final shape. Then make 3/4" "tab" fillets between the stitches to lock them in place, remove the stitches and make long, smooth 1" fillets. The smaller fillets will get covered by the larger fillets. I used two different modified plastic spreaders to do this step. Each spreader was cut with a box knife and filed/sanded into its final shape.
While you're doing the previous steps, if you're in a time crunch, go ahead and build the daggerboard trunk. It's made of numerous parts that are pre-coated with a couple layers of unthickened epoxy, then glued together with silica-thickened epoxy. This makes it strong and waterproof as it will be below the waterline so must be completely waterproof.
The daggerboard trunk is the most important part of the boat, especially if you're making a sailboat version (this boat can easily just be used as a rowboat). Not only does it support the center seat (thwart), but it has to transfer all of the force from the sail to the water and if you run the boat aground, it takes all the shock loading from the daggerboard.
The daggerboard gets filleted into place like everything else. Make sure it's perfectly on the centerline of the boat as that will affect its sailing characteristics.
Next, let's make the daggerboard slot in the center thwart. I set up a straight edge with a spiral upcutting router bit. Make sure to enlarge the slots at the end of the center thwart so that it can fit around the fillets of the center bulkhead. Now is the time to ease the edges of the center thwart because you'll be sitting on it a lot, so it needs to be comfortable. Because it's so thin, I only routed the top edge of the center thwart that shows and just hand sanded the edge underneath (it's very problematic to use a round-over bit on the second side of a thin board). Paint all of the thwarts with three coats of unthickened epoxy, especially the undersides. Once the woodworking is done, the thwart can be epoxied into place with peanut butter (or you can jump to cutting the daggerboard slot in the bottom of the hull). Make sure the thwart fits snugly in place. Drop dollops of peanut butter on the top edges of the center bulkhead and daggerboard case and spread it out evenly (make sure none gets inside the slot to interfere with the daggerboard). Firmly seat the thwart (pun intended) into the goop and weight it down. Let it cure overnight.
While you've making sawdust, cut out the mast hole (partner) in the forward thwart by drilling holes in the four corners (for the square mast we're going to make), then cut out the sides, file it smooth, then round over the top edge with the router.
Any time after the bulkhead thwart fillets have cured, you can seal the airtank chambers. Paint the bottom, sides, inside of the bulkhead and transom up to the level where the thwart will be.
Step 6: Rail & Sailboat Parts...

There are several processes in this boat building instructable that can be done concurrently. While you're waiting for the epoxy on one part to cure, you can be doing woodworking or epoxying another part. This step illustrates that point. While you're waiting for the epoxy on the rub rail (outwale) to cure, you can be fabricating the sailboat accessories (e.g. daggerboard, rudder, tiller, spars, etc.).
In order for the outwale to be thick/strong enough to be effective, you'll need to laminate it in two strips on each side. You can't bend a single piece that thick around the curvature of the hull without either breaking the wood or softening it by steaming it which is a complicated process.
Take a strip that's half the final thickness and a little longer than the boat edge (I made mine a bit beefier), mix up some peanut butter with the colloidal silica and carefully spread it on the inside of the strip. Starting at the stern, clamp it in place, perfectly align it with the top edge of the plywood. Now you have a long, springy lever to bend the wood strip along the compound curve. It dips both vertically (shear), and bows out at the widest part of the boat (beam), then back in toward the bow. At least every foot, clamp it as you go, moving forward. More is better. Toward the bow, the strip will get stiffer as it gets shorter. Once clamped in place, scrape/wipe off all the squeeze-out. It's much easier to remove now than after it hardens. Let it sit overnight. You'll have to repeat this three more times, meaning this step takes four days (if you're using "slow" epoxy hardener).
During those four days that you're dealing with the outwale, you can make major progress on the sailboat parts. They're completely separate from the hull. If you're just making a rowboat, then you can skip making these parts.
The daggerboard and rudder are cut out and laminated. Then a bevel is ground onto the leading and trailing edges to make it slice through the water more efficiently. Then they're covered in layers of epoxy. The mast step is assembled. This has to be very strong because all of the force of the sail is transmitted to the boat through the mast step and the mast is a very long lever arm. The rudder cheek plates and tiller also have to be assembled similarly to the daggerboard case.
NOTE: Whenever there's a hole to be drilled into any part of the boat, you must take additional steps to make sure the water doesn't penetrate and damage the wood. The correct procedure is to drill an over-sized hole, completely fill that hole with epoxy (I usually put a piece of masking tape on the back side to act as a dam), then once the epoxy cures, re-drill in the center of the epoxy plug the correct hole size. That makes each hole in the boat possibly a 2 day process, so plan accordingly. You can also use 5 minute epoxy to knock out a bunch of holes quickly, but be careful, they're not kidding. This stuff gets rock hard very quickly and will permanently glue anything touching. This is exactly how you drill the hole for the pivot point for the rudder/cheek plate assembly. If the pin is 1/4", then drill 1/2" hole and fill that with epoxy. Now the 1/4" hole will fit nicely in the center and be completely waterproof.
Since all the parts need several coats of unthickened epoxy and they just about all have holes in them, I hung them up with some twine and painted them on all sides, one layer at a time, for several days. Make sure the rudder doesn't get too thick to fit inside the cheek plates.
Step 7: Making the Spars...

More sailboat parts you can make while waiting for other parts to cure are the spars, the structural parts that support the sail. The mast is another glue up. I used 3 - 1x3's of hemlock. A relatively soft wood, but with a nice tight grain with no knots. A mast would break at a knot, regardless of how strong the wood is. Using the waterproof glue, align the pieces as perfectly as you can then clamp up the assembly and let dry overnight. Then run it through a table saw to get the final dimensions. Use a router and a round-over bit to ease the edges. Cut to length and sand the sharp corners. It should fit easily, but snugly into the forward thwart.
The boom (bottom of sail) is a little more complicated. Cut out the gooseneck (boom pivot point) by using a hole saw first, making sure to clamp it securely to the workbench, then cut out the profile. This gets attached to another piece of 1x3 hemlock, after it's been cut to length and the edges have been rounded over.
The yard (top of sail) is easy. Just cut to length and round over the edges. Drill and fill any holes in the spars at this time. You'll need at least one hole on each end to lash the sail grommets to.
This time, everything gets covered with several coats of varnish, epoxy is not necessary. The varnish protects the wood from water and UV damage.
The reason we had to make at least the mast at this point is because we'll need it in the next step to establish the location of the mast step.
Step 8: Finishing Up the Interior & Exterior...

Once the outwales are successfully attached, trim them flush with the face of the transom(s). While you're at it, use a flush cut saw (with no sawtooth offset to mar the wood) to trim the sides flush with the transom. This will show you how well your injected silica mix worked earlier. Now you're ready to install the mast step.
The mast step must be precisely located on the floor (sole) of the boat to give the mast the proper angle (rake). This is very important because it directly affects the boat's ability to sail upwind. Using your mast, insert it into the forward thwart (partner) and into the mast step. With the mast at a 3° angle (mostly vertical but with a small, yet noticeable and graceful tilt toward the stern of the boat), trace the location of the mast step. Use a combination square to make sure it's perfectly aligned side to side (athwartship). You can now set the mast aside. Drill and fill holes in the bottom of the boat so that you can securely screw the mast step from the outside of the hull. The mast base must also be epoxied to the sole with peanut butter. After it's screwed into place but before the epoxy cures, make sure to test fit the mast again and verify the rake angle is correct. It would be a little messy at this point if you had to tweak it, but at least you wouldn't have to cut it off.
Now comes the most unpleasant part of the whole build. On your hands and knees, make a 1" radius fillet on the underside of every part in the boat. I didn't worry about making these pretty, just structural and water tight (these create the flotation tanks that keep the boat from sinking if you capsize). Let that cure overnight.
Next is the scariest part of the build, making the slot in the hull for the daggerboard. Using a drill bit extension, from the inside of the boat, reach down through the daggerboard case and drill a hole at each end of the slot through the bottom of the boat (make sure to use a backer board). Drill a couple holes in between, then take a jigsaw and connect the dots. This weakens the hull enough so that the router won't tear out any extra wood. Note, this step can easily be done prior to affixing the center thwart. Using a flush trim/laminate router bit, let the bearing run around the inside of the daggerboard case. This will make the hole in the hull perfectly match the slot. This is important because you don't want a shoulder on the inside for the daggerboard to hit and you don't want to damage the waterproof lining of the case. Last, ease the sharp edge of the daggerboard slot with the router and a small radius round-over bit.
The skeg must be cut to fit the curve of the hull (rocker), then using silicone bronze screws, attach it to the hull using the same drill and fill/peanut butter techniques. Make sure to snap a chalk line on the centerline of the boat for reference. Then make a 1" fillet where it meets the hull which will support the skeg and make it strong. The skeg keeps the boat tracking straight in the water. I optionally used some fiberglass cloth to cover the skeg and overlap onto the bottom to make the entire assembly stronger and more waterproof. The skeg will take the brunt of the abuse when launching, beaching, loading and unloading, etc. I also installed a stainless steel rubstrake on the aft end of the skeg with this in mind. In wooden boat building, silicone bronze screws are often used because they won't corrode when encapsulated like stainless steel screws can.
Install the skids parallel to the skeg. These are solid pieces of hardwood because they will also take a lot of abuse when the boat is sitting on shore, protecting the thin hull from rocks, etc. They get installed the same way as the skeg, although it's a little tough to bend the wood along the rocker. Scrape off the excess peanut butter once they're screwed in place.
I also installed the optional outboard motor pad at this point because I plan to use an electric trolling motor on the back to quietly putter around the lake in the evenings to relax with the family after work.
That should be the last parts that go into making the boat!
Step 9: Finishing the Hull...

Now comes the last dash to the finish line. One of the more tedious steps is that you now have to sand the entire boat. I actually built the entire boat inside, but for the sanding stage, I took her outside. Several hours of sanding all of the fillets nice and smooth. Everything will show in the finished product whether you paint the boat or leave it "bright" (unpainted). If you've been careful about cleaning up the peanut butter as you go, you should be able to sand the boat with mostly 220 grit. Be careful not to sand through the thin veneer of the plywood. After the sanding is done (make sure to use a dust mask), vacuum the entire boat and then wipe it down with a tack cloth to remove any dust. I also reversed the hose on the shop vac and used it to blow the sawdust off since I was outside.
Next, you must coat the entire interior and exterior with 3-4 coats of unthickened epoxy. This makes the entire boat waterproof. It will also give you an idea of how beautiful the wood will look when varnished. This is why a lot of boat builders decide to leave their boats bright so the beauty of the wood shows through.
Mix up 1 cup batches of unthickened epoxy and pour out large puddles onto the surface. Taking a foam roller, distribute the epoxy in a smooth coat. Now take a wide foam brush and gently smooth (tip) the rolled out surface. This should remove any lap marks or bubbles. Move along to the next area, making sure to not touch the wet parts. Also, make sure no dust or bugs get on your finish or it'll mean even more sanding later.
Start with the exterior first. It'll be much easier to get good by practicing on the convex surfaces. The interior is more tricky because you want to prevent sags and pooling by only applying very thin coats.
Make sure to check with the manufacturer's directions during this step in case you have to deal with "blushing", a thin layer that can sometimes form on the surface of epoxy when it cures. This could cause your layers to not stick to each other. If your epoxy does blush, it's easy to just wipe the entire boat down with a rag soaked in acetone after each coat has cured. Some people sand between coats of epoxy. This is how you would make an extremely smooth/shiny finish, so if you want your boat to be museum quality, invest the effort. I'm planning on banging my boat around so opted out of an extreme, fancy, mirror finish.
I was originally going to paint the exterior of the hull, which would require priming and painting, but I'm leaving it bright for the time being. The good news is that you can always paint later if you change your mind, but if you paint it and change your mind, it's tough to go back. There aren't a lot of pics of this step, which took a couple of days because there wasn't much visible progress after that first coat went on. At this point, any surface that's not painted should be varnished using the same "roll and tip" method as the epoxy, with the optional sanding between coats. Note that epoxy has no UV resistance, so to keep your boat from getting sunburned, you must either paint or varnish every surface. Giving a boat a "museum quality" paint and/or varnish finish can literally take as long as building the boat.
Step 10: Making the Sail...

Another step you can do while other parts are curing is make the sail. This particular design uses a "lug" sail, a classic looking sail for small boats with wood masts. It increases the sail area (therefore the force generated by the wind) without it having to be as tall as a modern sailboat mast made of aluminum. There is a kit from an online sailmaking company that you can get for a reasonable price. The Dacron cloth panels are all cut out by a CNC machine, so they fit perfectly together. I used a regular, domestic sewing machine, not an industrial one. The only time I had trouble was when sewing through all 7 layers at the reinforcement patches. When I got to those parts, I had to manually push down on the foot of the sewing machine with a flat-bladed screwdriver (minus) to help push the needle through the Dacron. We jokingly call Philips head screwdrivers "plus".
The panels/parts all come labeled. The directions were a bit confusing because they suggest you make sub-assemblies after the fact to make wrangling the large sail easier but they mention it after you've already sewn the large panels together. It's important to understand what parts go together while the panels are still small and more manageable. For example, the batten pockets are tricky enough to build on a single panel, much less the finished sail. Building the sail was about as difficult for me as building the boat, but it was worth it.
The lug sail gets reinforcement patches on all four corners where you attach it to the spars (bend), and there's also a reefing point for when the wind starts to pick up (freshen). Modern sails have three corners (Marconi rig).
I opted for the less expensive white Dacron sail kit, but there's also a classic red (tanbark) colored kit that's $100 more expensive. Before I sewed a single stitch, I carefully traced every part of the sail kit onto painter's tarp poly film so I can always use the templates to build another sail, all I need to do is buy the tanbark cloth.
Step 11: Rigging Your Sailboat...

This seems to be the trickiest part for most people, probably because there are numerous ways it can be successfully rigged, depending on your experience, preferences or criteria. It's confusing because you have to know what the finished setup will look like in your mind while you're staring at a pile of ropes. I chose a setup that allows the most room in the cockpit for a full-sized adult, so the mainsheet is led forward of the skipper's position. This keeps the skipper's attention forward so they're looking where they're going. I have another boat where the mainsheet is behind the skipper and it takes some practice getting used to.
The lines I made up (rope becomes a line when you give it a job description) were the halyard (hauls the sail up), the mainsheet (adjusts the angle of the sail to the wind = trim) and a traveler bridle (where the mainsheet attaches to the boat). I got fancy and spliced all my ends, but you can just as well use a bowline knot.
I installed a cheek block at the top of the mast instead of the large diameter hole in the directions. I wanted the halyard to run as smoothly as possible when setting the sail. Then I installed a pair of cleats at the base of the mast, one for the halyard and one for the downhaul (cunningham). With both of these lines pulling in opposite directions, it locks the sail in place, flat, so it effectivley acts like a wing. The main halyard attaches to the gaff with a snap onto a padeye. This allows easy on/easy off when rigging at the boat ramp. I also used a small loop (parrel) around the mast and through the eye to keep the gaff located close to the mast. I looped the downhaul over the boom and down to the cleat to try to keep the gooseneck from twisting. Note, except for the blocks, just about all of the hardware used on rigging a boat this size can come in stainless steel or brass/bronze, depending on the look you're going for. If you plan on installing oarlocks to row the boat, this decision becomes even more important to the final look of the boat.
For the mainsheet, I made a short bridle between the handles on the transom with a small eye tied in the center. This allows a place for the snap on the end of the mainsheet to attach to. I could've just as easily allowed the snap to slide, which would give the bridle the function of a traveler, but would affect its pointing ability (sail upwind). The mainsheet is then run to a block on the end of the boom, then to another block in the middle of the boom. This leaves the main cockpit area unobstructed with running rigging. Make sure your mainsheet is long enough for your boom to swing forward of 90° to the boat, with enough to still come back to the cockpit for the skipper to control. A stop knot at the end of the mainsheet will keep the mainsheet from getting away from you and give you something to grip.
The rudder pivot hardware (gudgeons and pintles) must be installed perfectly vertical and on the exact centerline of the boat so that she will sail well. Drill and fill the necessary holes for this hardware. Be careful with the spacing. It's designed to be easily installed and uninstalled while underway.
With this particular rigging layout, when under sail, the skipper must constantly keep the mainsheet in hand, which is a good idea anyway for safety reasons (if you get hit by a gust of wind = puff, you won't get blown over = capsize). The tension on the mainsheet is easily manageable for any size skipper. On larger boats, the mainsheet is held by a fiddle block with a cam cleat, which is not necessary for a boat this size. With that being said, a possible future upgrade would be to install a block and a camcleat somewhere on the centerline of the boat so that more advanced sailors wouldn't need to constantly have to oppose the tension on the mainsheet. Of course the trade-off would be the hardware would probably be somewhere you might want to sit.
Another upgrade I figured out after actually taking her sailing would be to rig up a bungee/shock cord system that will hold the daggerboard both in an up and down position. With the current setup, the centerboard is held down by gravity and must be pulled out of the slot when beaching.
Step 12: Go SAILING!

Because I wanted to be able to go sailing by myself if needed, I made a dolly out of 2x4's and large pneumatic tires (which makes the dolly float). The dolly fits securely between the center and aft thwarts when driving out to the lake. The sides on the dolly lock against the skids on the bottom of the boat so it can't twist. Roll the sail up with the spars and wrap it with the main halyard. At the designed length, the mast doesn't fit inside the boat, but it seems a bit long, so some people have cut the mast down enough so that it fits inside the boat.
Out at the lake, unload the boat, slide the dolly underneath and you're ready to roll down to the ramp. At the launch, roll the boat out into the water until it floats off the dolly, toss the dolly off to the side out of everybody else's way. Drop the daggerboard into the slot and install the rudder assembly. Facing into the wind (important), stick the mast into the receiver hole (partner), tie off the downhaul (cunningham) and hoist the sail until the downhaul is tight, then cleat off the main halyard. Reave the mainsheet (run the line through the blocks) and you're ready to go sailing.
I've found that this boat sails very well. The lug sail makes it very easy to sail upwind (weather helm), it's a little more tender for a large adult, more so than a boat with a hard chine, like an El Toro/Optimist but it's a lot more graceful looking. The payload is very reasonable for a boat this size. My wife and son can easily (and safely) go sailing with me and I don't even need anyone's help to get it rigged and launched. All in all, this is one of the best projects I've every built. I hope you too can discover the joy of building your own boat and then take her sailing. Remember, in sailing, the wind is free, but nothing else is...
This is my very first Instructable after many years of referencing this excellent site to build numerous cool projects (you should see my next post). Anyway, I hope you enjoy it and please feel free to ask any questions you may have and I'll do my best to answer them. I'm planning on building a larger boat in the near future so stay tuned...

Participated in the On a Budget Contest

Participated in the Wood Contest
Recommendations

Engineering in the Kitchen - Autodesk Design & Make - Student Contest

Make it Resilient

Made with AI - Autodesk Design & Make - Student Contest


What Is A Sailboat Mast?
A sailboat mast is one of the most defining features of a sailboat (along with the sails of course!) You can immediately tell that a boat is a sailing boat when you spot the tall mast sticking out of the hull.
But why do sailboats need a mast? Having lived on a sailboat for years now I’ve never really questioned the need for a mast. It’s such an integral part of the boat that I just sort of forget it’s there!
When our friends recently lost their mast due to a rigging failure it got me thinking – why do sailboats need a mast and what function (aside from holding up the sails) do they actually play. It turns out, quite a lot!
We’re going to dive into the fascinating world of sailboat masts, exploring different rigs, mast materials, and the different functions that masts play. It’s important stuff if you want to go sailing, and a lot of it I should have known sooner!

As an Amazon Associate, we earn from qualifying purchases. We also earn from other affiliate programs. This means we may receive a small commission on products purchased through our links at no extra cost to you.
Table of Contents
Why do sailboats need a mast, parts of the mast, what materials are masts made from, single mast rigs, sailboats with two masts, sailboats with three masts, how to look after your mast.

A sailboat mast is a vertical, upright structure that supports the sails of a sailboat. It is a crucial component of the boat’s rigging system and plays a key role in harnessing the power of the wind to propel the vessel. Typically located in the center of the boat, the mast extends upward from the deck or hull.
The height of the mast varies depending on the size and type of the sailboat, directly impacting the sail area and overall performance of the boat.
Together with the boom (a horizontal spar attached to the bottom of the mast), the mast allows sailors to control the shape and orientation of the sails, optimizing their efficiency in different wind conditions.
The design and configuration of the mast can vary depending on the type of sailboat, such as a sloop, cutter, ketch, or schooner.
Sailboats require a mast primarily to support the sails.
It holds the sails in an elevated position, allowing them to catch the wind effectively. Without a mast, the sails would lack the means to be raised and positioned to harness the power of the wind.
There are a few other important jobs that the mast plays:
Control and Manipulation of Sails: The mast, along with the boom (a horizontal spar attached to the mast’s lower end), enables sailors to control and manipulate the sails.
By adjusting the angle and tension of the sails through the mast, sailors can optimize their performance according to wind conditions and desired boat speed.
This control allows for maneuverability and efficient use of wind power.
Structural Integrity: The mast contributes to the overall structural integrity of the sailboat. It helps distribute the loads and forces exerted by the sails, rigging, and masthead components throughout the boat’s hull and keel.
The mast’s design and construction ensure stability and strength, allowing the boat to withstand the forces generated by the wind.
Attachment Points for Rigging: The mast provides attachment points for various rigging components, including halyards (lines used to raise and lower the sails), stays (wires or rods that support the mast in different directions), and shrouds (wires that provide lateral support to the mast).
These rigging elements are essential for properly tensioning the sails and maintaining the mast’s stability.
Height and Visibility: The mast’s height contributes to the sailboat’s visibility, allowing other vessels to spot it more easily, particularly when sailing in congested waters. The mast’s presence also serves as a visual reference for determining the boat’s position, orientation, and distance from potential hazards.
While the mast’s primary purpose is to support the sails and enable control over their position, it also plays a significant role in maintaining the structural integrity of the sailboat and enhancing its visibility on the water.
Basically, the mast is pretty darn important!

Along with a million other confusing sailboat terms , the mast has lots of different parts too. A sailboat mast consists of several distinct parts, each serving a specific function. Here are the different parts commonly found on a sailboat mast:
- Masthead: The masthead is the topmost section of the mast. It often includes attachment points for various components such as halyards (lines used to raise and lower the sails), the forestay (the wire or rod that supports the front of the mast), and other rigging elements. The masthead may also house instruments like wind vanes or antennas.
- Spreaders: Spreaders are horizontal bars attached to the mast, typically positioned at specific intervals along its length. They help support the rigging wires and prevent excessive sideways bending of the mast. The position and angle of the spreaders contribute to the proper alignment and tension of the rigging.
- Shrouds: Shrouds are the wires or cables that provide lateral support to the mast. They connect the mast to the sides of the boat, helping to stabilize the mast and distribute the loads generated by the sails. Shrouds are typically tensioned using turnbuckles or other adjustable fittings.
- Backstay: The backstay is a cable or wire that provides support to the rear of the mast. It helps counterbalance the forces exerted by the forestay and the mainsail, preventing the mast from excessively bending forward. Adjustable backstays allow for tuning the mast’s rigidity based on wind conditions and sail trim.
- Halyard Sheaves: Halyard sheaves are small wheels or pulleys located at the masthead or lower down the mast. They guide halyards, which are lines used to raise and lower the sails. Halyard sheaves minimize friction, allowing smooth and efficient hoisting or lowering of the sails.
- Gooseneck: The gooseneck is a fitting that connects the boom to the mast. It allows the boom to pivot or rotate horizontally, enabling control over the angle and position of the mainsail. The gooseneck may include a pin or other locking mechanism to secure the boom to the mast.
- Mast Step: The mast step is the base or fitting where the mast rests and is secured to the deck or hull of the sailboat. It provides stability and distributes the loads from the mast to the boat’s structure.
These are some of the primary parts found on a sailboat mast. The specific configuration and additional components may vary depending on the sailboat’s design, rigging system, and intended use.

I was surprised to learn that sailboat masts are commonly made from several different materials, each offering its own advantages in terms of strength, weight, and flexibility.
The choice of material depends on various factors, including the type and size of the sailboat, desired performance characteristics, and budget.
Here are some of the materials used for sailboat mast construction:
Aluminum is a popular choice for sailboat masts due to its favorable combination of strength, lightweight, and corrosion resistance. Aluminum masts are relatively easy to manufacture, making them cost-effective. They offer good stiffness, enabling efficient power transfer from the sails to the boat.
Carbon Fiber
Carbon fiber has gained significant popularity in sailboat mast construction, especially in high-performance and racing sailboats. You’ll see black carbon fibre masts on fancy sailboats!
Carbon fiber masts are exceptionally lightweight, providing excellent stiffness-to-weight ratios. This allows for enhanced responsiveness, improved performance, and reduced heeling (tilting) of the boat.
Carbon fiber masts can be precisely engineered to optimize flex patterns and provide targeted strength where needed.
Traditional sailboats, particularly those with a classic or vintage design, may have masts made from wood. Wood offers an aesthetically pleasing and traditional look.
Wooden masts can be constructed using solid wood or laminated techniques, which involve layering thin strips of wood for added strength and stability. Wood masts require regular maintenance, including varnishing and sealing to protect against moisture.
In some cases, steel may be used for sailboat masts, especially in larger vessels or those designed for specific purposes, such as offshore cruising or heavy-duty applications.
Steel masts offer robustness and durability, but they are heavier compared to other materials. They require adequate corrosion protection to prevent rusting.
Composite Materials
Sailboat masts can also be constructed using composite materials, such as fiberglass or fiberglass-reinforced plastics. These materials provide a balance between cost, weight, and strength. Fiberglass masts can be an option for recreational sailboats or those on a tighter budget.
It’s worth noting that advancements in materials and manufacturing techniques continually evolve, introducing new possibilities for sailboat mast construction.
The choice of mast material should consider factors such as boat type, intended use, performance requirements, and personal preferences, balanced with considerations of cost and maintenance.
Different Types Of Masts

There are several different types of masts used in sailboat designs, each with its own characteristics and purposes.
We’ve included how the masts are fixed on the boat. This one is an important one when buying a sailboat as you might have a preference over how your mast is attached to the hull or deck.
We’ve also included different rigs, as some boats have just a single mast and other sailboats will have two or more masts. Again, you might have a preference as to which rig set up you prefer so it’s worth knowing the pros and cons of each.
Keel-stepped Mast
A keel-stepped mast is one that extends down through the deck and is secured to the boat’s keel or structural framework. Keel-stepped masts offer stability and strength, as they transfer the loads directly to the boat’s foundation.
They are commonly found in larger sailboats and offshore cruising vessels. We loved knowing our deck was secured to one of the strongest parts of the boat.
It does come with some problems though, like the fact it can leak and start raining in the boat! A decent mast boot will stop this.
Deck-stepped Mast
A deck-stepped mast rests on a step or fitting on the deck, rather than extending down through it. Deck-stepped masts are typically used in smaller sailboats and are more straightforward to install, maintain, and unstep.
They are often lighter and less expensive than keel-stepped masts but may sacrifice some stability and rigidity.
Fractional Rig
A fractional rig features a mast where the forestay is attached below the masthead, typically at a point less than halfway up the mast’s height. This design allows for a larger headsail and a smaller mainsail.
Fractional rigs are popular on modern cruising and racing sailboats as they offer versatility, easy sail control, and improved performance in various wind conditions.
Masthead Rig
In a masthead rig, the forestay attaches at the top of the masthead. This design is commonly found in traditional sailboats. Masthead rigs typically feature larger headsails and smaller mainsails. They are known for their simplicity, easy balance, and suitability for cruising and downwind sailing.
There are various different rig set ups that just have one single mast. We’ll look at a few of the most popular types, but be aware that there are quite a few variations out there these days! It can get a little complicated!
The sloop rig is one of the most popular and widely used single mast rigs. It consists of a single mast with a mainsail and a headsail. The headsail, typically a jib or genoa, is attached to the forestay at the bow of the boat, while the mainsail is attached to the mast and boom.
Sloops offer simplicity, versatility, and ease of handling, making them suitable for a wide range of sailboats, from small day-sailers to larger cruising vessels.
A cutter rig utilizes two jibs : a smaller headsail attached to the forestay and a larger headsail called a staysail attached to an inner stay or a removable stay.
The mainsail is usually smaller in a cutter rig. This rig provides versatility and options for different sail combinations, making it suitable for offshore cruising and handling various wind conditions.
We absolutely loved our cutter rig as it gave so much flexibility, especially in heavy weather. A downside is that tacking is a little harder, as you have to pull the genoa past the stay sail.
Sailboats with two masts tend to be seen on older boats, but they are still popular and quite common, especially with long-distance sailors looking for versatility.
The yawl rig features two masts, with a shorter mizzen mast positioned aft of the main mast and rudder stock. The mizzen mast is usually shorter than the main mast.
Yawls offer versatility, improved balance, and increased maneuverability, making them suitable for offshore cruising and long-distance sailing.
A ketch rig has two masts: a taller main mast located near the boat’s center and a shorter mizzen mast positioned aft of the main mast but forward of the rudder stock. The mizzen mast is typically shorter than the main mast.
Ketch rigs provide additional sail area and options for sail combinations, offering good balance and flexibility for cruising and long-distance sailing. A lot of long-term cruisers love ketch rigs, though they tend to be found on older boats.
The downside is that you’ll have two masts with accompanying rigging to maintain, which isn’t necessarily a small job.
Sailboats with three masts or more are rare. They tend to be seen only on very large, expensive sailing yachts due to the additional expense of maintaining three masts, rigging and additional sails.
They aren’t great for single-handed crews but they do look very impressive and can power bigger vessels.
Schooner Rig
A schooner rig features two or more masts, with the aft mast (known as the mizzen mast) being taller than the forward mast(s).
Schooners are known for their multiple headsails and often have a gaff-rigged or square-rigged configuration on one or both masts. Schooner rigs offer impressive sail area, versatility, and classic aesthetics.
Schooner rigs are much rarer than the rigs mentioned above so it’s unlikely you’ll find one on a cruising vessel.
These are just a few examples of the different types of masts used in sailboat designs. Each rig type has its own advantages and considerations in terms of sail control, performance, balance, and intended use.
The choice of mast and rig depends on factors such as boat size, purpose, sailing conditions, and personal preferences.

We didn’t know the first thing about looking after our mast when we first moved aboard and we made it our mission to find out. When you’re sailing frequently then the last thing you want is to experience a mast coming down mid-passage!
Taking proper care of your sailboat mast is important to ensure its longevity and optimal performance. Here are some tips on how to look after your mast:
- Regular Inspections: Conduct regular visual inspections of your mast to check for any signs of damage, wear, or corrosion. Look for cracks, dents, loose fittings, or any other issues that may compromise the mast’s integrity.
- Cleaning: Keep your mast clean by regularly washing it with fresh water. Remove dirt, salt, and other contaminants that can accelerate corrosion. Use a mild detergent or boat-specific cleaner, and rinse thoroughly.
- Corrosion Prevention: Protect your mast from corrosion by applying a suitable corrosion inhibitor or protective coating. Pay particular attention to areas where fittings, rigging, or other components come into contact with the mast.
- Lubrication: Lubricate moving parts such as sheaves, shackles, and slides with a marine-grade lubricant. This helps prevent friction and ensures smooth operation. Be cautious not to over-lubricate, as excess lubricant can attract dirt and debris.
- Rigging Maintenance: Inspect your rigging regularly for signs of wear, such as broken strands, fraying, or excessive stretching. Replace any worn or damaged rigging promptly to avoid potential mast damage.
- UV Protection: The sun’s UV rays can degrade and weaken the mast over time. Protect your mast from UV damage by applying a UV-resistant coating or using mast covers when the boat is not in use.
- Storage Considerations: If you need to store your boat for an extended period, consider removing the mast and storing it horizontally or in a mast-up position, depending on the boat design. Store the mast in a clean, dry, and well-ventilated area to prevent moisture buildup and potential damage.
- Professional Inspections: Periodically have your mast inspected by a professional rigger or boatyard to assess its condition and identify any potential issues that may require attention. They can provide expert advice on maintenance and repair.
Remember, if you are unsure about any maintenance or repair tasks, it’s always recommended to consult with a professional rigger or boatyard to ensure proper care and safety of your mast.
We learned so much from having our rigging inspected, so we highly recommend you do this if you’re at all unsure.
Conclusion: What Is A Sailboat Mast?
In conclusion, a sailboat mast is a crucial component that plays a vital role in the performance, control, and integrity of a sailboat. It’s a good idea to learn about sailboats before you head out on a sail – unlike us!
The mast serves as a vertical structure that supports the sails, allowing them to capture the power of the wind effectively. The mast enables sailors to control and manipulate the position of the sails, optimizing performance based on wind conditions.
Additionally, the mast contributes to the overall structural integrity of the boat, distributing loads and forces throughout the hull and keel. Various rigging components, such as halyards, shrouds, and spreaders, are attached to the mast, providing support and enabling precise sail control.
By understanding the importance of the mast and properly caring for it through regular inspections, cleaning, corrosion prevention, lubrication, and rigging maintenance, sailors can ensure their mast’s longevity and optimal performance.
A well-maintained sailboat mast contributes to a safe, enjoyable, and successful sailing experience.
- How much do new sails cost?
- How long do new sails last?
- Storm sails
Similar Posts

The Best Shallow Draft Liveaboard Sailboat 2024

Lateen Sails – What Are They And Why Are They Important?

The Best Books On Sailing For Beginners

How Dangerous Is Sailing? The Truth About Dangers At Sea

Bottom Paint For Boats: Your Options 2024

How To Make Cheap Fender Covers
Sailboat Mast: Everything You Need To Know
Anyone who loves sails and boating needs to know their sailing boat from the inside out. If you are new to the sport, then you are probably wondering about things like a sailboat mast and everything around it.
In this article, we have everything you need to know about a sailboat mast, like what it is, its different types, as well as the material it is made of.
All you have to do is keep reading below to find it all out!
What Is A Sailboat Mast?
A sailboat mast is a tall pole that is attached to the deck. It helps secure the sail’s length to the boat and upholds the sail’s structure.
A sailboat mast is the most defining characteristic of a sailboat, helping keep the sail in place. What’s amazing about it is that it can even be taller than the vessel’s length!
Although conventional sailboats use wood, the majority of the newer sailboat masts are constructed of aluminum. The kind of sailboat mast a vessel has depends on the kind of sail plan supported.
What Are The Parts Of A Sailboat Mast?
The sailing mast is essentially a pole that cannot operate effectively without certain critical components.
Moving from the deck to the rest of the sailboat, we can first see the mast boot, which prevents the water from draining down the mast and flooding the cabin.
The stays are the long cords hooked up on each side of the mast, and they hold the mast up off the ground under massive force.
A gooseneck pipe fitting joins the boom to the mast. The sail is raised and lowered using halyard lines that go to the mast’s highest point.
Types Of Sailboat Masts
Rigs with one mast.
Many people that are not aware of the modern sailboat design envision single-mast sailboats.
The reason why this type of sailboat is so widely known is that these masts are low-cost to construct and fairly simple to operate alone.
Sloops, cutters, and catboats are among the most popular rigs with only one mast.
Sloop Masts
Nowadays, sloop rig vessels are the most popular type of sailing boat. Sloops typically have only one mast positioned somewhere on the front third or the middle of the deck, even though some boat models might vary a bit.
A sloop mast is equipped with a big mainsail and a jib sail (see also ‘ Why Are Sails Made In A Triangular Shape? ‘). A Bermuda-rigged sloop has only one towering mast and a triangle-shaped sail. Other not-so-popular gaff-rigged sloops have a significantly smaller mast and bigger 4-point mainsails.
Catboat Masts
Catboats are distinctive New England boats that have a forward-mounted standard mast and a long boom. A catboat, unlike a sloop-rigged boat, is only equipped with one sail.
It is also typically mounted (more or less) right in front of the boat, and it is commonly short and relatively thick.
Catboats are frequently gaff-rigged. In a single-mast design, gaff-rigged sail designs (see also ‘ The Definition And History Of The Lateen (Triangular) Sail ‘) succeed in making the most out of short masts and are relatively simple to maneuver.
The mast of gaff-rigged catboats is shorter than that of a Bermuda-rigged boat of comparable size, but it is typically taller than that of comparable gaff-rigged crafts.
Cutter Mast
A cutter-rigged sailboat has only one towering mast and several headsails, which is why it can be mistaken for sloops when seen from afar.
However, because cutters use numerous headsails rather than one standard jib (see also ‘ Everything You Need To Know About Sailboat Jibs ‘), their masts are typically taller than those of comparable-sized sloops.
In several places, a gaff-rigged cutter is far more usual than a gaff-rigged sloop. Even at times when its sails are folded, a cutter can be distinguished from a sloop.
This is due to the fact that cutters frequently have a protracted bowsprit and two front stays; the forestay and the jib stay.
Rigs With Multiple Masts
Multi-mast sailboats (see also ‘ Small Sailboats: What Are They Called? ‘) are not as popular as single-mast sailboats. That is why the design and structure of a multi-mast boat usually make it classier and more navigable.
A multi-mast boat provides more than simply great looks. It also provides speed and efficient control for skilled seamen.
Most of these boats have two masts, which seem to be frequently smaller than the masts on comparable-sized single-mast crafts. Yawl, ketch, as well as schooner rigs, are among the most popular types.
Yawls are sturdy multi-mast boats whose length ranges from 20 to more than 50 ft. A yawl has a lengthy forward main mast and a small mizzen mast at the back of the vessel. This type is also frequently gaff-rigged and was previously used as a utility boat.
A yawl-rigged boat can also self-steer by using the mizzen mast and sail. The yawl can be distinguished from many other double-mast vessels by its short mizzen mast, which is frequently half the size of the main mast.
Furthermore, the mizzen mast is located toward the back of the rudder post.
Ketch Masts
Ketch masts can be mistaken for yawls with a quick look. However, ketch masts are equipped with two masts of comparable size and a significantly bigger mizzen mast. A ketch boat’s mizzen mast is located at the front of the rudder post.
Ketch-rigged vessels are frequently gaff-rigged, with topsails on each one of their masts. Triangle-shaped sailplanes on some ketch-rigged vessels prevent the necessity for a topsail.
Ketch masts, much like the yawl ones, have a headsail, a mainsail, and a mizzen sail that are similar in size to the mainsail. Finally, a ketch-rigged vessel can sail while handling more than one rear sail.
Schooner Masts
Schooners are some of the most beautiful multi-mast sailboats. They are clearly more similar to ketches than yawls. However, if you closely look at a schooner, you will see that it will feature a smaller foremast and a longer (or nearly equal-sized) mast behind it.
Schooner masts are large and heavy, but they are generally shorter than single-mast vessels of comparable size.
This is due to the fact that double-masted vessels share the sail plan over 2 masts and do not require the additional length to compensate for the reduced sail space.
Finally, they are typically gaff-rigged, with topsails and topmasts that expand the mast’s length.
Masts Of Tall Ships
Tall ships are those traditional large cruising ships that ruled the seas well before age of steam. Renowned ships with this massive and intricate rig setup include the U.S.S Constitution as well as the H.M.S. Victory.
Tall ships have 3 or more massive masts that are frequently constructed using big tree trunks. Tall ships with 5 or more masts are quite common too.
Tall ships typically are as long as 100 feet or more, since the size and sophistication of these square-rigged vessels render them only useful at scale.
Tall ships have main masts, foremasts, mizzen masts, and gaff-rigged jigger masts at the back of their mizzen masts.

Mast Materials For Sailboats
The masts of sailboats (see also ‘ Two-Mast Sailboat Types ‘) are typically constructed of aluminum or other specific types of wood. Until the 1950s, almost all sailboat masts were constructed of wood.
That began changing around the time that fiberglass vessels rose to fame, with aluminum being now the most used mast material.
Aluminum Masts For Sailboats
Aluminum has become the most popular modern mast material. Aluminum masts are lighter in weight, hollow, and simple to produce. Such reasonably priced masts efficiently withstand seawater. These masts are also heavy for their size.
If there is one drawback to this type of mast that would be galvanic corrosion, which happens extremely quickly once seawater is in contact with aluminum and another metal, like steel and copper.
So, in types like the Bermuda-rigged sloop which are frequently made with aluminum, that is an issue.
Wooden Masts For Sailboats
The typical material for sailboat masts is wood, which is still employed for many specially designed boats nowadays.
Wood masts are big and bulky, yet very sturdy, and proper maintenance can guarantee their lengthy (over 100 years!) lifespan. They are also prevalent on gaff-rigged vessels because wood is best suited for short masts.
The Fir family provides the most popular mast wood. Although Douglas Fir is widely used, regional models (such as British, Columbian, and Yellow Fir) are also ideal.
Several sailboats, especially the tall ships, have masts made of pine and sometimes redwood. Other cedar species like the Port Orford or the Oregon cedar, can also be used for masts and spars.
Carbon Fiber Masts For Sailboats
Carbon fiber masts are a relatively new addition to the boatbuilding industry, and they have a few perks over the wood and aluminum ones.
First of all, carbon fiber is both strong and light, making it perfect for sailboats designed for races and which typically have tall masts. The best top-quality carbon fiber masts in the business are used by ships competing in America’s Cup races.
Maintenance Of Masts
It is critical to maintaining the sailboat masts and all of their associated hardware. Masts’ stays, lines, and halyards must be regularly checked, modified, and replaced on a regular basis. Masts made of wood must be lacquered and inspected for rot.
Masts made of aluminum do not typically require regular checks and maintenance, but any indications of a corrosive environment should be acted upon right away.
Build a clear maintenance schedule with your regional boat repairman or boating specialist. Keep in mind that preventative maintenance is always less expensive and simpler than repair work.
Choosing The Right Mast
For those who own a production boat, the options will be determined by the model and manufacturer.
The important factors to keep in mind for one-off boats without a designer sail plan are:
- the masts step’s features
- the length and displacement of the boat
- the addition of backstays and running backstays
- the quantity and placement of chainplates
If the mast is on a step on deck rather than on the structural beam, an image of the step may be useful to the mast maker.
For those who frequently take part in races, a carbon mast will save them from the extra weight and enhance their performance.
The Bottom Line
We hope that this article was helpful in learning more about a sailboat mast, the different types of mast you can see on vessels, as well as the materials they are made of, and their maintenance requirements.
Masts play a vital role in holding the boats in place, allowing people to keep on sailing to their dream destination, and they are also an eye-catching element of sailboats thanks to their vertical form and their length that often surpasses that of the sailboat itself.
Depending on the use of the boat, you will get a different type of mast, and the material it will be made of, its size, height, and weight, will guarantee the best sailing experience!
Related Posts:

- Sign In or Register
- Boats for Sale
- Research Boats
- Sell a Boat
- Search Alerts
- My Listings
- Account Settings
- Dealer Advertising
- Wooden Sailboat Mast
Wooden Sailboat Mast Boats for sale

Miami Beach, Florida
Make Beneteau
Posted Over 1 Month
ngine hours (total): 500 length overall (LOA): 39 make / manufacturer: Beneteau propulsion type: sail year manufactured: 1991 length overall (LOA): 39 make / manufacturer: 1991 Beneteau Oceanis 390 propulsion type: sail year manufactured: 1991 Beneteau oceanis 390 owners version building 1991 powered by Universal diesel very good and clean boatThe BENETEAU Oceanis 390 (39')Owner's Version (Special Layout Design) is the two cabin layout, two head arrangement with separate walk in shower, A large L-Shaped sofa and large folding teak table, galley is to starboard entering from the cockpit, there is also a starboard entrance to the aft cabin, there is a large double berth, a sit down navigation station then aft a head, the main salon is very light and features center line teak table drop-leaf with L-shaped convertible settee at starboard, going forward the head is also starboard with hanging locker to port. The spacious salon is large enough for everyone. Boats for Sale Search YachtWorld United States (change) 1991 Beneteau Oceanis 390 Owners Version Boat Name NOBLE AMBITIONS Specs Builder: Beneteau Dimensions LOA: 39 ft 0 in Beam: 13 ft 5 in LWL: 36 ft 8 in Maximum Draft: 4 ft 6 in Bridge Clearance: 54 ft 5 in Engines Engine 1: Engine Brand: Universal Year Built: 1991 Engine Model: 3m20 Engine/Fuel Type: Diesel Engine Hours: 568 Tanks Fresh Water Tanks: (40 Gallons) Fuel Tanks: (45 Gallons) Holding Tanks: (1 Gallons) Accommodations Number of twin berths: 2 Number of cabins: 2 Number of heads: 2 Layout & Accommodations Salon: Headroom: 6'5 Lockers under berths with rigid water tank (40 gal.) Table with fiddlers, bottle rack Anodized aluminum mast support Deck liner with wooden panels, access to mast wires, sliding shutters Opening deck hatch Opening port in coach house Fixed porthole Bar and shelf along the hull Fluorescent light above table Cushions and backrests with removable covers Grab rail Teak and holly floorboards Forward Cabin: Double bed Lockers on the hull Stowing space under berth Seat with stowing space Shelf, drawer & mirror Hanging locker Two fixed ports Ventilation through dorade Ceiling light Two reading lights Curtains Wooden paneling and vinyl lining Forward head: Formica laminated bulkhead Marine toilet with holding tank Stowage with mirror and door Wash basin with hot and cold pressurized water with shower Opening deck hatch Ventilation through dorade Fluorescent light Accessories: glass with holder, towel holders, toilet paper holder Aft cabin: Double bed Shelf along the hull Hanging locker with mirror Vanity Drawer Settee with stowage Two opening ports on coach roof and cockpit Ceiling lamps Reading lamps Ventilation through dorade Access to back of engine, stern gland, engine water intake and electrical bilge pump Aft marine head with separate stall water Aft head: White Formica laminated bulkhead USCG Marine head with holding tank Washbasin with hot and cold pressurized water Mirror & Shelves Stowing space under washbasin Opening port Fixed port in hull Ceiling light Ventilation through dorade box Accessories: glass with holder, towel holders, toilet paper holder Separate shower Galley The well ventilated functional galley will bring out the cook in everyone. Designed for extended cruising, this vessel offers a large refrigerator/icebox, 3 burner stove with oven and hot &cold pressurized water, stainless steel sinks and stowage space. Hot/Cold pressure water in showers and galley, Immersion Heater & Calorifier , 12v Refrigerator , Cooker/Oven/Grill, Radio (VHF), Cockpit cushions, Showers with self-activated pump-out Electronics & Navigation Chart table with stowing space for charts Shelves under chart table Bookshelf Panel for navigation instruments Electronic panel, 16 functions, hinged for easy access to wiring Fluorescent light Chart reading light Electrical, Power & Plumbing 12v / 120v including shore supply, Hot/Cold pressure water in showers and galley , Immersion Heater & Calorifier , 12v Refrigerator , Cooker/Oven/Grill , Radio CD-Player ,Speakers in saloon and cockpit (with fader), Showers with electric pump-out Deck & Equipment Bow stemhead fitting with anchor roller, fast track attachment, and 2 fairleads with built-in rollers (patented) Self bailing anchor well with mooring eye Mechanical windlass One opening hatch for lighting and ventilation of front cabin and head Pulpit with navigation lights Opening aft push pit with horseshoe buoy support and teak flag pole Anodized aluminum toe rail with 4 fair heads in-corporating built-in rollers (patented), 2 aft and 2 amidships Stainless steel profiled stanchions Double s/s lifelines with opening gates Four dorades with s/s guards Genoa tracks with adjustable car Two teak grabrails Mainsail traveler with adjustable car One winch Lewmar 30 S/T or equivalent for main sheet with cleat One winch Lewmar 30S/T or equivalent for main halyard and reefing lines Two Footblocks Two Lewmar 46 S/T (or equivalent) genoa sheet winches with cleat Four blocks for reefing lines with jammers Two genoa turning blocks Slatted teak seating in cockpit Cockpit table Teak cockpit grating Steering wheel (leather covered) with pedestal compass Two sail lockers with life raft storage in cockpit One gas bottle locks One bathing platform, teak laid, with 2 lockers Rubber protection at base of transom S/s chain plates for shroud, forestay, baby stay and backstay One winch handle holder One double action manual bilge pump One aft self-bailing anchor well One aft anchor roller Swim ladder Companionway step/locker Sent from Yahoo Mail on Android

1954 Custom-Craft Wooden (All Teak)
Seattle, Washington
Make Custom-Craft
Model Wooden (All Teak)
1954 Custom-Craft Wooden (All Teak), Rare Opportunity! Beautiful 35' Wooden all teak Sailboat... This boat has a wonderful history. It has been maintained by an artist and craftsman for years. It was my father's pride and joy but he recently passed. I live in California can not give it the love and attention it deserves... So it is time to pass it on to others who can truly enjoy it for all its splendor.It was pulled out of the water last week... the hull and boathouse were freshly varnished. The bottom was corked and painted. All zincs were replaced.S/V HINTHA 35'Custom built in Rangoon Burma 1954All teak construction except mast and boom (Sitka Spruce)Length overall 35ft W/L 27ft, beam 10ft 6inchesPower: Universal M35b 30HP based on Kabota BlockWeight 1400lbs Ballast 6800lbs full keelHarken rolling fuling 150 jibRaymarine Smart Pilot XC5 Tiller PilotJRC 1800 Radar / Chartplotter GPSDickenson #26-000 Carabean propane 2 burner love with ovenDickenson P12000 Newport propane fireplace wall heaterStandard Horizon depth sounderGroco Model K-H manual toilet with holding tank thru hull

1915 Crosby 25’ Classic Wooden Catboat-Sailboat - Diesel
New Iberia, Louisiana
Make Crosby Classic Catboat
The Silence Dogood is a rare 1915 Crosby catboat in good condition for her age. She underwent extensive repairs in 2006 and shortly thereafter was used as a touring/day sail vessel until 2012 when we purchased it and transported it to New Iberia, Louisiana. ________________________________________ Fuel: Diesel Hull Material: Wood - White Oak Beam:10 ft. Draft Board/Drive Up: 3 ft. board up and 6 ft. board down. Engine Make: Westerbeke Length Overall: 25 ft. The Silence Dogood is a classic wooden sailing and lobster fishing vessel with 25 feet of space overall and is slightly over 10 feet wide and draws 3ft board up and 6ft. board down. She is classically gaffed rigged, wooden from bow to stern, and fitted with many traditional features. Also included in this sale is the sail. The Silence Dogood was built by the Crosby Boatyard in Osterville, MA. In 1915. The Crosby Boatyard was established in 1850 in Osterville, Massachusetts and was the first to build a catboat designed for New England waters. The Silence Dogood was rescued from freshwater in New York State and was used as a commercial sailing vessel in Maine (see 1st and last photos). We purchased it in March 2012 from Maine and had it transported to New Iberia, Louisiana where it has remained. We re-caulked, re-painted the hull and upgraded the Westerbeke engine in 2012 shortly after purchasing it. It was used as a recreational vessel in the bayous of Louisiana since 2012. In 2005/2006 overall work on the Silence Dogood included new mast partners, deck beams and foredeck, fully re-fastened under the waterline with silicon-bronze fasteners, half floors around centerboard trunk, 2 full floor timbers, housing around rudder post through hull, two 750gph bilge pumps (one port, one starboard), one 1500gph auxiliary pump, two house batteries, one starting battery; solar charging. 40hp Westerbeke diesel engine, starter, alternator, and fresh water pump (all Westerbeke products). Original Edson steering gear, mahogany wheel. Photo 7 shows the mast and boom. Photo 2 was taken at the dock in 2012/2013 and Photo 11 was taken when the hull was repaired. The catboat is in good condition. It has leaks in the hull which need to be repaired but has otherwise been maintained. Please ask any questions that you may have. This is a local pick up only. Sale price does not include transportation of vessel to buyer's location. This listing price is for the sale of the catboat only. Buyer is responsible for transporting catboat from the present location in New Iberia, Louisiana to their desired destination. (Photo credit for first and last photos: Jesse Archer.) Thank you very much for looking and please let us know if you have any questions.

1940's 16' Wooden X Class Sailboat with Trailer
Freeland, Michigan
Model X Class - Cub
Category Daysailer Sailboats
Length 16.0
Wooden X Class sailboat with trailer. I was told it was built by a Michigan boat builder back in the 40's. Fair condition but will need restoration. 6' beam, around 500 lbs. Boat is complete, spruce mast and boom, two sets of sails (well used) rudder, galvanized center board in excellent shape, outboard well. Newer tires on trailer, lights will need some work. Please email if you have any questions or would like to take a look at it, thanks!

sailboat 16' classic wooden custom built one year old with trailer
Benton, Pennsylvania
Make Does Not Apply
Specifications: LOA 16'; DWL 12'6" Beam 6'1" Draft 1'6" Displacement 1,389 lbs Sail Area 134 sq ft This boat was custom built and sailed only one season.With 550 lbs lead ballast and 20 lbs in center board, she is a delight to sail. Very easy and stable for beginner or experienced sailor. . With Mahogany trim, seats, floors and transom, she shows off very nice. The mast is Sitka Spruce and handles easily. This design is very similar to the famous Herreshoff 12 1/2. The custom trailer is galvanized, and she tows easily by a standard sedan, no need to have a truck.

Classic Collectible1938 Hull #1 24' 6" Typhoon Wooden Sailboat - Winthrop Warner
Port Hueneme, California
1938 Hull #1 24' 6" Typhoon Wooden Sailboat Designed by Naval Architect Winthrop Warner / Built by Whitaker Marine This is Hull #1 documented as "Typhoon". She is a beautiful example of a compact, full keel, blue water yacht. Her distinctive lines and fine workmanship is evident throughout. Typhoon was restored. She yearns for an owner who can fully appreciate her legacy, with a strong desire to sail her often and continue to giver her TLC as she needs it! Specs 1938 Winthrop Warner 24' 6" Wooden Sloop Sailboat - recently restored Boat Name: Typhoon (Documented, same name as plans) Hull Year: 1938 Hull#: 1 (The first, the original and the construction was overseen by Winthrop Warner) Manufacturer: Whitaker Marine Company (East Hartford Conneticut.) Model: Typhoon Length 24' 6" Feet * Lying In Oxnard , California * Hull Material: Stem White Oak, Double Planked w/ Philipine Mahogany Wood Fiberglass + Epoxy Glue Barrier * Engine/Fuel Type: Single Diesel (Rebuilt < 200 hrs.) Additional Specs, Equipment and Information: Builder/Designer Builder: Winthrop Warner (Naval Architect) Dimensions LOA: 24' 6" LWL: 20' 4? Beam: 9' (Tip to Tip 33' 6" - Boomkin to Bowsprit) Displacement: 11,500 lbs Draft: 4' 10? Bridge Clearance: 5'5" Ballast: 3,500 lbs (Iron Keel) Engines Engine(s): Yanmar Engine(s) HP: 30 Engine Model: 3GM30F Hours: Est.140 Cruising Speed: 5 kts Recently rebuilt. $6000+ invested. No expense spared. Injectors, fuel pump, crank turned, professional complete assembly all new Yanmar parts! All receipts on boat Mechanical Bilge Pump: Manual Urchin & Electric Rule 1500 w/ float switch Steering - Wooden Wheel Worm Gear Fuel System Fuel: 25 Gallons Diesel (Tin Lined Copper) Shut-off valves under lazerette. Single Racor Fuel Filter. Marine Grade Fuel Hoses. Cabin Sole Solid Teak, professionally installed in 2005. Galley Fuel Shipmate Wood, Charcoal. Stove w/ Alcohol Adapter is not included in sale. No dinghy included. Fresh Water System Water: 15 gallons (Copper) Manual Original Bronze Sink Hand Pump. Bronze Seacocks. Sanitation System Toilet Jabsco, discharge for overboard . Shower / Hanging Wet Locker with with manual overboard pump. (5' headroom) Accommodations The interior is very spacious for a boat this size due to her generous 9' beam. My wife and I have found her to be a comfortable cruiser for both costal and offshore adventures. She has an impressive amount of storage and we recently purchased a brand new Shipmate wood stove which includes a bronze alcohol burner to bring her back to her original glory. Typhoon features a traditional yacht interior, white paint and varnished Mahogany througout. Her sole is soild teak She also has ample ventilation. * Sleeps 4 in 3 berths * Bronze opening ports - (6) * Cockpit cushions (blue) Galley Equipment Galley is located on the port side and is offers ample space for serious chefs. * Large Icebox * Original Bronze Handpumps (working perfectly) * Stainless Steel sink Electronics * Yanmar Engine Instrument gauges Electrical Battery Switch. Batteries: House: (2) 12v Group 27 AGM (100 Amp hours each 200 total) Engine: (1) 550 Cranking Amp Lead Acid Starter Charger: ProTech 1220i 20amp Xantrex Link Pro Battery Monitor Horizon VHF Radio Control Panel: Perko12v DC OCR LED Mastlight w/ strobe and photo diode ABYC Approved Wiring Deck Hardware and Rigging Sloop rigged double spreader New 1×19 Stainless standing rigging w/ New Nav-Tec Norseman SS end fittings and bronze turnbuckles Bronze Chainplates The deck is teak w/ marine plywood which was replaced. Solid Fir spars (varnished) 20# CQR Anchor + 15' 5/16" Chain & 250' 3/4" Line Jib Sheet Track Winches: 3 Merriman Bronze Mahogany fordeck and lazarette hatches; sliding Mahogany companionway hatch Lifeline Stanchion sockets Bronze bolted to deck & bulwarks Sails (376 Sq Ft.) * Working Jib - Good * Yankee - Condition Good * Mainsail - Condition Good *All Recently Professionall Repaired Photos *Shipmate Stove and heat shield not included in sale! *Shipmate Stove and heat shield not included in sale! Typhoon and the people we met treated us like royalty, rolling out the Red Carpet. Major 86's Restoration She had a major restoration on her in 1986 and received new mahogany shear planks, mahogany transom planks, deck beams, teak over plywood deck, mahogany gunwale planks, reinstalled bowsprit, new dawg house, and interior. Detailed Condition Report Some time in early 2000’s she was improperly stored inside a warehouse on the east coat for wintering, and it was to warm. She showed signs of plank separation as would be expected. At that point a decision was made (not by me, some other owner?) to lay a fiberglass sheath over the planks. I don’t know why they didn’t simply repack the planks and float her. Important: I drilled a new thru hole for the Bronze Depth transducer in 2007 and the wood was perfect. No water damage, no sogginess, no mold it was like brand new wood. I have never had a problem with her, and amazingly enough she is drier than the newer plastic boat I own. If you wanted to, you could remove the fiberglass barrier which was attached with Epoxy glue and restore her original wood planking finish. I considered it myself, but never got around to it. Shipping If you decide to ship her, we can assist you in hauling the boat out, stepping the mast, securing all items and supervise her loading on a properly setup and permitted delivery truck. There would be 2 sets of costs which are not included in the auction! 1) The first set of costs are the boat yards. This includes the haul out fees, and crane fees required to load the boat on the truck, plus removal of the mast which requires a crane and one additional hired, qualified boat hand. Estimated $1200. 2) The second set of fees is for the Owner's agent to supervise and assist in the complete process. $600 The acutal hiring / contracting of the shipping company would be soley the buyer's responsibility. Those costs vary, but shipping it back to the East Coast will most likely cost about $5K when all is said and done. Survey If you require a survey with a haul out, the yard fees will be an estimate $400 for the first day, then additional fees for layaway days thereafter. Although if the surveyor is scheduled correctly, it shouldn't require more than one day. There will also be a $250 fee for the captain reuired to move the boat to the haulout ramp, and back. The cost of the surveyor can vary, estimated cost of at least $300 - $500. The whole proposition estimated $1000 -1200. Generally the buyer selects a surveyor to ensure there is no bias to the owner in the report. The survey is paid for by the potential buyer. Special Notes The Shipmate Wood Stove & Heat Shield are not inlcuded in the sale and the oil lamp featured in the pictures is not included. A simple inexpensive alcohol or propane stove can be installed if you desire. Sale & Payment Terms The boat is sold as is with not warranty, and all sales are final. We accept a bank check, cashiers check or cash. The deposit must be paid at the completion of the auction through Ebay via CC or PayPal. The final payment will be held until the payment clears. A personal check can take up to 14 business days. A cashier's check will now require a 3 day hold due to the massive fraud using them. Upon completion of payment clearance, we will issue the buyer the Federal Documentaion with our authorized notary required, via Fed Ex mailer. If our assistance is required to haul the boat, step the mast, and assist the truck driver, these fees can be included in the initial payment or you can wait until after you receive the Federal Title Docs, and then issue another payment to cover these costs. All yard fees are to be paid directly to them. Our preferred yard is Channel Islands Boat Yard. They have pulled Typhoon many times, and are the cheapest, closest yard in town. Slip Fees The boat is currently on a county slip in Oxnard. It is possible they might allow it to be transfered to the new owner, but no guarantee. You will have to fill out all the appropriate applications, etc. The current slip rent is $372 per month. We can assist you and leave it under our name, if you continue to make the additional monthly payments until you can successfully apply, or have the boat moved. If the sale occurs before the next month's payment is due, there is no charge to you until the next month's payment is required. We also pay $30 a month to have the bottom cleaned, and $20 per month to have the topside cleaned. You can continue paying this fee, or we can cancel it, it is up to you once the boat is yours.

1950 Cutter Sailboat
Forest Lake, Minnesota
Recently refurbished wooden cutter sailboat-RC Jefferson design. Features folding mast and original trailer. Volvo penta diesel runs great. Convertible center cabin top for open or closed sailing. battery charger, extra prop and Genoa Jib, Yankee and Gaff mainsail.

2003 Hunter 356 Sailboat
Oyster Bay, New York
2003 Hunter 356 Sailboat Beautifully maintained 2003 Hunter 356 sailboat in the water in Oyster Bay, New York. Designed by Glenn Henderson and built by Hunter Marine (USA). Features B & R rig, cockpit targa arch and bimini, heavy-duty rub rail, semi-circular cockpit seating and the transverse double berth in the aft cabin. Comfort of paramount and features two private, large staterooms along w an enormous head w shower and a salon that can seat eight plus a gourmet galley. Storage is abundant and the walk-through transom complete w shower and folding ladder are perfect for water sports and swimming. LOA: 35.6 Beam: 12.0 Draft: 5.0 LWL: 30.7 Displacement: 13,900 Ballast: 5,023 Headroom: 6.5 Engine: Yanmar diesel, 27 hp, Model 3GM30, 3 cylinder w low hours, 3 bladed prop and racing prop Aft cabin has huge queen sized berth, lots of storage, hanging locker, reading lights and ventilation hatch. Forward cabin has full size double v-berth, storage, opening hatch and lots of lights and lighting. Gourmet galley has Corian counter tops, ss double sink, two burner gimballed propane ss stove/oven, Origo microwave, refrigerator/freezer, hot and cold pressurized water, dedicated garbage bin compartment and lots of counter and storage space. Galley is well lit and ventilated by numerous hatches, portholes and a Dorade vent plus large windows of the front of the coach house. Bathroom has enclosed shower compartment w wooden grille, Vacuflush head, molded vanity w Corian counter top, storage and separate linen closet. Sails/Rigging: Sails are dacron by UK Sails loft and mainsail w lazy jack system. In-mast furling mainsail, furling Genoa and Spinnaker and all necessary gear. Harken traveler. All lines lead aft. Transom seating hinges up to provide walk-through access to boarding/swimming platform. Navigation station has lift top desk w chart and document storage. Electronics: Raymarine suite of instruments, wind, depth and speed, autopilot, ICOM VHF, compass, stereo w speakers and tank level monitoring system for fuel, fresh water and holding tank. Electric windlass, shore power and operating and maintenance manuals. Full cockpit canvas(dodger, bimini, connector and main-sail cover), screens for ports and hatches, barbecue gas grill, full set of fenders, dock lines, safety equipment, boat hooks, etc. Hunter 356 is in great condition - must see!!! Photos: www.sellyourboatnow.shutterfly.com Contact: Steve/Patty (631)896-6212

17' sailboat gaff rigged sloop
Port Kent, New York
Make Cornish Crabbers, Cornwall, UK
Model Crabber
Length 17.0
Gaff rigged with wooden mast, wooden boom and wooden rudder, roller reefing jib Blue Hull with Ivory decks / Red sails / Teak seats / Coppercoat Antifoul

1968 Johnson "Y" model sailboat
Vancouver, Washington
Johnson Boat Works was a builder and developer of racing sailboats of the scow design in White Bear Lake, Minnesota. It was founded in 1896, by John O. Johnson who had emigrated from Norway in 1893. After working with Gus Amundson for three years, Johnson started his own boat building business in 1896. His first major success was the "Minnezika" a 38 ft. scow design which won the championship on White Bear Lake in 1900. This sailboat was the beginning of the A-Class. As more classes were founded, Johnson moved on to design other classes of boats. J.O. Johnson was always interested in new designs, innovations, and inventions. In 1909, he designed a bi-wing airplane with a 20-horsepower engine. This design was totally unlike the Wright brothers, as the wings were arranged in front of each other, and the structure carrying the motor and the aviators seat hung beneath the 2 wings and right between them. In January of 1910, on frozen White Bear Lake, he flew his originally designed plane a distance of 200 feet at 20 feet in the air, making him the first Minnesota aviator to fly that distance. In 1923, he designed and subsequently received the US patent on the first rotary snowplow. Five years later, he sold the patent for $50,000.00 and this money was used to expand and modernize the Johnson Boat Works. In 1998, two years after JBW turned 100 years old, the family sold the company. I acquired this boat in 2005 and have Washington title for both boat & trailer. The hull is fiberglass. It has a wooden mast. The boat, mast, sails, trailer and rigging are in good condition and ready to sail.

AMF Alcort Sunfish Sailboat with extras
Danbury, Connecticut
Make AMF Alcort
Model Sunfish
Length 13.9
Used 1982 AMF Alcort Sunfish Sailboat with ExtrasModel: AMF99536M82D This Sunfish was manufactured in December of 1982 in a line of Sunfish manufactured from 1969-1986 by AMF. This boat has only been used in freshwater and has spentmost of its life sitting in a garage between the times itwas used. This listing will include:1982 AMF Alcort Sunfish Sailboat with all parts and accessoriesDaggerboard Dolly w/ wooden stand 2 x blue flotation cushions I will rate all Sunfish Equipment to the best of my ability: Sunfish Hull: 8/10 - still retains original clear coat shinehas a few scuffs and scratches, and has a small paintchip behind the bailer as pictured. Underside has beenbeautifully kept with light scratching but, in overall good shape Lateen Mainsail: 8/10- Sail has 3 small rips as pictured, upper and lower boom are in great shape along with gooseneck mast ring all in good shape. The Mast is in great shape as well, but one sail set is missing. All rigging is included as pictured. Wooden Kick up Rudder and Daggerboard: 9/10 - Both in excellent100% working order. Daggerboard has spring lock in tact and the kick up rudder actually works and is spring loaded. Daggerboard Dolly: Just freshly packed grease into tires , makes iteasy for one person to move the Sunfish around for beach use or self launching. Also has a wooden stand for garage storage. Overall I rate this boat an 8/10 based on its age and condition,you don't really find these boats in this good of condition every day.Hoping it lands in good hands and is used for enjoyment and continuesto be as well maintained as it was in my family. This Sunfish will be pickup-only from Danbury, CT. Pretty central to NY, NJ, RI, MA. Buyer can fully inspect all items before purchase upon pickup.

Lightning Sailboat with Trailer and Cover
Rapid City, Michigan
Make Jack A Helms Co.
Model Lightning
Length 19.0
Lightning Sailboat Hull Number 10919 with Trailer and CoverFiberglass Lightning #10919 , a Classic built in 1968 by the Jack A. Helms Co. One of the first with self rescue tanks. Upgraded with an oval Aluminum Mast, but still with the vintage wooden boom and tiller/rudder. All standing and running rigging in great shape. Very nice Karavan trailer for ease of ramp launching. Motor mount so you can cruise in class (just add long-shaft motor, the one in some photos is NOT included). Two sets of sails and two spinnakers. Wood fine but could use varnish. We enjoyed this boat sailing a fresh water lake and hope you will too. A great boat for cruising. Dry sailed , as we kept the boat on a lift when not in use. An almost-new custom Sailor's Tailor cover included. Boat is in the Elk Rapids, MI area. Asking $2800 / OBO. Just hoping to find this boat a good home with appreciative owner, we have enjoyed, and you will too. See photos and feel free to ask for more photos or any questions about condition etc. Make an offer, too many boats, this one needs a new home. Local pickup only, will help with delivery within reasonable distance.

24 ft Sailboat CAL T/4
Ewa Beach, Hawaii
24’ CAL T/4 Sailboat, production # 47. This sailboat was completely refurbished in 2010 with new rigging, mast stepped, (inspected and painted), all new chain plates, deck hardware, stainless steel bolts throughout, new life lines, gunnel, running lights, hull & deck paint, new electrical, telescoping motor mount, new interior paint, wood restoration. Equipment: Main Sail (good condition), Standard Jib (good condition), Genoa 150% (good condition), Spinnaker (good condition), outboard motor (Tohatsu 9.8 HP 2 Cycle), VHF Standard Horizon Eclipse DSC Marine Transceiver, 2012 Shakespeare Antenna & Coax Cable, standard horizon HX 280S VFH FM Marine Transceiver, Cruiser 970 Series portable toilet (extra tall), compass, stainless steel ladder, wooden oar, West Marine inflatable 2 man dinghies – new w/foot pumps, 2 oars each with oar locks, life jackets (6), flotation cushion, Tailor Made boat bumpers (6), hook pole, extendable, 12 v marine battery, anchors (2), emergency light, flares – handheld, air horn, Fire Extinguisher, bilge pumps (2), (hand operated). Hull Type: Fin Keel Rig Type: Masthead Sloop LOA: 24.17 LWL: 21.00 Beam: 8.00 Draft (max) 4.00 Draft (min) SA: 256 Displacement: 4000 Ballast: 2000 Designer: C. William Lapworth Builder: Jensen Marine (USA) Hull: Fiber Glass Bal. Type: Lead Weighted Keel Hull Number: 47

Custom Flex Interlake Sailboat 18 ft with Pamco Trailer
Delphos, Ohio
Make Custom Flex
Model Interlake
Length 18.0
This boat is a 1975 Custom Flex Interlake sailboat. The boat is complete as far as I can tell and includes the mast, boom, rudder, tiller, main and foresail and a Pamco trailer. I am the third owner of this boat, I have not sailed it but the previous owner was sailing the boat in 2013. The hull needs some fiberglass work done where the centerboard pocket is on the hull, and the floor has delaminated. The sails, rudder, mast and boom are in good condition. The tiller is in working condition but should be replaced.The Pamco trailer is in excellent condition and only needs tires and paint. I would probably replace the wooden guides also. The boat has a title, the trailer is registered. Local pickup only. Delivery might be arranged depending upon distance. No returns unless item not as described.

Rhodes Bantam #1381 Sailboat, 14.5 ft. Mahogany. Restored 2008
Island, Kentucky
Length 14.5
Rhodes Bantam 14-foot of Honduran mahogany and African sapele plywood. A classic racing dinghy with lovely bronze hardware and wooden mast. Hull #1381, designed by Phillip Rhodes and built 2/1966 by Bill Kallusch Boats of Sodus Point N.Y.. This boat saw several years at Sodus bay (Lake Ontario) in New York. Later she was moved to Lake Champlain in Vermont for many years. She has sailed Kentucky Lake since 2006, infrequently of late due to owner being 28 years older than the boat... Restoration was completed in early 2008 included replacement of nearly all of the structural mahogany. Full treatment with CPES epoxy and 3M-5200 sealant allows the prospect of another 49 years of service. Three sails: main, jib and spinnaker all in excellent condition. Also included is a galvanized trailer. Boat is complete and ready to sail beautifully. Built for crew of two, with solo sailing accommodated. Hull is varnished inside and painted outside. The boat can be easily trailed as one person can lift and step the wooden mast. A great performing boat with beautiful traditional touches.
Narrow Results
Current search reset all.
- Keyword: wooden sailboat mast
- AMF Alcort (1)
- BENETEAU (1)
- Beneteau (1)
- Catalina (1)
- Cornish Crabbers, Cornwall, UK (1)
- Crosby Classic Catboat (1)
- Custom Flex (1)
- Custom-Craft (1)
- Does Not Apply (1)
- HALLBERG RASSY (1)
- Herreshoff (1)
- Homebuilt (1)
- Jack A Helms Co. (1)
- Newport (1)
- Sunsail (1)
- Daysailer Sailboats (4)
- Cruiser Motorcycles (2)
- Dinghies (1)
- Sailboats (1)
- Sloop Sailboats (1)
- California (6)
- Michigan (4)
- New York (4)
- Washington (4)
- Florida (2)
- Indiana (2)
- New Jersey (2)
- Pennsylvania (2)
- Connecticut (1)
- Kentucky (1)
- Louisiana (1)
- Minnesota (1)
- POP Yachts (2)
- Search Title Only
- Has Picture
- Include Sold Listings
Showcase Ads

1973 Hondo tdeck

2002 Sea Ray 380 Sundancer
Riverside, CA

2015 MasterCraft X-30

2004 Sea Ray 260 Sundancer
University of Richmond, VA

2014 Tige Z1

2007 Boston Whaler 255 Conquest
Los Gatos, CA

2015 Chaparral 21 H20 Sport
Black Wolf, WI
Create Alert
Please, name this search
Select Interval
Alert Successfully Created
- For Sale/Wanted
- Readers Tips
- Your Yarns.
- Restoration
- Miscellaneous
- DIY Boat Yards
- Boat Building
- Cabin Cruisers
- Free Boat Plans
- Begin Boating
- Boating Terms
- Ropes and Rigs
- Just for Fun
- Celestial Navigation
- Passage Planning
- Sailing Rigs
How to make a Mast Boot
A mast boot, skirt or coat is the traditional method for making a waterproof seal between the deck and a keel stepped mast.
Despite modern advances in sealant technology, a flexible boot is still the most effective and best looking solution to preventing water leaking down the mast into the cabin.
- Making a Pattern
- Fitting and Sewing
A skirt is also a relatively simple, low tech, DIY solution, which can also be retrofitted.
It is possible to simply caulk and seal around the wedges and partners but this is unlikely to be very satisfactory and every time you need to re-step the mast or adjust the wedges it will all have to be raked out, and then resealed.
The next simplest method is to use a rigging and mast boot tape.
This is the self-amalgamating type of tape which can be bought in wide rolls.
It is waterproof flexible and extremely simple to wrap on.
First it does need to be wrapped on to something, it is fine around the mast and wedges but getting it to cover the seam between the wedges and the deck is the problem.
It will also show dirt and tends to peel after time, and it isn’t all that cheap either, especially as you will need a couple of rolls for the average mast diameter.
The next best DIY solution is the rubber mast boot.
These are made using inner tube material, if you can find any theses days.
Wile the inner tube and hose clamp system works well if done right it does look pretty ugly and the rubber will degenerate over time in sunlight.
Another option is to use a combination of the above methods, then cover with a wraparound cover of material such as ‘sunbrella’, which could simply be attached with a ‘velcro’ strip.
But then if you are going to the trouble of cutting and sewing a cover why not make a proper mast boot in the first place.
The top of the mast boot attaches directly to the mast.
The bottom edge will also need to be attached to something.
So you will need a deck ring or flange.
The deck-ring should be well clear of the wedges and with a grove or lip into which the bottom of the boot is securely fastened.
It will also be of the same profile as the mast, circular for a round mast, oval foe an oval mast and be positioned so as to allow the mast boot to have a runoff slope of somewhere in the region of 60 degrees.
Making a Mast Boot Pattern
The material for a mast boot should be strong, such as proofed acrylic or painted canvas.
The best mast boot requires three separate pieces.
The top and bottom collars will simply be cylindrical so they are easy to cut and sew.
The middle part is the cone shaped bit, so that’s the tricky one to measure out and cut.
It is always best to start with a paper pattern which can be tried against the mast before cutting the material.
And perhaps even before buying material so you know exactly what you will need.

In order to draw the pattern you will need to take note of three measurements.
- The circumference of the mast.
- The circumference of the deck ring.
- And the proposed height of the mast boot from the deck ring to the top position on the mast. (H).
This height should allow for the finished boot to have a slope of at least 60degrees and be clear of wedges and any mast fittings.
This is for a circular mast and deck ring, for masts and rings which are not perfectly circular add a bit extra to the height (H) then trim the pattern to fit.
Take these measurements and write them down.
So, lets start with the top and bottom collars, these are added to smooth the transition from the cone shape of the boot to the cylindrical shape of the mast and deck ring.
The collars are simple oblong strips cut to the respective circumferences of the deck ring and mast with an allowance all round for sewing.
The width of the deck ring collar needs to allow for any tuck around the lip, one and a half times the deck ring height should be sufficient, plus the hem.
The mast collar needs to be wide enough to take whatever means of fastening you decide on.
Now the next stage is to work out that ‘lampshade shape’ for the main part of the mast boot.
I have tried to do this just by pinning paper against the mast and trying to do it free hand, believe me it is easier and quicker to do the simple maths first.
So, fi rst, we need to work out the diameters of the mast (Bd) and the deck ring (Cd), which if you remember your geometry is the circumference divided by 3.1416 ().
Now we need to draw two arcs both with their centres at A.
But first we need to work out the length of their respective radiuses.
To get R2, multiply H by the diameter of the deck ring (Cd), and then divide by the difference between the diameter of the deck ring (Cd) and the diameter of the mast (Bd).
At this stage it is always best to round any odd numbers up, the paper pattern can always be trimmed down later.
To get R1 simply subtract the height (H) from R2.
The lengths of the arcs should be the respective circumferences plus a bit for trimming/sewing.
Now, cut out your paper pattern, take it to your mast, pin it or hold it against the mast to check how it fits and trim as necessary.
Once you are satisfied with the fit you can take the pattern to your cloth and mark it out, not forgetting to allow plenty of extra for seams and overlaps.
Sew the top and bottom collars on to the ‘lampshade’ and hem the top and bottom edges.
Ideally the whole mast boot would be sewn up, the seams sealed and then fitted to the mast before the mast is stepped.
However, it can be fitted to an already standing mast, it just means that the final sewing is a bit awkward, though the overlap can be done with a good sticky sealant.
Begin by placing the boot inside out and upside down around the mast and securing the top collar to the mast.
The very large sized hose clamps are ideal for this.
Don’t seal it just yet as the position may need to be altered.
Then pull the boot down over the top collar so that it reaches the deck ring without being too tight.
Make sure that the overlaps are tucked inwards.
Secure the bottom edge to the deck ring temporally so you can check and if necessary alter the fit.
Mark where you want the overlap to be sewn.
You can now release the bottom edge to make sewing a bit easier, it is still going to be a fiddly job but well worth taking you time and getting it as neat as possible.
You can then run some sealant down the seams.
You could just glue that side seam but the problem is how to hold the edges together wile the glue or sealant sets.
Then all you need to do is paint or proof the mast boot or if you've used a waterproof cloth just run some sealant along the outside of the seams.
And you now have a relitively leak free Mast Boot.

Recent Articles
WANTED: Long lost Chris Craft 26 feet
Jan 29, 24 01:35 AM

"Everyone, in some small sacred sanctuary of the self, is nuts." (Leo Rosten, 1908-1997)
You might like these

Plywood and Veneer Guide for Marine use.
A guide to plywood for boat building and why you should use the best marine grade you can afford.

DIY Woodboat Building Questions
Woodboat building questions a Forum for wooden boat building, plans, lumber, caulking compounds and other boat building problems.

Boat Books for Wooden Boat Builders
Boat Books a series of boat books based on some of the 1960's, classic, Free Boat Plans that were published in magazines such as "Popular Mechanics", "Popular Science" and the "Boat Builder Handbook".

Build a Boat, tips for the DIY Wooden Boat Builder.
How to Build a Boat, Wooden Boat Building methods for the DIY, backyard, self-builders explained, carvel, lapstrake and plywood

Clench Nails, Fastening for Small Wooden Boats.
How to use Clench Nails, these provide a fast reliable method for fastening small wooden boats.

Wood Screws for Boat Building and Repair.
Wood Screws are the most widely used and versatile fasteners used on wooden boats. Which type to use and how to use them

Timber, Lumber for Boat Building.
A brief description of the most common Timber used for building Wooden Boats how to choose wood for your project boat

Timber Properties
A brief guide to timber properties and wood, characteristics such as strength, stiffness and elasticity for choosing lumber for wooden boat building and restoration.

Rivets and Copper Rove Wood Boat Fastenings.
How to use Copper Rivets and Roves construction guide to fasteners on your wooden boat.
Ring Nails for Marine Fastening.
Ring Nails sometimes call Gripfast or ring shank, silicon bronze boat nails are renowned for their holding power. but how to get them out?
HELEN M HOBART
Jan 21, 24 05:31 AM
Private account
- Our mission
- Media about us
- Our partners
- Paid services
- Marketplace
- Vacancies & Resumes
- Add advertisement
- Industry Forum
- Companies catalog
Special offer How to get here? In order for your ad to appear in the "Special Offers" block, you need to select the "Special Offer" service when creating or editing an ad on the page for using paid services . These ads will be displayed on pages of all categories and on pages of all announcements during the month.'>

Equipment: Format panel saw REMA DMMD-40/340 №9226
Aug. 20, 2015, 11:33 a.m. Views: 978
Organization name : show name and reputation
Type : Woodworking equipment
Equipment name : Format panel saw REMA DMMD-40/340
Price : 2,231.41 $
Description: Sell. Format panel saw REMA DMMD-40/340 Roller cart 3200 mm, for example.145 mm, saw blade tiltable 0-45 deg, 5.5 kW 935 kg. Year of build 2001 The condition is excellent. Specifications REMA DMMD-40/340 : Cutting length, mm 3000 Diameter main saw mm Ø 300 ÷ 450 Maximum cutting height, mm 145 Max cutting width on the longitudinal support, mm 1300 The size of the transverse support, mm 30 ÷-3200 The saws tilt 0 - 45 deg. The power of the engine main saw kW 6 Rotation speed of main saw, Rev/min 3500, 4500, 6000 Bore diameter main saw blade, Ø 30 mm Diameter scoring saw blade mm (use only with the main saw Ø300, Ø350 mm) Ø 120 ÷ 130 Motor power scoring saw 0,75 kW Rotation speed scoring saw blade, rpm 8500 Diameter scoring saw blade, Ø 20 mm Connection diameter upper dust pumping device, Ø 80 mm Connection diameter of the lower dust pumping device, Ø 125 mm Need air top of the dust pumping device, mm 360 m3/hour Need air bottom of the dust pumping device, mm 900 m3/h Weight kg 935
Contact details: show contacts
- Terms of use
IMAGES
VIDEO
COMMENTS
1 YEAR SUBSCRIPTION (6 ISSUES) PRINT $39.95. DIGITAL $28.00. PRINT+DIGITAL $42.95. Subscribe. I have developed a "new" mast construction method for use on light- to moderate-displacement sailboats having a Marconi rig, and for motorsailers. I put "new" in quotes because I am sure it has been thought of before now.
Structural Considerations. A mast/spar needs both strength and stiffness and be able to resist fatigue. Sometimes these characteristics can be conflicting. Strength or resistance to breaking in wood involves its elasticity which allows the wood to bend to absorb stresses. Whereas stiffness is the resistance to bending.
For spars, it's imperative that the wood be dry (below 15 percent moisture content) and free of defects. The grain must be vertical. Our first attempt to procure lumber for this mast resulted in us receiving a batch of 12/4 Sitka spruce that was case-hardened.
Our wooden masts and spars are made with the same uncompromising quality and attention to detail as our oars and paddles. We have made hundreds of masts and spars for boats as small as nutshell prams, for many Herreshoff designs, and numerous larger boats like Concordia yawls. Due to our shop size, 50 feet is our maximum length. We offer solid and hollow masts in a variety of cross-sections.
A friend made a mast from kiln-dried Engelmann spruce, which is still in service after 25 years. The key is to saturate the wood, inside and out, with penetrating epoxy. It is best to epoxy prime and polyurethane paint the mast exterior for low maintenance and longevity. In a future blog, I will describe making masts using the bird's mouth ...
Draw a center line in pencil on your stock. Your mast will taper from 2.5" at the bottom (0') to to 2" at a point near the top (13') and finally reaching 1.5" at the very top (15'). Mark these dimensions. The profile of your taper will be drawn with the help of a batten - a flexible piece of wood which ensures a "fair" curve free of bumps.
An instructional video on how to build a sturdy, affordable, wooden sailboat mast.
In part twenty of this series on how to build a wooden Snipe class sailboat I show how I make a wooden mast from scratch. I mill blanks from left over cypres...
Even though aluminum has long since replaced Sitka spruce as the material of choice for a sailboat mast, there are plenty of wooden masts still in service. Many of the Taiwanese-built boats of the 70s and 80s had wooden masts, and of course, a wide range of U.S.-built classics still have their original wooden masts.
Here are the steps to follow when installing the cabin: Build the cabin on a flat surface using marine-grade plywood. Cut the cabin to fit the deck and hull and sand the edges to ensure a tight fit. Apply a layer of epoxy to the cabin and deck joint to seal it. Secure the cabin to the deck using screws or bolts.
The idea behind rotating wing masts is that the mast fairs into the sail, like a real wing, instead of the sail coming off what is frequently the wrong part of the mast. Visualize a mains'l attached to a mast track on an oval-shaped mast while beam-reaching, and you get the picture. The mast becomes a flat block, contributing nothing but ...
Building a Sailboat Mast. Over the last two weekends, I helped my brother in law make a mast for his Barnegat Bay Sneakbox, a beautiful little wooden boat, built in 1922, in Barnegat, NJ. The original mast is in fine shape as is the rigging, but it has to be taken out of the hole to move the boat on a trailer, a tough job for a couple of people.
A wooden sailboat can cost around $1,000 to build. (Source: Instructables) The boat is typically built from 4×8 sheets of plywood and measures 8 feet in length. (Source: Instructables) Various tools such as a pull-saw, table saw, router, sander, and drill are needed for building a wooden sailboat. (Source: Instructables)
Wood Sailboat Masts. Wood is the traditional material for sailboat masts, and it's still used today on many custom boats. Wood masts are heavy but strong, and a well-maintained wood mast can last over a hundred years. Wooden masts are common on gaff-rigged boats, as wood is an ideal material for shorter masts. ...
Tape off the top part that you want painted white. (The top is sometimes painted white so at night it can be seen.) Take black enamel paint thinned down and rub it on the mast. Take some thinner and rub most of the black off so that black is left in the grain. Then take brown shoe polish and color the wood.
This particular design uses a "lug" sail, a classic looking sail for small boats with wood masts. It increases the sail area (therefore the force generated by the wind) without it having to be as tall as a modern sailboat mast made of aluminum. There is a kit from an online sailmaking company that you can get for a reasonable price.
A sailboat mast is a cylindrical, long vertical spar mounted on the deck and supports the vessel's sails. Masts are a distinctive feature of sailboats and hold the sails in place. Most masts for modern sailboats are made of aluminum or carbon fiber, while traditional boat masts are made of wood. Masts are usually taller than the boat's ...
A sailboat mast is a vertical, upright structure that supports the sails of a sailboat. It is a crucial component of the boat's rigging system and plays a key role in harnessing the power of the wind to propel the vessel. Typically located in the center of the boat, the mast extends upward from the deck or hull.
Wooden Masts For Sailboats. The typical material for sailboat masts is wood, which is still employed for many specially designed boats nowadays. Wood masts are big and bulky, yet very sturdy, and proper maintenance can guarantee their lengthy (over 100 years!) lifespan. They are also prevalent on gaff-rigged vessels because wood is best suited ...
I'm outfitting my 15' Skerry with a lug sail. Is there a good substitute for Sitka spruce that I could use for the mast and spars? I'll be grateful for any suggestions or advice. (I'm in Chicago.) ... Alternative to Sitka spruce for mast and spars? 03-17-2024, 09:36 AM.
Wooden X Class sailboat with trailer. I was told it was built by a Michigan boat builder back in the 40's. Fair condition but will need restoration. 6' beam, around 500 lbs. Boat is complete, spruce mast and boom, two sets of sails (well used) rudder, galvanized center board in excellent shape, outboard well.
If you get the extrusion numbers and manufacturer you might be able to get a sparmaker to repair, this new forum doesn't show location. If replacing with new was out of the question I might explore a donor rig off a similar size boat. A new mast is circa $8,750 in the US. But there s $2k for crating and packing and then $2k for shipping, all ...
A mast boot, skirt or coat is the traditional method for making a waterproof seal between the deck and a keel stepped mast. Despite modern advances in sealant technology, a flexible boot is still the most effective and best looking solution to preventing water leaking down the mast into the cabin. Methods. Fittings. Making a Pattern.
Wood species: Deciduous:oak Moisture content: Natural Length in mm: 2600 - 3000 Width in mm: 100 - 450 Thickness in mm: 32 - 52 Stock: In stock and on order Price per cubic meter: 368.29 $ Selling Wood Veneer Sheets planed veneer in Vologda region Russia №46855 | WoodResource.com