

How to make a paper boat (step-by-step instructions)

I think everyone has made a paper boat at least once in their lifetime. Making paper boat is easy as we don’t need many materials to make it.
This is an origami craft, so all you need is a sheet of paper.
And this is a craft that every parent passes onto their kids, right?
Here is the step-by-step way to make a boat out of paper.
Materials required
A4 sheet / Letter size paper/Any rectangular paper
Step-by-step tutorial to make an easy paper boat for kids

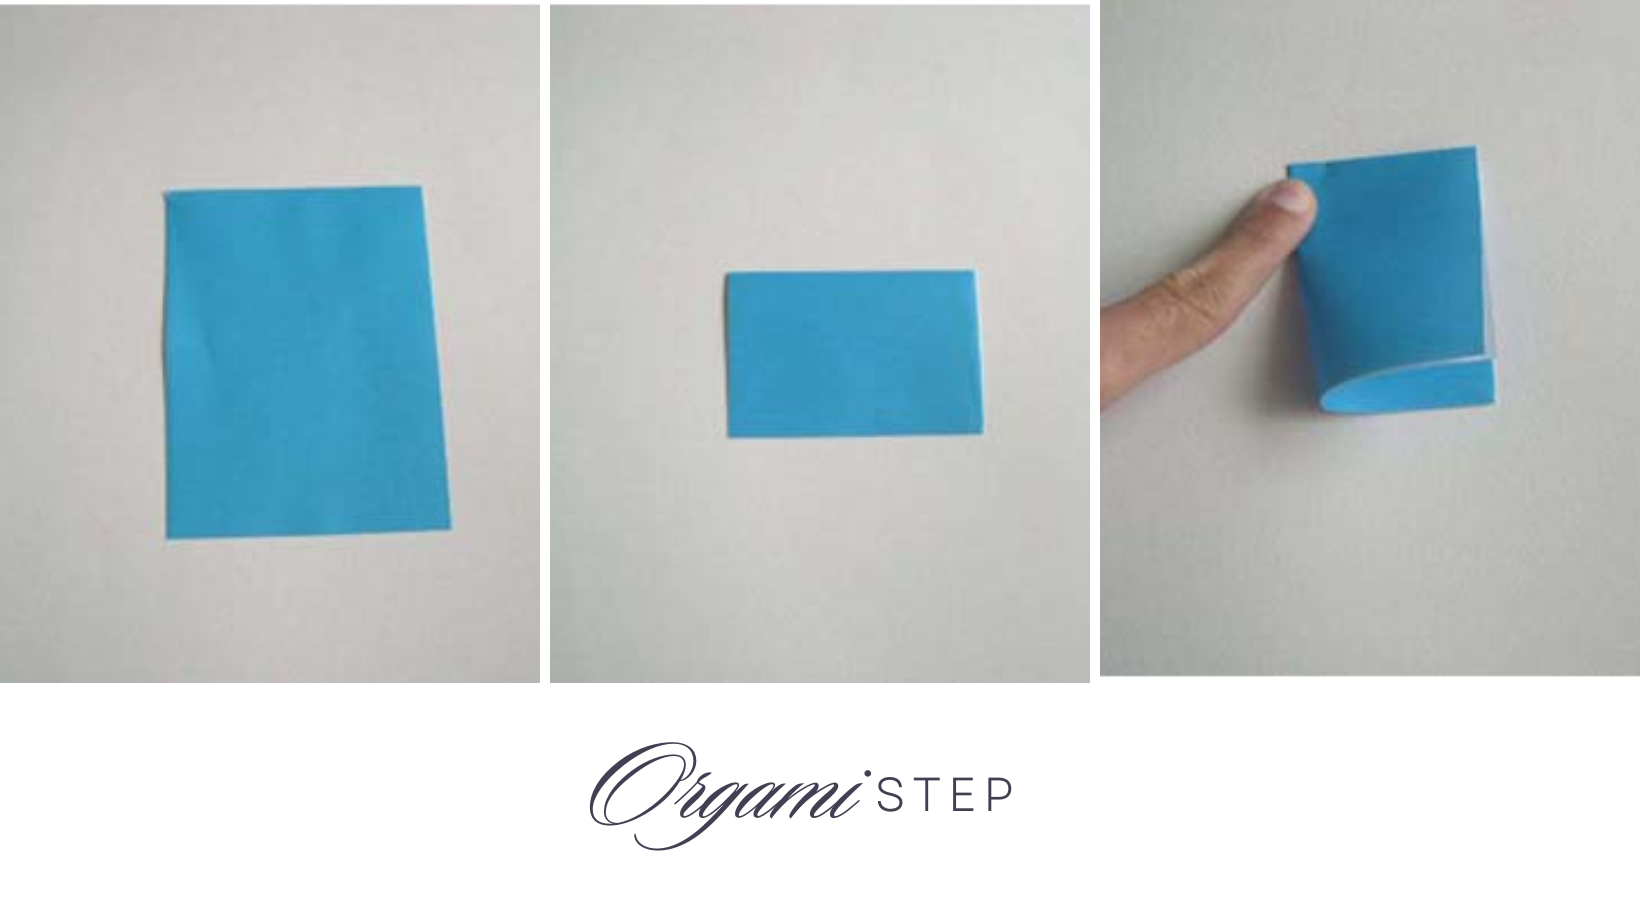
a. Take an A4 sheet paper. Hold it horizontally as shown in the picture.
b. Fold it from left to right.
c. Make a crease.
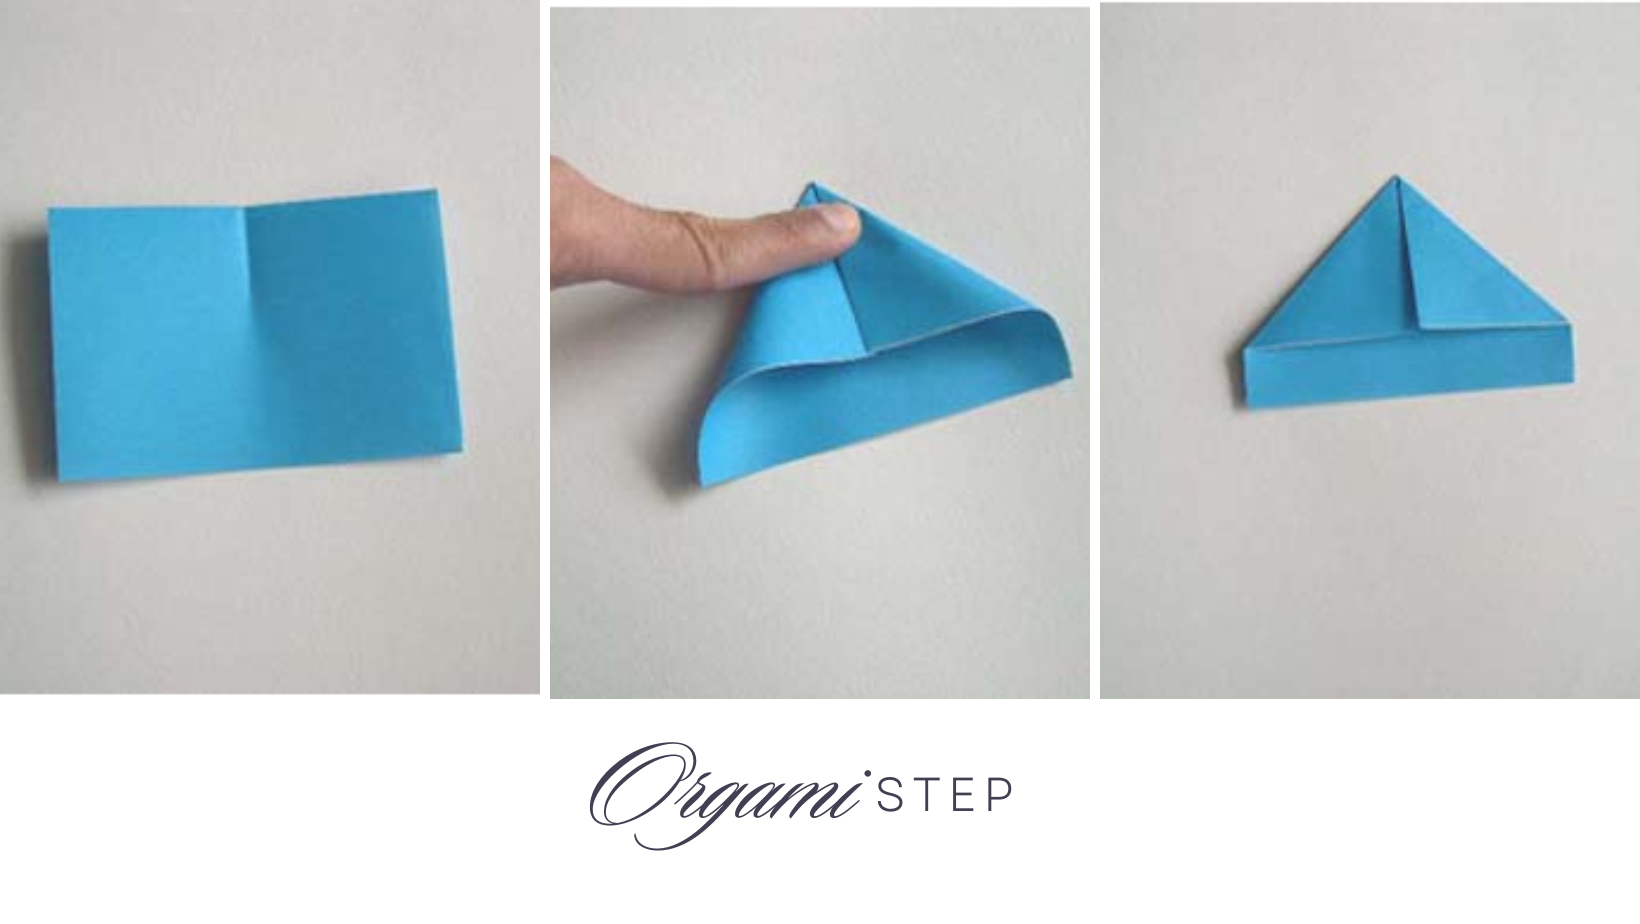
d. Now, fold the paper from bottom to top.

e. Fold it well and make a crease.

f. Unfold the fold we just made in step d.
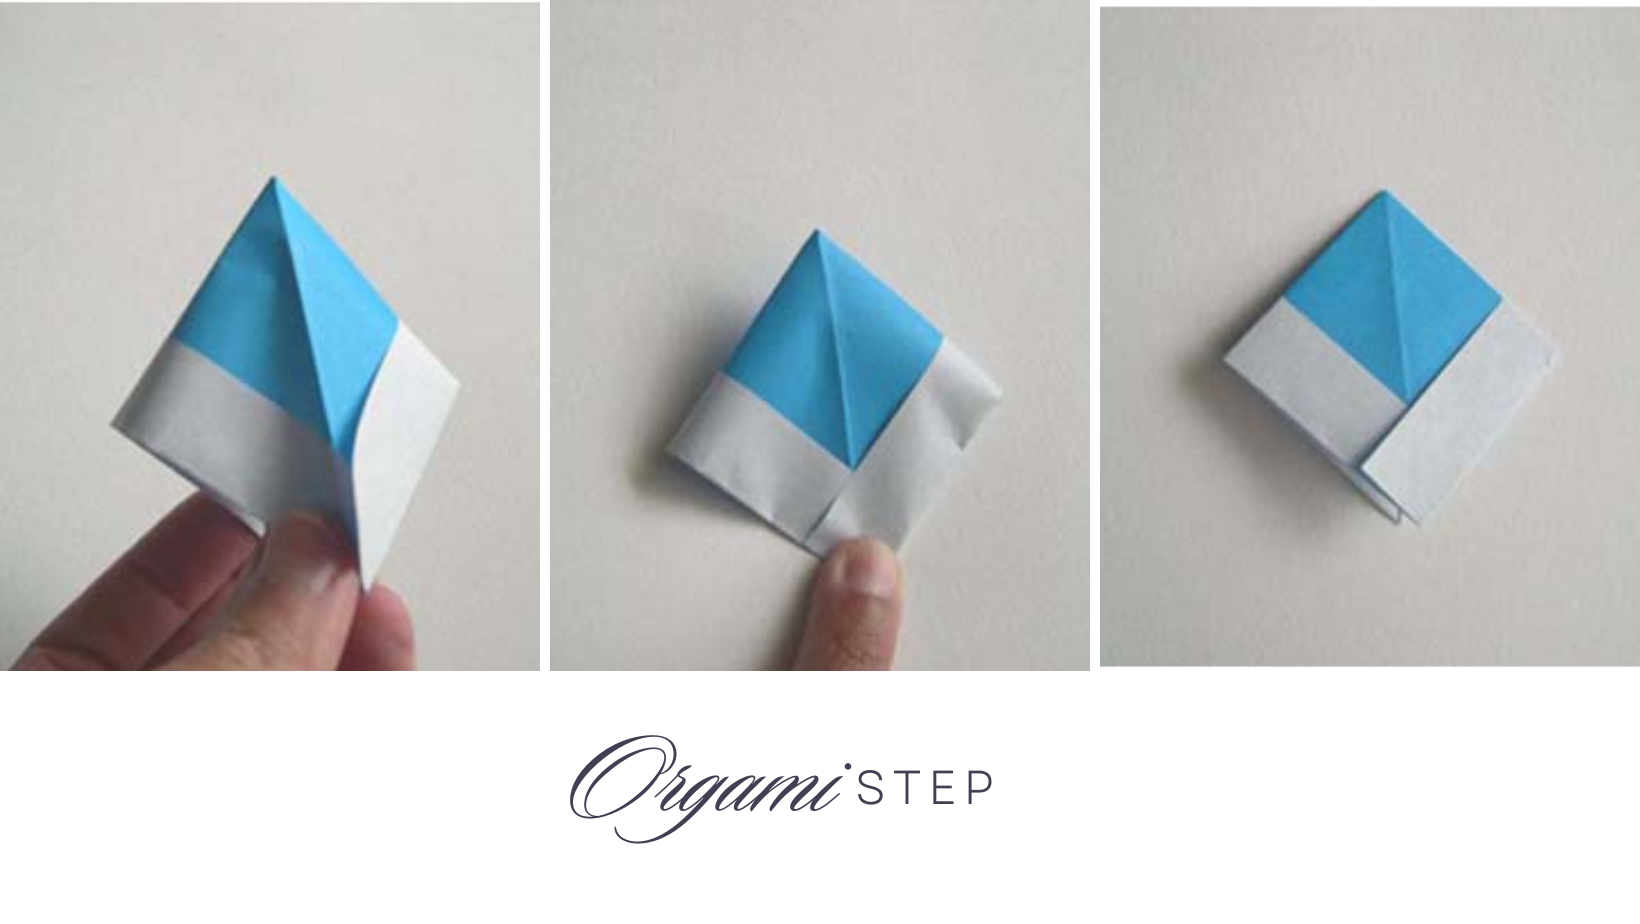
g&h. Now, fold the right corner towards the centre and make a crease.
i. Similarly, fold the left corner towards the centre.

j. Flatten the folded pieces down and now you have the figure as shown in pic j.
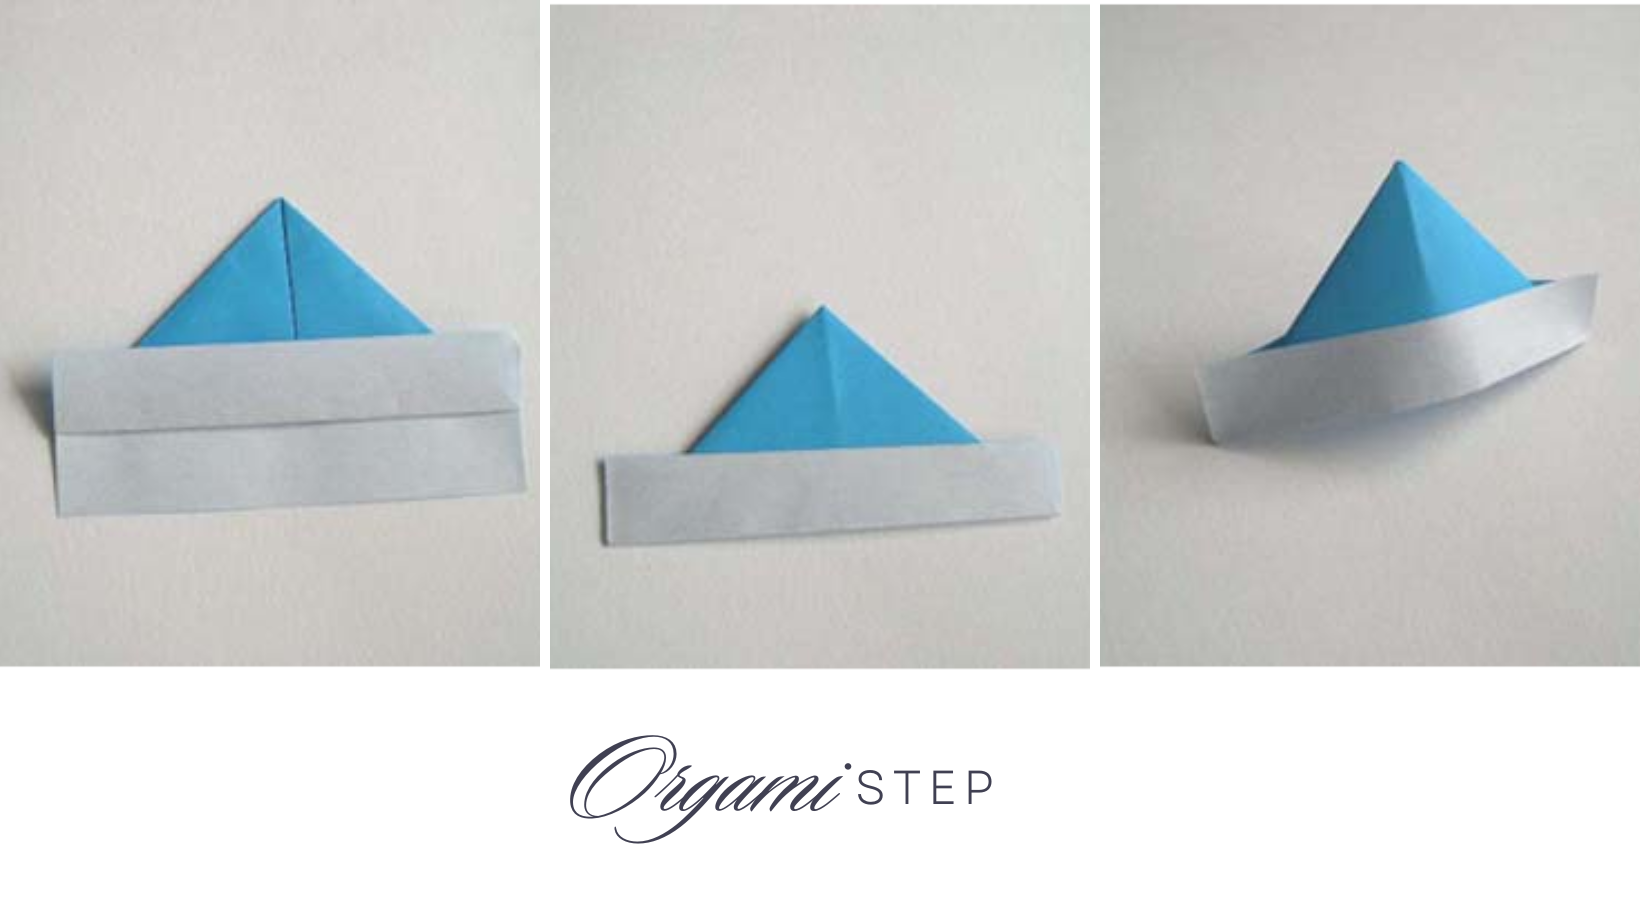
k&l. Now, from the bottom, fold one layer upwards along the bottom of the folds we made in j.
m. Make a crease and flatten it well.

n. Turn the figure over.
o. Now, like we did in the previous step, fold the bottom layer upwards.
p. Flatten the fold and make a crease again.

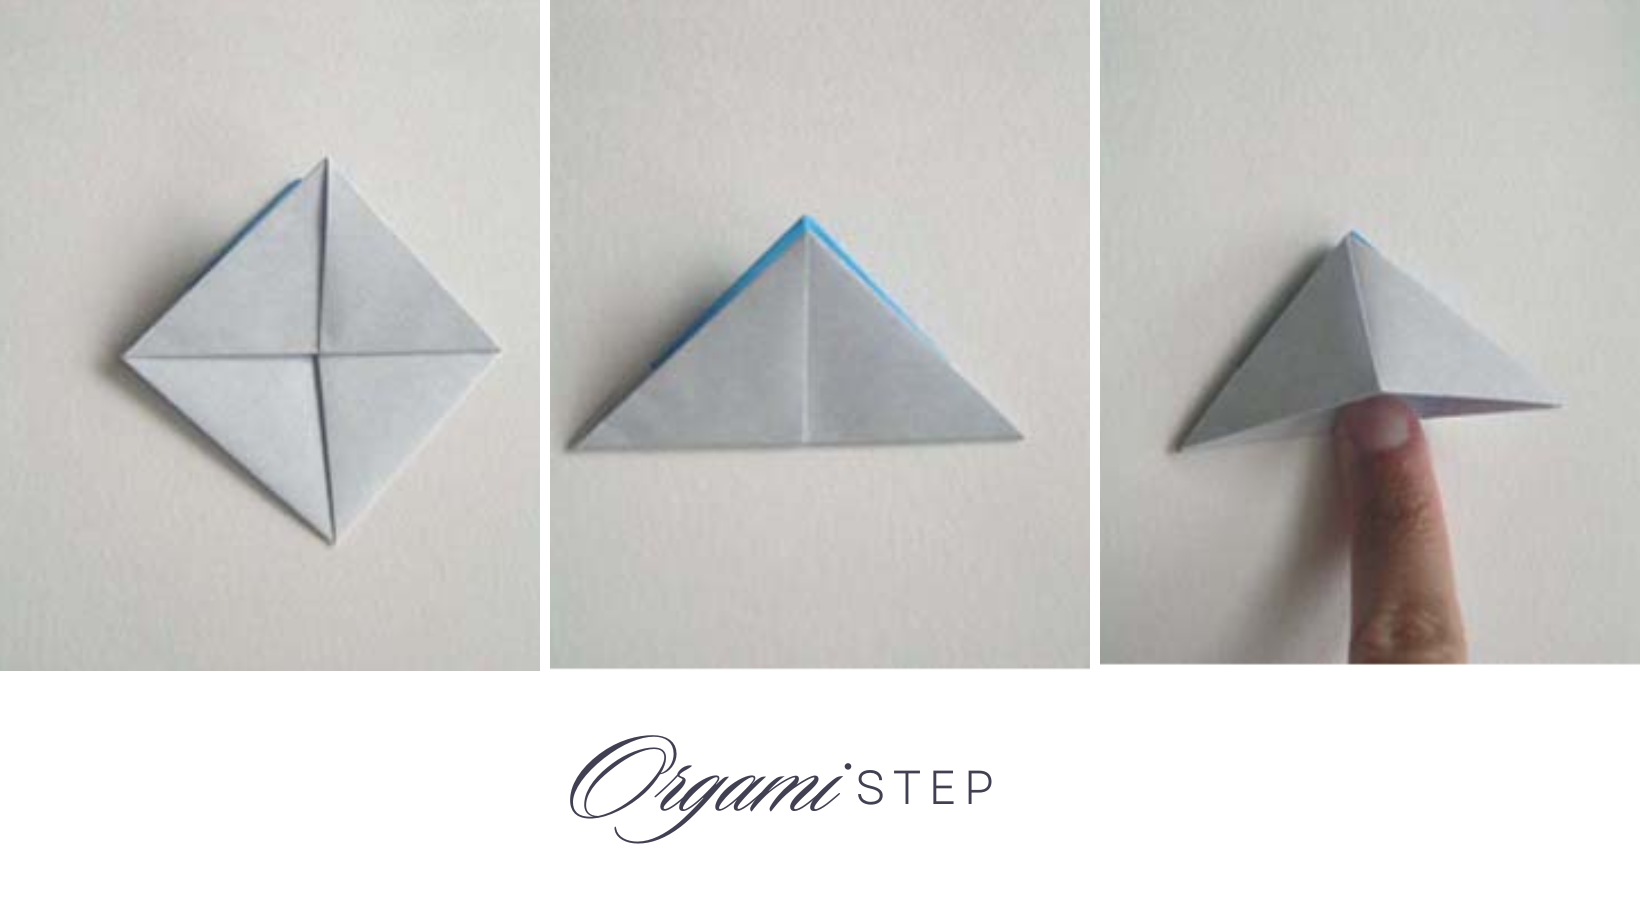
q&r. Open the bottom of the figure.
s. After opening as shown in pic r, flatten the top corner to the bottom as you can see in pic s.
You can see that the edges of the paper boat are overlapping on each other.
t. Insert one edge into the other (see pic t).

u. You get the figure in u.
v. Now, fold the layer from bottom to the top as shown in pic v.
w. Flatten the fold.
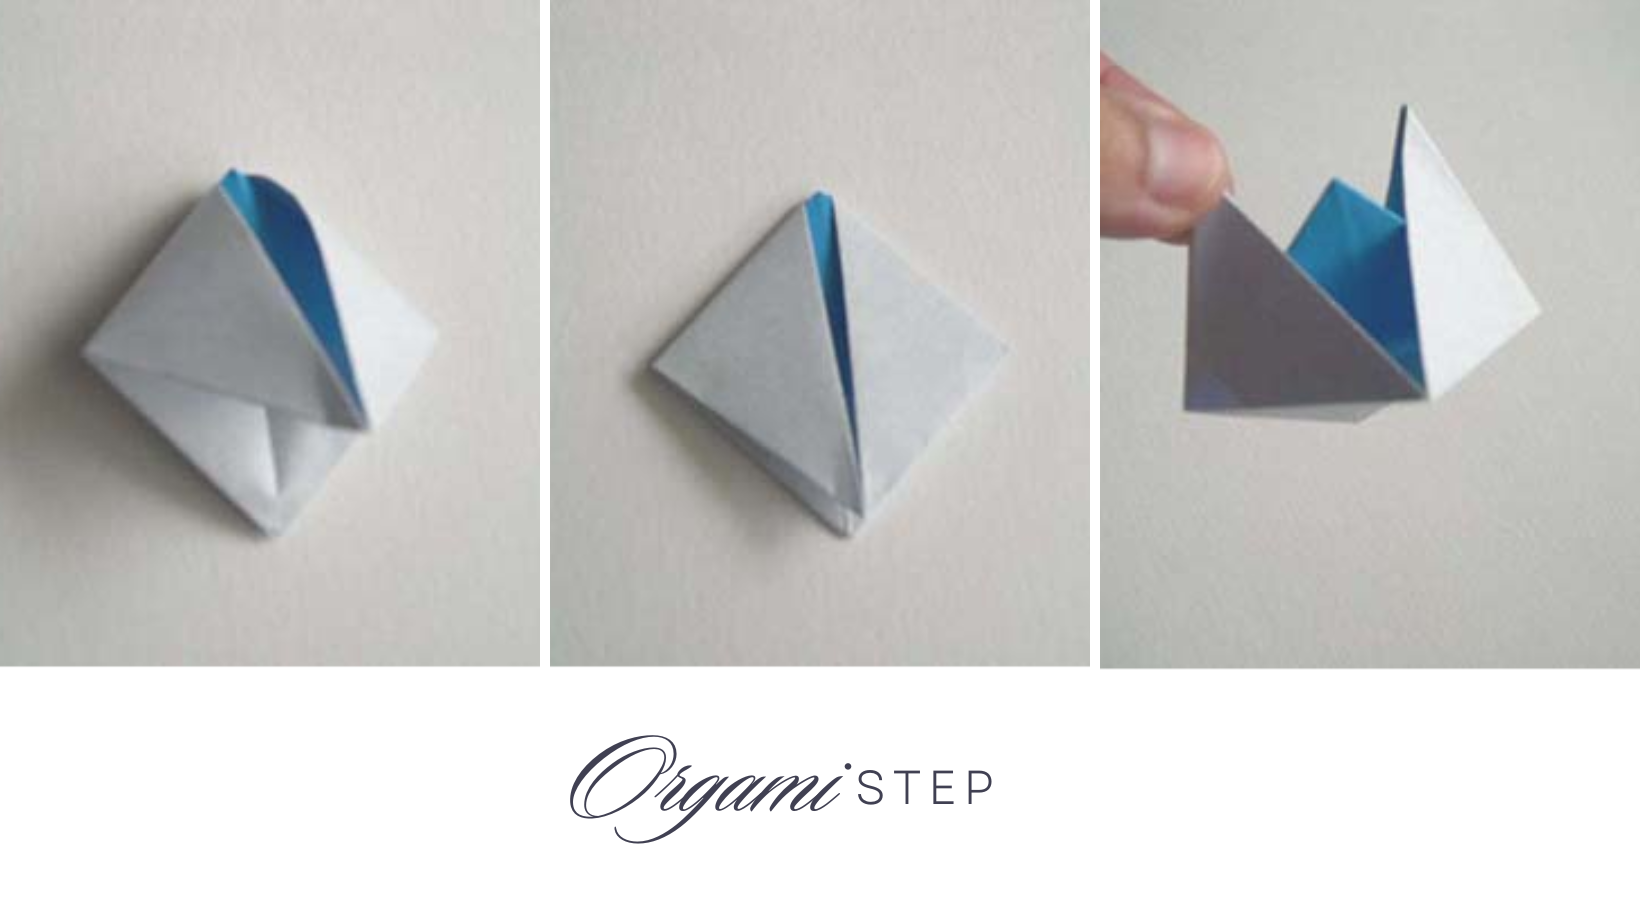
x. Flip the paper over and fold the other layer too. You will get the triangle shape in x.
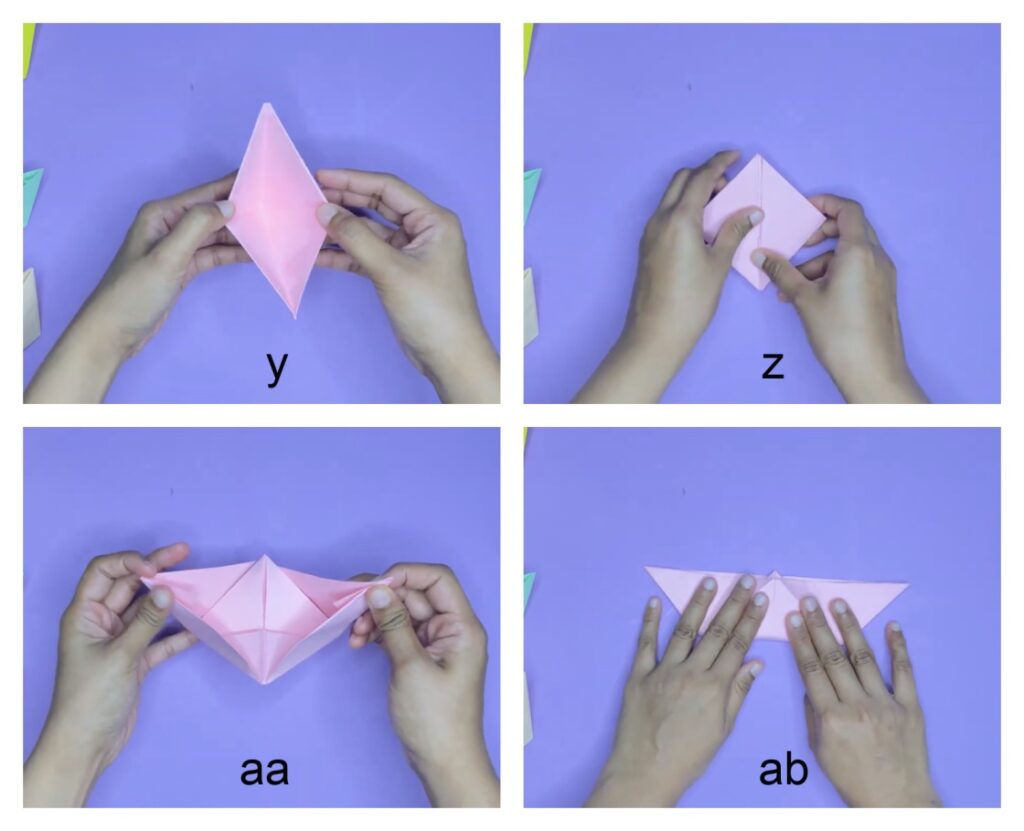
y. Open the bottom of the figure again by pulling the flaps apart.
z. Flatten it out and you will get a diamond shape now.
aa. Open the figure by pulling the sides apart from the top to get the shape of the boat.
ab. Flatten it out an open again and your paper boat is ready.

In case you have any doubt regarding any step, feel free to watch the step-by-step video tutorial below. Please make sure you also subscribe to our Youtube channel to get more craft ideas for kids every week.
Never miss new craft ideas!
Subscribe to get our latest content by email.
Video tutorial to make a paper boat
More paper crafts for kids
- How to make a paper airplane step-by-step
- How to make an easy and beautiful paper flower
- How to make an Origami jumping frog step-by-step
Similar Posts

Peeking Bunny Easter craft for kids (with free template)
Paper Easter bunny craft for preschoolers and above This peeking bunny Easter craft is a fun and easy project that your children will enjoy making. It is a simple craft and hence kids as young as preschoolers can do the craft. You can help them with cutting the bunny and carrot out from the template….

Santa Claus ornament craft for kids
If you are looking for a super simple Christmas ornament craft for kids, you are in the right place! This Santa Claus ornament craft is easy to do and will look cute on your Christmas tree. It’s so easy to make! Kids can make lots of it, hang them on the Christmas tree and also…

Paper Cup House Craft
Paper cups are so flexible. We can do so many crafts using paper cups that the list is endless. All you need are some paper cups, a few craft materials and some creativity. But if you don’t want to be creative, let US do that part and you can enjoy your idea. So today, we…

How to make an Origami tulip with stem and leaf
Materials required Origami paper OR Color papers of square size 15 cm. Take two colors for the flower and stem. Step-by-step tutorial to make a paper tulip flower You can either use color paper or Origami paper. Here we used color paper. It’s an A4 size paper. We cut it into a square paper of…

Printable sunglasses craft for kids (with free template)
These paper sunglasses are so easy and fun to make. Whether your kids want to make a funky pair of sunglasses for a costume party or a fun accessory for a sunny day, this tutorial will guide you through the process step by step. You can add your own embellishments to the sunglasses by drawing…

How to make an Origami paper vase at home (step-by-step photos)
Origami paper vase is a useful craft to make. You can quickly make this paper vase following the step-by-step instructions and make some paper flowers to put in the vase and keep it as a decorative item. If you have patterned paper, more points because patterned paper makes the vase look more beautiful. But if…
Leave a Reply Cancel reply
Your email address will not be published. Required fields are marked *
Save my name, email, and website in this browser for the next time I comment.
Making an Easy Origami Boat
:max_bytes(150000):strip_icc():format(webp)/chrissy-pk01-56a6d65e3df78cf772907c07.png "how to make a yacht out of paper")
The Spruce Crafts / Chrissy Pk
- Total Time: 10 mins
Origami comes from the Japanese. The word means the art of folding paper. " Ori " means "folding," and kami means "paper." In modern usage, the word "origami" is used as an inclusive term for all folding practices. The goal is to transform a flat square sheet of paper into a finished sculpture through folding and sculpting techniques.
Learn how to make the most well-known origami boat with this quick and easy step-by-step tutorial. This origami boat can also float in water .
Watch Now: How to Make an Origami Boat
This origami boat is a great model to teach kids. It is similar to the origami hat that you make with newspaper. Also, origami can be a great math-related activity for kids as your child creates using geometry.
What You'll Need
- 1 Rectangular sheet of paper
Instructions
Make the first folds.
Start with your rectangular paper, orient it vertically, with the long edges going up and down. Fold the bottom half up to the top.Fold the bottom right corner over to the left corner and make a small pinch, just enough to crease the paper. Open it back up.
Create a Triangle Shape
Using the crease as a guide, fold the left and right bottom corners up and to the middle. Flatten the folded pieces down. Rotate the paper. Fold one layer from the bottom up along the bottom of the front flaps.
A Boat Begins to Take Shape
Flip the paper over to the other side. Fold the bottom edge up in the same way. Unfold, and then fold the bottom right corner in along the crease you made. Repeat on the bottom left flap.
Form the Bottom of the Boat
Re-fold the bottom edge back up. Open the bottom of the model. Look at the corners. Flatten and then insert the overlapping flap on the left underneath the right section.
Continue Folding
Fold one layer up to the top. Repeat on the back. Open the bottom of the model.
Finalize the Folds
Pull apart the left and right flaps. Flatten it out, in the shape of a boat. Open it slightly. The triangle in the middle resembles a sail.
More from The Spruce Crafts
- How to Make a Cute Origami Sail Boat!
- How to Make an Easy Origami Dollar Shirt
- Origami Star Box Tutorial
- How to Fold an Origami Heart Bookmark
- Traditional Origami Lily Flower Instructions
- Fold a Square Paper Into Fifths
- Easy Origami Envelope Instructions
- How to Fold a Horizontal Pull Tab Note
- How to Make Cute Origami Fish
- Folding a Traditional Origami Crane
- Easy Origami Bow Tie Tutorial
- Origami Envelope Box Tutorial
- Easy Rectangle Origami Box Instructions
- How to Make an Origami Corner Bookmark
- Making an Origami Kusudama Flower
- How to Make an Easy Origami Rose

How to Make a Paper Boat | Origami Boat Tutorial
Origami, the art of paper folding, is a delightful pastime that allows you to create intricate designs using a simple sheet of paper. Among the many fascinating origami creations, the origami boat is a classic and timeless design that can be easily mastered by beginners. In this guide, we will walk you through the steps to create a simple origami boat.
To begin, select a square sheet of paper. You can use origami paper, colored paper, or even a plain white sheet. Place the paper in front of you, ensuring that one corner is facing upwards.
Fold the paper in half diagonally, creating a triangle. Make sure the edges are aligned accurately, and crease the fold firmly. Next, unfold the triangle and repeat the same step by folding the paper diagonally in the opposite direction. Once again, unfold the paper to reveal a creased “X” shape.
Table of Contents
What you need;
Square piece of paper:
How do you make an origami boat step by step?
Origami boats are a classic and enjoyable paper folding project. In this step-by-step guide, we will walk you through the process of creating an origami boat. With just a square sheet of paper and a few simple folds, you’ll be able to make your very own paper boat. Whether you’re a beginner or an experienced origami enthusiast, this guide will help you create a charming origami boat that can sail your imagination’s seas. Let’s dive into the world of origami and get started on this delightful project.
Certainly! Here is a step-by-step guide to making an origami boat:
Take the object and fold it in half according to the demonstrated method. Afterward, proceed to fold it once more, but only partially this time, creating a crease in close proximity to the upper section.
Please refer to the image on the left below, where you can clearly observe the crease. This crease serves as a guide to align the corners appropriately. Proceed to fold down the corners as indicated in the image below.
Begin by folding each edge of the paper upwards, following the instructions provided. As demonstrated, use your fingers to carefully open up the folds, resulting in the formation of a hat. At this point, you can choose to conclude the folding process and enjoy your hat. However, if you wish to proceed further, you have the option to transform the hat into a boat.
To transform the hat into a square shape, bring the corners of the hat brim towards each other. As you do this, you will notice that the edges of the brim will naturally push outwards. This action can be likened to “squashing” the hat, gradually reshaping it into a square.
Next, select one of the lower corners of the square and fold it upwards, creating a triangular shape. Flip the folded piece over and repeat the same folding process for the other corner. Now, you should have a folded triangle. To continue, carefully open up the folded triangle and bring the corners together, aligning them neatly…
Once you have the folded triangle, proceed to “squash” it again into a square shape, similar to the middle photo provided. Gently pull on the folded edges to unfold the paper and reveal the boat shape. If you prefer, you can turn the boat over and expand the hole in the bottom. Enlarging the hole will improve the boat’s balance and floating ability.
Watch Video Tutorial
Frequently Asked Question
Can i use any size of paper to make an origami boat.
While it’s possible to make an origami boat with different sizes of paper, it is generally easier to work with a square sheet of paper. The size of the paper will determine the final size of the boat. Larger paper will result in a bigger boat, while smaller paper will create a smaller boat. It’s recommended to start with a square piece of paper, but you can experiment with different sizes to achieve the desired result.
What if I don’t have origami paper?
If you don’t have origami paper, you can use any square-shaped paper, such as regular printer paper, construction paper, or even recycled paper. You can easily make a square from rectangular paper by folding it diagonally and trimming off the excess. The key is to have a square shape to begin with, as it makes the folding process easier.
Can I decorate or personalize my origami boat?
Absolutely! Origami boats can be a fun and creative project. Once you’ve folded your boat, you can use markers, crayons, or colored pencils to add designs or patterns to the paper. Just be mindful not to use heavy materials that may weigh down the paper or make it difficult to fold.
How can I make the origami boat float in water?
While origami boats are not typically designed to float for extended periods, you can take some steps to make them float temporarily. You can apply a thin layer of waterproof sealant or wax on the surface of the boat to make it more water-resistant. Additionally, you can use lightweight materials, such as toothpicks or small pieces of cork, to create a simple raft-like structure underneath the boat, which can improve its floating ability.
Can I unfold the origami boat once it’s folded?
Yes, you can unfold the origami boat by reversing the folding steps. Gently unfold the paper along the creases you made, taking care not to tear or damage the paper. This allows you to reuse the paper or try folding a different origami model.
Making a simple origami boat is a fun and enjoyable activity. All you need is a square piece of paper, and you can follow the step-by-step instructions to create your own boat. Remember, while origami boats may not float for an extended period, you can decorate them and make them temporarily float by applying a waterproof sealant or adding lightweight materials. Don’t hesitate to get creative and personalize your origami boat. Enjoy the process of folding and have fun with your finished creation!

Chrissy is a freelance writer, teacher, and designer who creates content on origami and paper crafts. She runs the site Origami Step and makes her own origami tutorials for readers. She has been writing about origami since 2008 and is the founder of website Origami Step, where she creates videos, resources, and printable origami paper.
How to make an Origami Koi or Origami Carp
Origami cow face origami cow easy i simply&easy origami.
ann wood handmade
sewing patterns, crafts and diy projects
make a paper boat : a free tutorial

Some projects are most satisfying to work on in batches. These paper boats are like that. They are quick and easy and you can make a bunch at once without much extra effort. Plus the finished group is very satisfying. You probably already have most of the materials you need and you could easily be hanging a respectable fleet by the end of the day, who doesn’t want that?
download the boat template
You will also need:.
- heavy paper (I’m using water color paper) or light cardboard (like poster board)
- a bamboo skewer
- paper for the sail
- elmer’s glue
- embroidery thread or light string (like baker’s twine)
- paints, brushes and/or collage materials
- exacto knife
- clothespins or paperclips for clamping
*Please read through all the steps before beginning.
*Also note I included some simple directions on the sail template for your convenience but the directions below include more details and options.

1. Cut out the boat and mast support templates and trace them onto light cardboard or a heavy weight paper. I’m Using water color paper (140 pound hot press is my favorite). Optional – paint both sides. I almost always paint a wash of water color on both sides of the boat and mast support.
2. Place the template back on the boat and poke your pencil through where the score lines intersect. Mark with a dot. Remove the template and draw on the score lines. Draw the score lines on the mast support too and mark an X on the center of the top section.

3. Use the back of an x-acto knife to score the lines on the boat and mast support.
4. Gently fold the boat and mast support at the score lines.

5. Add glue to the last section of the mast support, fold it into a triangle and glue the top section over it.
6. Clamp with paper clip or clothespins while it dries.

7. While your mast support dries paint or collage or draw on your boat. I did all three. I used a wash of watercolor, some pencil lines and a little collage. If you’re doing lots of collage I recommend using nori paste instead of blue stick . It is awesome. You can find it here . * FYI – this is an affiliate link – meaning I get a small commission if you purchase through the link.

8. Apply glue to the bow as indicated on the template.
9. Fold the boat together at the front and clamp with clothespins or paper clips while the glue dries. Alternatively – you can skip the glue, bring the front sides together and stitch on the sewing machine close to the edge.

10. Fold the center back ( A on the template) and apply glue to the top.

11. Bend up tab B – covering the top of tab A and matching the top edges. Apply glue and bend up tab C covering the top of tab B and matching the top edges. Clamp and let dry. Alternatively – skip the glue and attach the three layers with a stitch and a button (step 16 below).

12. Use and xacto knife to poke an X at through the center of the mast support.
13. Snip iff the tip of your skewer and insert it into the hole – push it all the way to the bottom of the mast support. Make sure it is straight and add glue (lots) to the insertion point. Let it dry, mast support end up.

14. Cut out a sail and flag from paper. Poke a hole at the center of the top and bottom and insert the mast through the holes.

15. Cut a 36 inch length of embroidery thread or fine string (like baker’s twine) and tie a loop in the center. Apply glue to the top 1/2 inch of the mast and wind the tails on to attach. This leaves most of the strings hanging down below.

16. Add a button at the back. Use a large needle to poke a hole through all the layers and ties on a button. Poke a hole through the tip of the bow as well and tie on one or two buttons.

17. Fold the flag in half, unfold it and apply glue stick. Fold it over the mast. Press the sides together and if you like trim and curl the ends.

18. Place the mast support into the boat. You can glue it in place or use the strings to attach hold it in place (see below).

19. Hold (or glue) the mast support in the boat and wind the strings around the buttons. To add flags fold a 1 inch strip of paper in half the long way and cut into flags, open the flag, apply glue stick and fold over the strings.
I hope you make lots of paper boats! And for variety you can mess around with the sail configurations, scale and the edges of the boat template. If you make boats I’d love to see – please use #annwoodpattern on instagram or email a photo to me at info at ann wood handmade dot com.

Get my free weekly-ish newsletter, there are tips and tricks, ideas, stuff to try, all the latest news and blogposts and extra stuff, just for subscribers, delivered mostly on Friday. Pretty much.
17 comments.
Thanks so much, Ann. I was recently wondering what new thing I could make with my paper, stamps and watercolors.
So exciting to share with my grandchildren, thank you!
This is lovely – thank you for sharing.
I can’t wait to make these! I made a big fleet of the paper boat ornaments last Christmas as gifts. I’ve been wanting to make boats to keep. This is it! Thank you so much!
This is a wonderful project! Thank you so much for sharing. Love your blog, I always take time to read through, “and smell the roses”.
Love them! What is the little connector you have used to connect them to the string that is holding them up to the ceiling? Thank you as always……
Thanks Gail! I put a little button on the end of each string so I could move the boats around easily when I was arranging them. Just slip the loop at the top of the boat over the button to hang.
You let our imaginations set sail upon a sea of dreams. A perfect ship for my little spool and button dolls to sail away. Thank you!
I am quite sure that I will be making some little boats in the near future!
What a lovely place to create, that library and cabin and the scenery look so peaceful and inspiring.
For some reason I have never commented before, not sure what that is as I have enjoyed your blog a lot, and I think I have made about twenty of your little tiny rag dolls now! The first three made just after you first published the pattern, the rest I’ve made this year. Just made the jacket last night and my newest one ‘Clipper’ loves it.
Thank you for your generosity in sharing these marvellous patterns.
I so ♥ this, and the fact that you are still blogging & making fun tutorials Ann! So many bloggers have stopped and I miss them all!
I recently printed the pattern for the needle case and will make myself one soon, with fabric inherited from my grandmother.
This post got me started on a most enjoyable series of paper mache boats using your “Dear Little Boats” pattern – thank you for being so generous with your creativity.
Dear Ann, How generous of you to share such detailed instructions for free! I haven’t had the courage yet to make a ship, but I am much inspired. Thank you for the lovely world, mood, spirit, and community you have created with this faithful, long-running blog. It is balm and a well of inspiration for creative, like-minded souls. Blessings, Hollyann
So so elegant simple and beutifull
I am finishing up my little wire bed for mouse. I am having so much fun! You’d think I was a little girl or teenager, and not a 73 year young women. Great to be able to do whatever you want to do.
[…] Quote from the source: … […]
I have made these mini boats and people love them. The instructions are clear and easy to follow and the result is precious.
Comments are closed.
Privacy Overview

Get all the latest news, sales and discounts, blogposts and extra stuff, just for subscribers, delivered mostly on Friday. Pretty much.
- Experiments
How To Make An Easy Origami Paper Boat
- Paper Art Videos
When I as a kid, I used to make paper boats during the rains and float them in a large puddle that collected outside my grandmother’s place. The basic origami boat is another model that many children come across and we forget as adults. Let’s float back down memory lane.
The basic paper boat requires a rectangular sheet of paper, so if you’re using square origami paper, cut off a strip to make it rectangular.
Like most basic models, this is very forgiving and you can get away with using almost any sort of paper. If you plan on actually floating it in water, however, paper that’s too thin will not last very long, so keep that in mind.
Instructions

To begin, keep the rectangle in portrait format in front of you, i.e. laid tall rather than wide. Fold the paper down in half, making it half as tall.

Next you should fold it in half again along the width of the sheet. That’s 4 layers of paper, so be careful to make a neat crease.

Open up the last fold and now fold down one half of the top folded edge down towards the central crease. It will form a triangle like this.

Mirror the same fold on the other half and you’ll create this peak or point at the top of your paper.

The model now has two loose layers of paper towards the bottom. Lift the top layer and fold it upwards. Turn the model over and do the same with the bottom flap of the paper again.

The model is now almost a perfect triangle except for these extra corners at the bottom. Fold the extra bits over the sides of the thick triangle, and repeat from the other side. Now you have a perfect triangle with a hollow bit at the bottom.

Open up the hollow gap and bring the two side corners of the triangle flat together like this. Fold the rest of it flat to form this small square.

The square still has a hollow area inside and one end has two free corners. Fold one of them to the opposite corner like this to form a smaller triangular shape.

Turn the model over and repeat with the remaining free corner.

You now have a smaller triangle with a hollow area inside. Like before, open this up and fold it flat into a smaller square.

The top end now has two loose triangular corners like you can see here. Pull those apart, and fold the base of the boat flat.

Open up the boat model and it should look like this with a triangular shape sticking out from the middle.
That triangular shape is hollow and can be opened up from the bottom. Pull it apart a little to make the boat more stable, It will also help it float on water without tipping over.
Your boat is done. Try it out!
P.S. Please subscribe to Papernautic on YouTube to keep track of the latest videos and tutorials.
SailingEurope Blog - Sailing, Yacht Charter and Beyond

How to Make a Paper Boat
We get tons of queries about how to make a paper boat. So this blog post is dedicated to teaching you how to make a boat out of paper. Following our simple step-by-step guide, you will have a floating paper boat in a flash.
In folding a paper boat you will make a step in Origami technique ; a creative and innovative world of paper formatting. Origami is the Japanese name for the art of paper folding, and it has now become a beloved art form for people around the world. Origami has a history; the first use of the word “Origami” in Japan was not for our familiar recreational paper folding, but certificates. In Japan, there is an expression, Origami Tsuki , meaning “certified” or “guaranteed”.
The phrase stems from an ancient custom of folding certain special documents – such as diplomas for Tea Ceremony masters , or masters of swordsmanship – in such a way as to prevent unauthorized copies from being made. However, nowadays origami represents a creative way of spending time and a hobby for both adults and children.

How to Make a Paper Boat Step by Step
- Start from a rectangle. Fold in half.

- Fold in half again and unfold.

- Fold to the center.

- Fold the overlapping strip upwards.

- Fold corners backwards. Turn over.

- Fold strip upwards.

- Fold triangle upwards. Repeat behind.

- Open (like in the steps 7 and 8).

- Take upper corners and stretch out.

- Your boat is finished.

Now that we’ve taught how to make a paper boat, you’re ready to charter a yacht and enjoy some true sailing on a real boat. We hope you found these instructions useful. We would love to see your own made paper boats in the comments.
1 thought on “How to Make a Paper Boat”

you dont work
Leave a Comment Cancel Reply
Your email address will not be published. Required fields are marked *
Save my name, email, and website in this browser for the next time I comment.
This site uses Akismet to reduce spam. Learn how your comment data is processed .
How to Make a Paper Boat – Origami for Kids
We love doing simple origami and this time we’re going to learn how to make a paper boat – a summer favorite!
We’ve done quite a few awesome origami tutorials for kids and each of them is a must make!

I loved to make these as a kid (the exact same ones) and I loved to play with them even more – we would sail them in the bathtub, puddles and lakes and when possible even have boat races with other neighbourhood kids.

This time though we took it a step further too see who can make the smallest origami boat – each time working with a smaller piece of paper (cutting the size of the paper to half each time) and I was genuinely surprised with the size of paper we have come down to – and too be honest we could probably do one even smaller if I’d have some tweezers at hand.
How to Make a Paper Boat
All you need is a sheet of paper letter sized or A4. Regular print paper is perfect for this project. Use as many colors as possible.

Start off with a sheet of paper and fold it in half downwards.
Fold in half again as shown on the second image (you don’t need to make the crease from top to bottom – you just need to mark the center).
Bring corners to the center so that you get a triangle shape with a rectangle under it.
Fold the rectangle part under the triangle upwards (as shown with the purple spots) – flip your origami and do the same on the other side.

Grab the center of the triangle shape as indicated on the first image above with the red spot and pull both sides (holding the red spot) out. Flatten.
You’ll get the shape as shown on the second image above (ignore that red spot in the left bottom corner – I have no idea how that one came there haha).
Fold the front layer up (as shown with the green spot) flip the origami boat to be and do the same with the back layer. You’ll get a triangle shape.

Slowly pull the top parts outwards and you have your paper boat!

More cool origami for kids you can try:

We’ve had a lot of fun creating this shark fortune teller – it’s fun to make and even more fun to play with. You should also give these origami frogs a try!

Want instant access to all of our printable crafts, activities, and resources?

With thousands of crafts, activities, worksheets, coloring pages, and drawing tutorials to print, you will always have just the resource you need at your disposal. Perfect for parents and teachers alike!
Sign Up Now and Start Printing!
Related posts.

Let's take a walk into the forest and learn about the animals there by making…

And here's something for the origami lovers! I've rounded up some of the most fun…

Time for another origami! This time we're making an easy origami hedgehog perfect for kids…

If your kids are into origami, or are just getting started this super simple origami…

Hedgehog crafts are usually "reserved" for fall but I do love this animal so much…

Why not use fun origami to encourage reading? This cute chick corner bookmark is an…
Origami Way
Make a paper boat origami boat instructions and diagram.

If you've always wanted to play with boats in the tub, but your parents wouldn't get one for you, don't worry. I will show you how to make an origami boat out of paper, and yes it floats...for a little bit, but it's still fun nonetheless. However, I heard that if you color the bottom of the boat with crayon, then it will float longer. Just be careful not to splash too much water on it!
Before we get into how to make an origami boat, let us first discuss where this paper folding originated and where it first appeared. If you're interested in the history of paper folding, continue reading to learn the fundamentals of origami.
Research studies say that origami was first invented about a thousand years ago by the Japanese, but its roots may well be in China. The term refers to the craft of paper folding. The word "origami" is an inclusive term for the folding process of paper. "Ori" means "folding," and "gami" means "paper." The objective of origami is to transform a flat square sheet of paper into a fully completed piece of art through folding techniques and cutting methods.
How to Make a Paper Boat Float Longer?
If you're ready to make your paper boat origami, keep these tips in mind to ensure it will last a long time on the water. The most common is that if you color the bottom of the origami boat with crayons, it will float longer but not long enough to reach the finish line. Some people also say that to make the boat last longer when it is on water, try using foil paper or grease-proof paper.
How to Make a Paper Boat?
The origami boat is actually very simple to make. All you need is a rectangular piece of paper, so any 8.5x11 copy or lined paper will do. Then follow the instructions and pictures carefully and you'll be able to make your own origami boat that floats.
With the help of this simple step-by-step lesson, you can quickly and easily create the most well-known origami paper boat.

- © Origamiway.com
No products in the cart.

How to Make a Fun Origami Paper Boat
Do you like making origami paper boats? Origami is fun, but it can be even more fun if you make the boat out of origami paper! This tutorial will teach you how to make an origami boat with just one piece of paper.
It’s also a great craft for kids , since it requires no cutting or gluing and is very simple to fold. Let’s get started!
Supplies Needed for the Paper Boat Origami
- Coloring Paper
- Crayola Markers
- or Colored Pencils
1. Origami Paper

2. Crayola Markers
3. Colored Pencils

If you love Origami, then click the links below!
- What Is Origami?
- What Does Origami Mean?
- The Wonderful History Of Origami Drawing
- Origami Easy for Kids
- Fun Easy Origami
- Birthday Origami Ideas
- 30 Origami Animals
- 25 Cool Origami
How to make an Origami Paper Boat?
This tutorial is a step-by-step guide on how to make a paper boat for your child to enjoy. It’s a fun activity for all ages, and a perfect rainy day activity.

Take a square sheet of paper, any kind of paper would work.

Fold in half.

Fold in half again.

Then take one of the triangle and fold it upwards.

Flip it and fold the remaining three triangles upwards.

Now you can see a pocket below.

Place your thumbs in it, stretch it and then press.

Take upper corners and stretch out.

That’s It! You have completed the Origami Boat.
Eazy Peezy, Lemon Squeezy!
Wrapping up How to Make a Fun Origami Boat
Origami paper boats are a fun craft that can be made by anyone. We’ve provided you with instructions for making an origami boat, but there are plenty of other designs to explore as well.
This is just one example of the many crafts and projects out there that don’t require any special skills! If you enjoyed this article or want more like it, please comment below so we know what our readers enjoy reading about.
Like and Share!
Similar Posts

Create an Amazing Paper Heart Chain
Paper heart chains are a popular art project in many classrooms and for good reason. They are simple, inexpensive, beautiful, and easy to make. There are so many ways to string hearts together that the possibilities of combinations is endless! Supplies Needed: Paper Pencil Scissor Step 1 Take long strip of paper, I used A4…

Fun Paper Popsicle Ice Cream Craft
Ice Cream Crafts What’s more invigorating than ice cream during a warm summer day. Paper popsicle craft is a great activity during summer breaks. It’s excessively easy to make since there are a couple of steps and not a great deal of cutting. This makes it incredible for crafting with preschoolers and toddlers. This is…

How to Create Fancy Winged Hearts Step By Step
Origami winged hearts are made by using only a square piece of paper and includes few and simple steps. So, let’s get started. Check out these amazing art projects 👇 How to make Winged Hearts Make this Valentine’s Day special! Learn how to make beautiful and unique Winged Hearts with our easy-to-follow tutorial. Surprise your…

Create a Cute Bunny Rabbit Calendar in Minutes: Quick and Easy Guide
This Bunny Rabbit Calendar craft for kids is a lot of fun! You can make a cute table calendar for yourself especially as it includes adorable bunnies. This can also be a good Easter craft as it is a bunny craft and looks very adorable! Check out these amazing art projects 👇 How to Make…

(Easy Activity) How to Make A Penguin
This tutorial is How to Make A Penguin! Winter is a slushy season, making us tremble in cold and giving us Goosebumps. We love this season for skating and we also love visiting snow animals in zoos, such as penguins! To keep you loving penguins, we have decided to make penguins in this tutorial and…

Creative Flower Pot Card (Mothers Day Crafts For Kids)
Mother’s day is a day that is celebrated to thank our mothers for their efforts and to give them a day of relaxation and happiness and show our love and care for them. It is usually celebrated on the second Sunday of May to honor our mothers and their role in society! Why not we…
One Comment
- Pingback: Origami Easy for Kids - CraftyThinking
Leave a Reply Cancel reply
Your email address will not be published. Required fields are marked *
Save my name, email, and website in this browser for the next time I comment.

Stimming and Autism: 15 Repetitive Behaviors You Need to Know

25 Best Social Skill Training Exercises for Children with Autism

What is High Functioning Autism? Signs, Symptoms and When to Diagnose.

20 Tips for Dating Someone with Autism Spectrum Disorder

10 Important Autism Traits and Everything You Need to Know About Signs of Autism

Alarming Rise in Autism: Data About the Increase in Autism Rates
Subscribe to our newsletter.
Subscribers get exclusive access to printable resources, special discounts, and early-bird notifications for our workshops.
Let’s keep the spark of creativity alive together! 🎨✨💌
32 Phonics Lessons
Up to 69% off
Teach your child to read.
- PRO Courses Guides New Tech Help Pro Expert Videos About wikiHow Pro Upgrade Sign In
- EDIT Edit this Article
- EXPLORE Tech Help Pro About Us Random Article Quizzes Request a New Article Community Dashboard This Or That Game Popular Categories Arts and Entertainment Artwork Books Movies Computers and Electronics Computers Phone Skills Technology Hacks Health Men's Health Mental Health Women's Health Relationships Dating Love Relationship Issues Hobbies and Crafts Crafts Drawing Games Education & Communication Communication Skills Personal Development Studying Personal Care and Style Fashion Hair Care Personal Hygiene Youth Personal Care School Stuff Dating All Categories Arts and Entertainment Finance and Business Home and Garden Relationship Quizzes Cars & Other Vehicles Food and Entertaining Personal Care and Style Sports and Fitness Computers and Electronics Health Pets and Animals Travel Education & Communication Hobbies and Crafts Philosophy and Religion Work World Family Life Holidays and Traditions Relationships Youth
- Browse Articles
- Learn Something New
- Quizzes Hot
- This Or That Game New
- Train Your Brain
- Explore More
- Support wikiHow
- About wikiHow
- Log in / Sign up
- Hobbies and Crafts
- Paper Craft
How to Make a Paper Boat with a Big Sail
Last Updated: November 3, 2022
wikiHow is a “wiki,” similar to Wikipedia, which means that many of our articles are co-written by multiple authors. To create this article, 13 people, some anonymous, worked to edit and improve it over time. This article has been viewed 60,497 times. Learn more...
You've heard of how to make a paper boat, right? Well, to make one with a bigger sail would be better, so read below to see how!

Community Q&A
- If you are using scrap paper, when doing the first step in How to Make a Paper Boat (fold in half) then when doing so, the written/printed side must be face up and it will turn out better. Thanks Helpful 2 Not Helpful 1

Things You'll Need
- 2 A4 sheets of paper (Any color)
- A Glue Stick (Pritt or Bostik Recommended)
You Might Also Like

About This Article
- Send fan mail to authors
Did this article help you?

Featured Articles

Trending Articles

Watch Articles

- Terms of Use
- Privacy Policy
- Do Not Sell or Share My Info
- Not Selling Info
wikiHow Tech Help Pro:
Level up your tech skills and stay ahead of the curve
Quill And Fox
Best Design Studio

Amber Robertson
Amber Robertson is the founder of Quill and Fox. A creative writing studio that helps people find their voice and share their stories. Amber is also a published author, with her first book slated for release in 2020. She loves spending time with her family and friends, reading, writing, and traveling. When Amber was younger, she loved to write short stories and plays. But somewhere along the way, she lost touch with her creativity. It wasn’t until she became a mom that she realized how important it was to share her stories—both the good and the bad—with the people she loves most. That’s when Quill and Fox was born. Amber is passionate about helping others find their voice and share their stories. She believes that every person has a story worth telling, and it’s her mission to help them tell it in a way that is authentic and true to themselves

How to Make a Boat Out of Paper: A Beginner’s Guide
Table of Contents
Are you looking for a fun and easy craft activity that you can do at home? Making a boat out of paper is a classic activity that has been enjoyed by many generations. Not only is it a great way to spend an afternoon, but it also allows you to exercise your creativity and imagination.
In this beginner’s guide, we will teach you how to make a boat out of paper in a few simple steps. Whether you are a seasoned paper crafter or a complete beginner, this guide will help you create a beautiful paper boat that you can be proud of.
Materials Needed

Before we get started, let’s gather the materials you will need to make a paper boat. The good news is that you probably already have most of these items at home.
- A sheet of paper: You can use any type of paper, but we recommend using a square sheet of paper. You can use origami paper, printer paper, or even newspaper.
- Scissors: You will need a pair of scissors to cut the paper.
- Glue or tape: You will need glue or tape to hold the paper together.
- Optional: You can decorate your paper boat with markers, crayons, or stickers.
Basic Steps in Making a Paper Boat
Now that you have your materials ready let’s move on to the basic steps in making a paper boat. Follow these simple steps to create your paper boat:
- Start with a square sheet of paper. If you are using a rectangular sheet of paper, fold one corner over to the opposite edge to form a triangle. Cut off the excess paper to create a square.
- Fold the paper in half diagonally to form a triangle. Crease the fold and then unfold the paper.
- Fold the paper in half diagonally again, but in the opposite direction. Crease the fold and then unfold the paper.
- Fold the paper in half horizontally. Crease the fold and then unfold the paper.
- Fold the paper in half vertically. Crease the fold and then unfold the paper.
- Fold the corners of the paper towards the center crease. The paper should look like a kite.
- Fold the top layer of the bottom edge of the paper upwards to meet the center crease. Crease the fold.
- Repeat step 7 for the other side of the paper.
- Fold the top layer of the paper downwards along the horizontal crease. Crease the fold.
- Tuck the corners of the paper into the pockets that were created in step 8.
Congratulations, you have just made a paper boat! Now that you have mastered the basic steps, let’s move on to the different types of paper boats you can make.
Types of Paper Boats
There are many different types of paper boats that you can make, ranging from simple designs to more complex origami boats. Here are three types of paper boats that you can try:
- Classic Paper Boat: The classic paper boat is the design we just taught you how to make. This boat is easy to make and is perfect for beginners.
- Origami Paper Boat: The origami paper boat is a more complex design that involves more folding techniques. This boat is perfect for those who have some experience with paper folding.
- Paper Plate Boat: The paper plate boat is a fun and creative way to make a boat out of paper. You can use a paper plate as the base of the boat and decorate it with paper sails and flags.
As we mentioned earlier, there are various types of paper boats that you can make. Here are some of the most popular ones:
Classic Paper Boat
The classic paper boat is easy to make and perfect for beginners. It is a simple design that involves basic folding techniques. You can decorate it with markers, crayons, or stickers to make it more colorful and fun.
Origami Paper Boat
Origami paper boats are more complex than classic paper boats and require more folding techniques. This type of paper boat is perfect for those who have some experience with paper folding. There are many different types of origami paper boats that you can make, ranging from simple designs to more complex ones.
Paper Plate Boat
The paper plate boat is a fun and creative way to make a boat out of paper. You can use a paper plate as the base of the boat and decorate it with paper sails and flags. This type of paper boat is perfect for kids and can be used as a fun summer activity.
Tips and Tricks
Now that you know how to make a paper boat, here are some tips and tricks to help you create the perfect paper boat:
Choosing the Right Paper
When making a paper boat, it is important to choose the right type of paper. You can use any type of paper, but we recommend using a thicker paper, such as cardstock or construction paper. These types of paper are more durable and will make your boat last longer.
Making the Boat Waterproof
If you want your paper boat to float on water, you need to make it waterproof. You can do this by applying a layer of wax or clear nail polish to the paper. This will make the boat water-resistant and prevent it from getting soggy.
Adding Designs and Decorations
To make your paper boat more fun and colorful, you can add designs and decorations. You can use markers, crayons, or stickers to decorate your boat. You can also add paper sails and flags to make it look like a real boat. Let your imagination run wild and create a unique and beautiful paper boat.
Fun Activities with Paper Boats
Once you have made your paper boat, there are many fun activities you can do with it. Here are three fun activities that you can try:
- Racing Paper Boats: You can race your paper boat with your friends or family members. All you need is a tub of water, and you can race your boats to see whose boat is the fastest. You can also make adjustments to your boat to see which modifications help it move faster through the water.
- Floating Paper Boats in a Pool: If you have access to a swimming pool, you can float your paper boats on the water. You can also make a game out of it by trying to toss your boats into a designated area of the pool.
- Making a Paper Boat Fleet: Once you have made a few paper boats, you can create a paper boat fleet. You can decorate each boat differently or even create different types of boats to add variety to your fleet. You can display your fleet on a shelf or use it as a centerpiece for a party.
In conclusion, making a boat out of paper is a fun and easy craft activity that anyone can enjoy. With a few simple steps, you can create a beautiful paper boat that you can be proud of. There are also many fun activities that you can do with your paper boat, such as racing, floating, and creating a paper boat fleet.
We hope that this beginner’s guide has inspired you to try making a paper boat. Remember to have fun and let your imagination run wild. With a little creativity, you can create a paper boat that is truly unique and special. So grab your paper and scissors, and let’s get crafting!
IMAGES
VIDEO
COMMENTS
For the full instructions visit: https://onelittleproject.com/how-to-make-a-paper-boat/These paper boats are SO FUN and they're so simple to make! All you ne...
Difficulty: ★ ☆ ☆ ☆ ☆ (Simple)In this video, you will learn how to make a paper boat. This is an easy traditional design that is perfect for beginners!This v...
1. Make the triangle into a square. Pick up the triangle, rotate it 45 degrees, then use your fingers to open up the bottom of the triangle. Pull the paper apart gently until it pops into a square shape. Make sure the bottom corners of the triangle fold over each other and become the bottom corner of a diamond.
This video will show you how to make a mini luxury yacht with paper. An easy diy craft for home decor or gift ideas.DIY paper boat ⛵️. How to make paper boat...
Press along the edge to make a fold. Pick up the folded paper and place your thumbs into the opening at the bottom. Again, slowly pull your thumbs apart from one another, pulling apart the paper as you go. When you finish pulling, the paper should be flat again, as shown in the photo below. Once again, run your fingers along all of the folds ...
x. Flip the paper over and fold the other layer too. You will get the triangle shape in x. y. Open the bottom of the figure again by pulling the flaps apart. z. Flatten it out and you will get a diamond shape now. aa. Open the figure by pulling the sides apart from the top to get the shape of the boat.
Start with your rectangular paper, orient it vertically, with the long edges going up and down. Fold the bottom half up to the top.Fold the bottom right corner over to the left corner and make a small pinch, just enough to crease the paper. Open it back up. The Spruce Crafts / Chrissy Pk.
In this guide, we will walk you through the steps to create a simple origami boat. To begin, select a square sheet of paper. You can use origami paper, colored paper, or even a plain white sheet. Place the paper in front of you, ensuring that one corner is facing upwards. Fold the paper in half diagonally, creating a triangle.
3. Use the back of an x-acto knife to score the lines on the boat and mast support. 4. Gently fold the boat and mast support at the score lines. 5. Add glue to the last section of the mast support, fold it into a triangle and glue the top section over it. 6. Clamp with paper clip or clothespins while it dries. 7.
Pull those apart, and fold the base of the boat flat. Step 12. Open up the boat model and it should look like this with a triangular shape sticking out from the middle. That triangular shape is hollow and can be opened up from the bottom. Pull it apart a little to make the boat more stable, It will also help it float on water without tipping over.
Take upper corners and stretch out. Step 10. Your boat is finished. Step 11. Now that we've taught how to make a paper boat, you're ready to charter a yacht and enjoy some true sailing on a real boat. We hope you found these instructions useful. We would love to see your own made paper boats in the comments.
Start off with a sheet of paper and fold it in half downwards. Fold in half again as shown on the second image (you don't need to make the crease from top to bottom - you just need to mark the center). Bring corners to the center so that you get a triangle shape with a rectangle under it. Fold the rectangle part under the triangle upwards ...
In this video I will show you step by step how to make a paper boat.
Step 3: Fold in half again, this time folding top to bottom. Step 4: Fold the upper left and right corners to the middle. Step 5: Fold the bottom strip up. Step 6: Do the same to the strip on the other side. Step 7: Open up the paper all the way to collapse it into a diamond shaped figure. Go to Next page to continue with the origami boat ...
To create the hull of the sailboat, follow these steps: Step 1: Take a rectangular piece of paper and place it in front of you. Step 2: Fold the paper in half lengthwise, creating a center crease. Step 3: Unfold the paper and fold the right and left edges towards the center crease.
Origami is fun, but it can be even more fun if you make the boat out of origami paper! This tutorial will teach you how to make an origami boat with just one piece of paper. It's also a great craft for kids, since it requires no cutting or gluing and is very simple to fold. Let's get started! Supplies Needed for the Paper Boat Origami ...
Origami Boat 🛥 How to Make a Paper Boat that Floats - Paper Speed BoatSubscribe to channel: http://bit.ly/2vxE4Wu#origami #easyorigami #papercraft #PaperCra...
Here's how to put a paper boat together. Step 1: Take the paper sheet and fold it in the middle. 2. Make folds from each of the corners so they meet in the middle. 3. Create a fold in the open lip. 4. Repeat the same fold on the other side. 5.
Step 14: Rotate the paper. Step 15: Fold the top right section down. Step 16: Fold the flap back up, leaving a small overlap. Step 17: Tuck the overlap inside the bottom section & Flatten the creases. Step 18: Flip the model over to the other side. Step 19: Fold the bottom point up to create a little stand & rotate.
3. Use the other sheet of paper to make the Big Sail. 4. Take the top-left corner of the paper and fold it down to the exact bottom point. 5. Then fold the top-right corner to the exact previous fold point, then do the same with the bottom-right corner. 6. Fold the right side to the fold point you made at Step 4. 7.
How to Make a Paper Boat that Floats. Paper Speed Boat. Origami Boat.
Crease the fold and then unfold the paper. Fold the paper in half vertically. Crease the fold and then unfold the paper. Fold the corners of the paper towards the center crease. The paper should look like a kite. Fold the top layer of the bottom edge of the paper upwards to meet the center crease. Crease the fold.
EASY ORIGAMI SAILBOAT / HOW TO MAKE PAPER SHIP / PAPER CRAFT / HOME DECORE / 3D PAPER BOAT / ORIGAMIhow to make paper sailboat how to make paper shiphow to m...