- BOAT OF THE YEAR
- Newsletters
- Sailboat Reviews
- Boating Safety
- Sailing Totem
- Charter Resources
- Destinations
- Galley Recipes
- Living Aboard
- Sails and Rigging
- Maintenance
- Best Marine Electronics & Technology

Maintaining Your Marine Water Tank System
- By Steve D'Antonio
- Updated: January 9, 2014
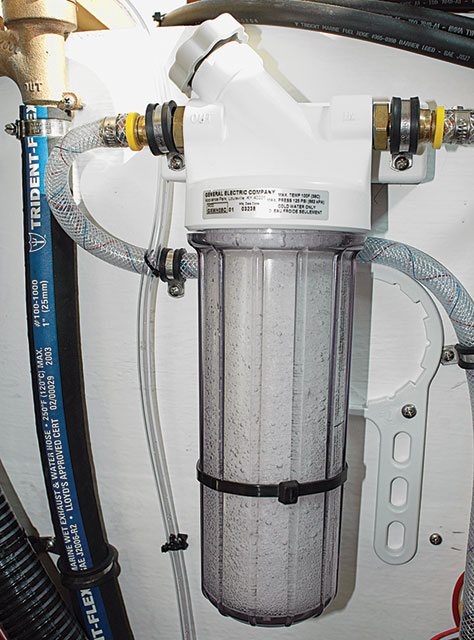
Water Filter
Clean water is not an onboard luxury: It’s a necessity. Drinking, bathing, cooking and cleaning all demand a high degree of purity in your potable water system. Begin the analysis of your system with your marine water tank. What is it made from? Has it ever been opened and inspected? Ideal potable water tank materials include 316L stainless steel; fiberglass that is coated with FDA-approved gelcoat; or epoxy and virgin linear polyethylene. Because of its susceptibility to both galvanic and poultice corrosion, aluminum, while used occasionally for water tanks (as well as integrally aboard aluminum vessels), is less than desirable in potable water applications.
Like all onboard tankage, water tanks should be equipped with inspection or cleaning ports. If your tank is so equipped and you’ve never peeked inside, now’s the time to determine if detritus has accumulated. Don a sanitary rubber glove and swab your finger across the inside of the tank. If it feels slimy or emits an odor, the tank’s interior needs to be scrubbed with detergent, rinsed and sanitized.
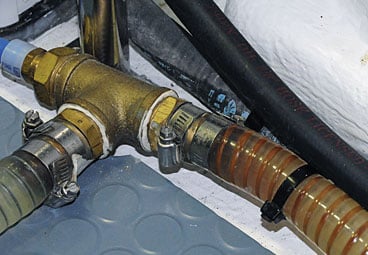
| |The bottom right hose in this image relies on steel wire reinforcement, which unfortunately is rusting. Seek other alternatives.|
Next, inspect your plumbing. All hoses , tubing and pipes should be rated for potable water use. If they’re not, there’s no telling what sorts of particles or compounds may be sloughing or leaching into your water supply. Hose, plastic tubing and plastic pipe (including fill and vent hoses) should all be emblazoned with at least one of the following designations: NSF61, FDA Approved or Potable Water Approved. Despite its widespread use, clear hose should be avoided due to its propensity to support algal growth. Conversely, opaque polyethylene, copper and PVC plumbing are well suited to potable water applications.
Anyone installing or working on potable water systems must strive to be as careful and hygienic as possible. Tank openings and plumbing ends must remain closed, taped over or otherwise covered unless they are actually being worked on at the time.
Filters can present a first, second and even third line of defense against potable water contamination. When filling tanks, running dockside water through a high-volume inline filter will ensure clean water is brought aboard. (Note: Dockside hoses are notorious for lacking a potable water approval rating.) However, filters containing activated charcoal should not be used for this purpose, as they will neutralize the chlorine contained in municipal water supplies, which will likely allow biological growth within the tank and plumbing. Also, liveaboard sailors who plan on leaving filters on the dock should make sure they have opaque canisters, as clear canisters are ideal breeding grounds for algae.
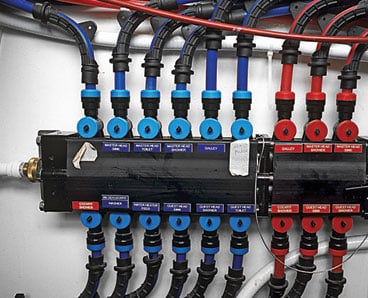
| |Proprietary potable-water plumbing systems like this one are not only reliable and compact, they are also specifically designed and suited for fresh drinking water.|
Onboard filters that service the entire boat can be installed immediately downstream of the vessel’s water supply pump, and in this case activated charcoal, along with a particulate filter, are an excellent option. These need not be specialized “marine” filters; household units work very well, and replacement elements are both readily available and inexpensive. Alternatively, you can opt to filter only the water that you intend to drink, cook or wash utensils with, using a “point of use” or under-counter unit. These low-volume specialized filters usually incorporate a carbon component and typically rely on a compact filter and dedicated countertop spigot.
Steve D’Antonio offers services for boat owners and buyers through Steve D’Antonio Marine Consulting ( www.stevedmarineconsulting.com ).
- More: boat maintenance , How To , monthly maintenance , ship's systems , systems
- More How To

3 Clutch Sails For Peak Performance

It’s Time to Rethink Your Ditch Kit

8 Ways to Prevent Seasickness

How To De-Winterize Your Diesel Engine

The Moorings Expands in Croatia

C-Map Updates North America Charts

New to the Fleet: Italia Yachts 12.98

St. Vincent Court Orders Deportation For Hijacking Suspects
- Digital Edition
- Customer Service
- Privacy Policy
- Terms of Use
- Email Newsletters
- Cruising World
- Florida Travel + Life
- Sailing World
- Salt Water Sportsman
- Sport Fishing
- Wakeboarding
Many products featured on this site were editorially chosen. Cruising World may receive financial compensation for products purchased through this site.
Copyright © 2024 Cruising World. A Bonnier LLC Company . All rights reserved. Reproduction in whole or in part without permission is prohibited.
- PRO Courses Guides New Tech Help Pro Expert Videos About wikiHow Pro Upgrade Sign In
- EDIT Edit this Article
- EXPLORE Tech Help Pro About Us Random Article Quizzes Request a New Article Community Dashboard This Or That Game Popular Categories Arts and Entertainment Artwork Books Movies Computers and Electronics Computers Phone Skills Technology Hacks Health Men's Health Mental Health Women's Health Relationships Dating Love Relationship Issues Hobbies and Crafts Crafts Drawing Games Education & Communication Communication Skills Personal Development Studying Personal Care and Style Fashion Hair Care Personal Hygiene Youth Personal Care School Stuff Dating All Categories Arts and Entertainment Finance and Business Home and Garden Relationship Quizzes Cars & Other Vehicles Food and Entertaining Personal Care and Style Sports and Fitness Computers and Electronics Health Pets and Animals Travel Education & Communication Hobbies and Crafts Philosophy and Religion Work World Family Life Holidays and Traditions Relationships Youth
- Browse Articles
- Learn Something New
- Quizzes Hot
- This Or That Game New
- Train Your Brain
- Explore More
- Support wikiHow
- About wikiHow
- Log in / Sign up
- Cars & Other Vehicles
How to Clean a Boat Water Tank
Last Updated: January 2, 2024 References
This article was co-authored by wikiHow staff writer, Megaera Lorenz, PhD . Megaera Lorenz is an Egyptologist and Writer with over 20 years of experience in public education. In 2017, she graduated with her PhD in Egyptology from The University of Chicago, where she served for several years as a content advisor and program facilitator for the Oriental Institute Museum’s Public Education office. She has also developed and taught Egyptology courses at The University of Chicago and Loyola University Chicago. There are 11 references cited in this article, which can be found at the bottom of the page. This article has been viewed 20,197 times. Learn more...
Having a fresh water system on your boat is super convenient if you tend to go on long boating trips. You can use it to cook, clean, or even take showers while you’re out on the water. Unfortunately, boat water tanks can become home to mold, bacteria, and algae, giving the water an unpleasant smell and taste or even making it unsafe to drink. Keep the water on your boat fresh and clean by cleaning out your tank and disinfecting it with bleach at least once a year.
Emptying out the Tank

- The location of the pump and water tank varies from one boat to another. If you’re not sure where to look, consult a schematic of your boat or your owner’s manual, if you have it.

- Listen for air coming out of the taps. This will tell you that the tank is empty.

- Many boats have pumps that automatically turn on after the water pressure drops below a certain level. This is meant to keep your water moving as the level in the tank gets lower. [4] X Research source
Removing Dirt and Residue

- In some cases, the cap might be difficult to remove. You may need a special tool to open it. Consult the user manual for your boat or your specific water system. [6] X Research source

- If you’re able to get your hand in through the opening of the tank, feel the inside walls. If they feel slick or slimy, that’s a sign of bacterial buildup.

- If you use a power washer, you’ll need some angle attachments to get into hard-to-reach corners.

- If you emptied the tank completely the first time, it will probably take a few minutes for the water to start flowing again since there will be air in the pipes.
Disinfecting the Tank

- Consult your user manual if you’re not sure where the water heater is located.

- To remove your faucet aerators, unscrew them with a wrench. Clean the aerators with hot, soapy water and a scrub brush. If there are a lot of mineral deposits on the screen, you can remove them by soaking the aerator in white vinegar for a few minutes before scrubbing it. [12] X Research source
- If your pump has a protective mesh strainer, leave that in place. It will help protect your pump during the cleaning process.
- If your water tank has a vent hose and screen, detach those as well. Clean them with hot, soapy water if they appear dirty.

- You can use this chlorine calculator to determine the correct amount of bleach to use: https://www.publichealthontario.ca/en/health-topics/environmental-occupational-health/water-quality/chlorine-dilution-calculator .
- For example, if you have a 50 US gal (190 L) tank, you’d need to use about 6.7 fluid ounces (200 mL) of bleach.
Warning: Never mix bleach with other household cleaners, since it could create toxic chlorine fumes. Always use bleach in a well-ventilated area.

- Combining the bleach with water before you pour it in will also help prevent corrosion if your tank is aluminum.

- Alternatively, you can fill the tank with fresh water before adding the bleach to the tank.

- If your tank has a vent, let a little of the water and bleach solution spill out through the vent in order to sanitize the vent line. If the vent is exterior, put a bucket or other container under it to keep the bleach solution from entering the water outside your boat.

- It may take a few minutes for the pump to push all the air out of the lines and get the water flowing again.

- If you don’t have time to let the bleach stay in your water tank for a full 12 hours, try to leave it for at least 4 hours. [18] X Research source

- If you still smell a hint of bleach after flushing and refilling the tank twice, add 1 teaspoon (4.9 mL) of hydrogen peroxide per 20 gallons (76 L) of tank capacity and flush the tank again. The hydrogen peroxide should neutralize the remaining bleach.

- Start with the tap farthest from the pump and work your way to the closest one. Make sure to let the air out of each tap to get your system working properly again. [22] X Research source
Expert Q&A
- Even with regular cleaning, the water on a boat can quickly take on an unpleasant smell and taste. Try adding a little lemon juice to the tank to keep your water fresh longer and improve its odor. [23] X Research source A solution of about 2 tablespoons (30 mL) of lemon juice per .26 gallons (0.98 L) of water can effectively disinfect drinking water. [24] X Research source Thanks Helpful 0 Not Helpful 0
You Might Also Like

- ↑ https://youtu.be/FM93IVN5fjk?t=9
- ↑ https://youtu.be/FM93IVN5fjk?t=18
- ↑ https://www.sailmagazine.com/diy/let-it-flow
- ↑ https://youtu.be/-Ov-24uJ8oE?t=101
- ↑ https://youtu.be/-QzsEvw67ec?t=141
- ↑ https://www.practical-sailor.com/blog/decontaminating-a-tainted-water-tank
- ↑ https://www.goodhousekeeping.com/home/cleaning/a28198674/how-to-clean-dirty-faucet-aerator/
- ↑ https://youtu.be/-Ov-24uJ8oE?t=254
- ↑ https://www.pbo.co.uk/gear/boat-water-tank-treatments-tested-20504
- ↑ https://www.researchgate.net/publication/15339874_Lemon_juice_as_a_natural_biocide_for_disinfecting_drinking_water
About This Article

- Send fan mail to authors
Did this article help you?

Featured Articles

Trending Articles

Watch Articles

- Terms of Use
- Privacy Policy
- Do Not Sell or Share My Info
- Not Selling Info
wikiHow Tech Help Pro:
Level up your tech skills and stay ahead of the curve
how-to-clean-boat-freshwater-tank
John robbins.
One teaspoon in 1/6 of an ounce. One teaspoon per gallon is 1.67 ounces for 10 gallons, not 8 ounces! That is way too much bleach.
Elina Brooks
Thank you for letting us know that steam cleaning is the most effective way to clean a fuel tank, especially if it’s in a bad shape. My dad owns a fishing boat, and he was thinking of getting a new fuel tank for it soon. I’ll be sure to tell him about this before he gets a custom order for his aluminum fuel tank soon. https://www.mycarrenterprise.com/boat-fuel-tank
Leave a comment
Own your first boat within a year on any budget.
A sailboat doesn't have to be expensive if you know what you're doing. If you want to learn how to make your sailing dream reality within a year, leave your email and I'll send you free updates . I don't like spam - I will only send helpful content.
Ready to Own Your First Boat?
Just tell us the best email address to send your tips to:
Practical Boat Owner
- Digital edition

Boat water tank treatments tested
- Ben Meakins
- March 25, 2015
Potable water is a valuable resource on a boat – but how do you keep tank water fresh? Ben Meakins and the PBO team test water treatments and filters to find out
The ‘tank taste’ you get from a boat’s fresh water tank can be pretty unpalatable, especially if you’re feeling seasick. Mostly this taste is disguised when used for cooking, but it makes your plain drinking water unpleasant and can produce a thick scum on top of your tea – not to mention making said tea taste terrible.
To overcome the drinking water problem many sailors drink only bottled mineral water and use the boat’s tank water just for cooking. But the plastic bottles take up a lot of space, they’re not exactly environmentally-friendly and it’s a shame not to be able to use tank water for its intended purpose.
But how do you keep tank water tasting fresh? We tested seven methods of making your drinking water more palatable, ranging in price from 54p to £355. These could be divided into the following groups:
- Activated carbon filters These work by passing the water through a carbon filter to remove the taste and smell. It won’t remove bacteria from the water, even though some filters have silver to inhibit the growth of bacteria in the filter. On first use, they must be flushed to remove black carbon particles.
- Sub-micron filters If you want to remove bacteria and other nasty stuff from the water, you’ll need a sub-micron filter. These can remove impurities down to 0.1 micron. Some of the filters on test have additional filters which use surface absorption and a polarised casing to remove chemicals and heavy metals. Many of these filters require a significantly higher pressure to work. Some solely sub-micron filters won’t do anything about taste and smell, however – you’ll need a charcoal filter for that, too.
- Additives We tried a couple of proprietary tank treatments, Aqua Clean, a chlorine-based product, and Aqua Sol. These can be added to the tank water to sterilise it, and are recommended for sterilising and flushing out a tank. They might make the water safe to drink, but they do often result in an unpleasant taste. Following a tip on the PBO forum we also tried using lemon juice as a water treatment.
How we tested them We needed water with a suitably unpleasant taste and odour, so took a sample from a flexible fresh water tank on a small yacht and then passed some through each filter after following the manufacturer’s instructions to flush and prime each unit. We used a sample of each water to make a cup of tea, each brewed for 10 seconds, before adding 10ml of milk by syringe. We then conducted a blind taste test, with testers scoring each sample for flavour, aftertaste and odour.
Control Samples
Plain tap water WATER *** TEA **** Straight from the tap at the PBO office in Poole, Dorset, this got a surprisingly low score in our blind taste test for the water, with a slight chlorine aftertaste, but was otherwise perfectly drinkable. For the tea it scored well. Plain tank water
Untreated tank water WATER * TEA * Unsurprisingly this got the lowest score of all. It had a stale flavour, a plasticky odour and a lingering aftertaste that one tester described as ‘old socks’ that got worse with time. Tea made with this water had the most scum on top and a plasticky taste, with a hint of the chlorine (Milton) used to sterilise the tank in the winter.
Water treatments tested
You can read the individual reviews of each of the following products by clicking on the title. For our conclusions, scroll down….
AquaClean Tabs
Lemon Juice
Water filters tested
Penguin Hydropure
Nature Pure QCII
Aquatiere Super Water Filter
Jabsco Aqua Filta
Whale AquaSource Clear
Seagull IV X-1
PBO Verdict

We found untreated tank water most unpleasant…
The tank water was unpleasant to drink – and adding any of the treatments to it served only to alter the taste rather than improve it. All of the filters tested improved the flavour and aftertaste, however.
The Seagull IV and Nature Pure QC filters gave by far the best taste improvement, and also remove bacteria and other substances, making even contaminated water safe to drink.
The charcoal filters all made the water more palatable, with the Jabsco Aqua Filta coming out best of these in our tests. You will need to ensure the water is safe to drink, ideally with the addition of a treatment before it is filtered. We found that the filters removed the taste of chlorine when Aqua Sol was added in a mild dose and this combination of a subtle water treatment to kill bacteria and a charcoal filter to remove any bad taste would seem to be the way forward if you want safe drinking water on a budget.
The Nature Pure system, while not cheap, does all this while delivering a taste close to that of mineral water.

- Boat Accessories
- Where to Buy

Special until March 31st: 40% off Teak Deck Sealant for the month of March. Use Code MAR24 at checkout. *restrictions apply
Free ground shipping in the Continental US for any orders over $150!
How to Clean a Boat Fresh Water Tank...
How to clean a boat fresh water tank.

The water in your boat’s fresh water tank won’t always stay fresh. When it sits in the tank with poor circulation, it eventually takes on an unpleasant odor. That’s why it’s important to regularly clean out the tank the right way, every time. Here’s how to clean a boat’s fresh water tank.
Drain the Tank

It’s important to adequately prep for proper drainage. You’ll not only want to have a designated place to drain out the water, but you also should make sure that the place your draining won’t lead to nasty water spilling somewhere you don’t want it. In addition, try to drain your tank somewhere that won’t negatively affect the environment. Then, you can remove the old water to prepare for cleaning. Turn on your water pump, open all of the taps, and let the water drain out.
Clean Out the Tank

The key to cleaning a fresh water tank is to allow the new, clean water to do the work. It will be the carrier of the cleaning detergent, the rinsing agent, and will continue flowing through the tank until there’s nothing but a clean tank and more freshwater left.
The question here is, what kind of cleaning agents should you use? Do you use bleach, or should you go with another product?
Be wary of bleach if you’re concerned about the environment. You also shouldn’t use bleach anywhere that could affect the marine life. If you do decide to use bleach, just be sure you have a proper place to drain it after cleaning.
Instead, add the appropriate cleaner—one designed for this specific purpose and with the environment in mind. You can find a plethora of boat cleaning options here at BoatLIFE for the cleaning of your tank!
Mix in your cleaner and fill the tank with enough water to dilute the cleaner to an appropriate amount. You can then turn off the pumps and the taps to allow this cleaner some time to go to work. Leave it overnight for the best results.
Shop Cleaning Products from BoatLIFE
Drain and Rinse

Drain the tank somewhere safe, repeating the draining process. Then, rinse with fresh water. Smell the water coming out if you’re still unsure; if it has the odor of bleach or cleaner, rinse again.
Keep in mind that even after a thorough cleaning, your fresh water tank will still not be suitable for drinking—after all, the freshwater you keep in there will tend to stay. However, you can use fresh water for other purposes on the boat, including rinsing its surfaces, especially if you’re sure to keep changing it out periodically.
Keep Your Boat Clean!
Now that you know how to clean a boat’s fresh water tank, are you looking for more great ways to keep your boat in top shape? Investing in boat cleaners will do the trick. BoatLIFE offers the boat accessories, sealants, and restoration products you need to help keep every aspect of your boat in top condition.
Share this:
- Click to share on Twitter (Opens in new window)
- Click to share on Facebook (Opens in new window)
Featured Products

Liquid LifeSeal® Sealant 5.2 fl. oz. Clear

Stainless Steel Cleaner 16 fl. oz.
Related blogs, maintaining your boat cover investment.
When choosing a boat cover, there are a number of factors to consider to maintain your boat cover investment. One, […]
Thanksgiving Trivia!
Thanksgiving is one of America’s oldest and most loved holidays. Even though the story is steeped in a dark history […]
Detailing Your Boat
There’s nothing better than hitting the water in a beautiful boat. A warm summer day with the sun shining, there’s […]
All products proudly made in the usa
Service Locator
- Angler Endorsement
- Boat Towing Coverage
- Mechanical Breakdown
- Insurance Requirements in Mexico
- Agreed Hull Value
- Actual Cash Value
- Liability Only
- Insurance Payment Options
- Claims Information
- Towing Service Agreement
- Membership Plans
- Boat Show Tickets
- BoatUS Boats For Sale
- Membership Payment Options
- Consumer Affairs
- Boat Documentation Requirements
- Installation Instructions
- Shipping & Handling Information
- Contact Boat Lettering
- End User Agreement
- Frequently Asked Questions
- Vessel Documentation
- BoatUS Foundation
- Government Affairs
- Powercruisers
- Buying & Selling Advice
- Maintenance
- Tow Vehicles
- Make & Create
- Makeovers & Refitting
- Accessories
- Electronics
- Skills, Tips, Tools
- Spring Preparation
- Winterization
- Boaters’ Rights
- Environment & Clean Water
- Boat Safety
- Navigational Hazards
- Personal Safety
- Batteries & Onboard Power
- Motors, Engines, Propulsion
- Best Day on the Water
- Books & Movies
- Communication & Etiquette
- Contests & Sweepstakes
- Colleges & Tech Schools
- Food, Drink, Entertainment
- New To Boating
- Travel & Destinations
- Watersports
- Anchors & Anchoring
- Boat Handling
- ← Install & Repair
The Care And Feeding Of Your Boat's Water Systems
Advertisement
Boating is all about water, inside and outside your boat. Let's take a close look at important maintenance tasks to stay on top of all your water systems.

Illustration: Dick Everitt
- Anchor/foredeck washdown with pressure pump and foot switch
- Galley sink. Filter for cleaner cold water. Sink drains above waterline at max heel. All thru-hulls must comply with ABYC standards
- Condensation drip tray drains overboard above waterline at max heel per ABYC standards
- Icemaker door open when not used
- Bilge pump drain well above water line on max heel. Smooth inner lining to hose. Vented loop may be needed if drain is near or below water line at max heel
- Head sink with filter on cold water and drain above waterline at max heel
- Shower sump pumped overboard to discharge above water line at max heel. Shower drain hose goes to shower evacuation pump. Head intake hose has a strainer and thru-hull
- All thru-hulls equipped with seacocks. Note double hose clamps
- Holding tank vented with minimum bends for better airflow
- Head discharges to MSD Type 1 with Y-valve
- Holding tank has pumpout hose and gravity discharge overboard after treatment where it's legal
- Water heater has anti-backflow valve to prevent expanding hot water from entering cold water system (This tank is shown lying on its side, an installation seen on some boats. Normally, hot-water tanks are upright.)
- Anti-siphon loops and valves where appropriate
- Potable water tank with fill and vent
- Potable water tank has sediment filter prior to pressure pump
- Accumulation tank diminishes pulsation
- Scuppers drain cockpit. Some boats need scuppers with hose to discharge
Seawater Washing (1) — Seawater systems such as anchor washdown and dishwashing with a seawater foot pump (if you're in clean water and rinse well with potable water) can conserve water. Frequently bathing in saltwater causes skin problems in many people; a freshwater rinse helps. Washdown water pump should be a short distance from the thru-hull but above the waterline.
Drinking Water Purity (2, 6) — When in question, can be improved by adding a small amount of bleach. Some authorities recommend adding approximately 1 teaspoon of household bleach with no perfumes, dyes, or other additives per 10 gallons of water. If possible, agitate the water after adding bleach and then let it sit for an hour. Chlorine odor will dissipate after a day. Bleach may initially make the water to which it's added unclear because it's killed the “bugs.” The water clears as these settle to the bottom. Ultimately they should be flushed out. It's preferable and safer to add product manufactured for the purpose; camping stores are good sources. If you have questionable water purity and no way to remedy it, boil water before drinking. Drinking-water filters such as GE's FXUVC under-the-sink cartridge remove many impurities and greatly improve taste. A water system UV light, such as those used in some reverse-osmosis systems, can kill viruses.
Air Conditioning & Refrigeration (3) — Condensation drain trays should occasionally be inspected to clear any blockage in drain hoses, which should preferably drain overboard rather than into the bilge. If trays don't drain fully, they'll develop a musty odor that will be circulated by the air handler.
Icemakers (4) — Should be left open and off when not being used for a few days or longer to avoid odor and mold. Often the incoming water line is behind the unit in an area warmed by the unit. This facilitates stagnation and odor, particularly in the filter that may be in that area. When in use, the ice bin should be dumped at least every few days to keep water flowing. Good ventilation helps.
Bilge Water (5) — Oil-absorbent pads in bilges under the engine and whenever there's oil-spill potential are critical. They must not interfere with the operation of a bilge-pump float switch. Always clean loose fuel and oils out of the bilge with an oil-absorbent pad, and discard appropriately. Proper bilge-pump installation is critical and will vary with different boats. The hose interior should be smooth, the water column in the hose should be no more than needed, and great care must be taken to avoid backflooding from the sea. Visual and audible alarms at the helm are crucial.
Bilge pump hose should exit well above water line at maximum heel within the parameters of ABYC standards. Pumps should be in sections where water can pool more than minimally.

A basic bilge pump schematic.
Sumps (7) — Those used for showers should be cleaned and flushed through regularly, even if the shower isn't often used. Shower sumps should discharge well above the water line at maximum heel within the parameters of ABYC standards.
Thru-Hulls (8) — Should be checked for obstruction every time you haul the boat and/or dive the bottom. Inspect them with a strong light, such as Streamlight's Stylus Pro 360 , while hauled. While in the water, you may need to carefully (to avoid damaging hose and valve) work an old table knife or similar tool around inside the hole to clear it of barnacles and other obstructions. A carrot peeler makes a good tool for small holes. If the hole is covered by an external filter, this should be removed, when hauled, for painting inside, inspection, and cleaning.

Water Passages (8, 6) from thru-hull openings — Sinks, heads, engines, air conditioners, refrigeration, bilge pumps, and other components use thru-hull openings and hoses. Regularly inspect and operate all thru-hull valves . Some valves periodically require disassembly and lubrication or cleaning while the boat is hauled. You may need to close one quickly when a breach occurs in a water passage inside the boat.
Regularly inspect all hoses and connections . Old or suspect hoses will deteriorate over time and should be replaced. Eventually, wire inserts will rust and harm inner and/or outer hose walls. Preferred hose clamps are AWAB brand or similar. Double the clamps (unless doing so would cut into the hose, in which event a longer hose barb is indicated) and regularly inspect.
All components should be 316 grade stainless or better. Cheap hose clamps tend to rust and break. Use hose appropriate for the job, such as marine-sanitation hoses for heads. ABYC standards should be followed in these and all other aspects.
Holding Tank (9, 10, 11) — Some chemicals added to holding tanks can harm the environment if spilled, either from the boat or from pumpout-disposal systems and system failures. Various companies market what they claim to be environmentally friendly holding-tank additives with varying degrees of effectiveness. Some boaters install a Raritan ElectroScan MSD plumbed to treat and discharge overboard where it's legal, and treat and discharge into the holding tank at other times.
Head Water (10) — Regular addition of products such as Star brite Instant Fresh Toilet Treatment and Raritan CP help keep head water odorless and improve operation of the head . Petroleum-based products can harm valves, seals, and gaskets. Check manufacturer's recommendations. Regularly pouring white vinegar into the head and flushing will help diminish calcium buildup on inside walls of head plumbing. Raritan's CH is stated to be environmentally harmless and is specially formulated to remove heavy calcium buildup as well as prevent buildup if used regularly.
Head discharge hoses should be specified for MSD use. Other types of hoses are usually more likely to develop calcium buildup, deposits, blockages, and odor permeation. Plumbing the head to flush with fresh water can reduce odor. The head intake hose is positioned as it is in the illustration for clarity, but should be far enough from the head discharge to avoid sucking up waste.
Water Heater (12) — Should be standing upright with a backflow valve between the incoming cold water and the heater. Requires periodic flushing by squirting in clean dock water with a water hose under moderate pressure through a discharge port at top, squirting around inside as much as practical, and draining through open intake port at bottom. Some water heaters have an anode for cathodic protection that should be checked yearly.

Anti-Siphon Loops and Valves (13) — Are needed in some hoses that exit underwater to prevent water from siphoning into the boat. Whether anti-siphon valves and loops are used depends in part on the location of relevant components in the boat and whether they're below the waterline or could end up below the waterline. These components may include heads, sinks, and engines and their raw-water intake and exhaust systems. As a precaution, when you're away from your boat, close the underwater seacocks.
Potable Water Tank (14, 15, 16) — Should be treated periodically with a product such as Star brite AQUA Water Treatment & Freshener to remove odors, scale, and bad taste. Also, thoroughly flush tank with clean water and pressure nozzle. Drain from bottom if possible; if not, pump it out. Follow manufacturer directions when applying anything to drinking water.
Follow instructions and warnings for cleaning additives, particularly with aluminum tanks. New tanks, especially fiberglass or plastic, may smell of the material of which they're made. Often, adding baking soda to the water will help, as well as with other odors later. The amount depends on the severity of the problem and volume of the tank.
Clarity of water may vary with source, such as from wells, cisterns, public water works, and reverse osmosis. The latter source, if coupled with a UV light and maintained well, probably produces the best water.
Drains and Scuppers (17) — Cockpits, side decks, and other areas of a boat normally have drains to rid the boat of rain and boarding seas. Test these regularly with a hose to be sure they're draining adequately. Leaves, plant material, dirt, and other debris can quickly obstruct them. Boats can sink if drains aren't kept clear. Clear them with a high-pressure hose nozzle or plunger.
Related Articles
The truth about ceramic coatings for boats.
Our editor investigates the marketing claims of consumer-grade ceramic coatings.
Fine-Tune Your Side Scan Fishfinder
Take your side-scanning fishfinder off auto mode, and you’ll be spotting your prey from afar in no time
DIY Boat Foam Decking
Closed-cell foam flooring helps make boating more comfortable. Here’s how to install it on your vessel
Click to explore related articles
Technical Editor, BoatUS Magazine
One of the top technical experts in the marine industry, Tom Neale, BoatUS Magazine Technical Editor, has won nine first-place awards from Boating Writers International, and is author of the magazine’s popular "Ask The Experts" column. His depth of technical knowledge comes from living aboard various boats with his family for more than 30 years, cruising far and wide, and essentially learning how to install, fix, and rebuild every system onboard himself. A lawyer by training, for most of his career Tom has been an editor and columnist at national magazines such as Cruising World, PassageMaker, and Soundings. He wrote the acclaimed memoir All In The Same Boat (McGraw Hill), as well as Chesapeake Bay Cruising Guide, Vol. 1. These days, Tom and his wife Mel enjoy cruising their 2006 Camano 41 Chez Nous with their grandchildren.
BoatUS Magazine Is A Benefit Of BoatUS Membership
Membership Benefits Include:
Subscription to the print version of BoatUS Magazine
4% back on purchases from West Marine stores or online at WestMarine.com
Discounts on fuel, transient slips, repairs and more at over 1,200 businesses
Deals on cruises, charters, car rentals, hotel stays and more…
All for only $25/year!
We use cookies to enhance your visit to our website and to improve your experience. By continuing to use our website, you’re agreeing to our cookie policy.
- Forums New posts Unanswered threads Register Top Posts Email
- What's new New posts New Posts (legacy) Latest activity New media
- Media New media New comments
- Boat Info Downloads Weekly Quiz Topic FAQ 10000boatnames.com
- Classifieds Sell Your Boat Used Gear for Sale
- Parts General Marine Parts Hunter Beneteau Catalina MacGregor Oday
- Help Terms of Use Monday Mail Subscribe Monday Mail Unsubscribe
Filling Fresh Water tanks
- Thread starter WasabiRush
- Start date Apr 25, 2021
- Hunter Owner Forums
I want to drain my water tanks so I can perform the clorox shocking. One of the tank valves was open and the other closed. I opened the sink faucet until it was spitting a little water and mostly air. I then closed that valve and opened the other and did the same. Was that the correct process? I now want to fill the tanks and put the clorox solution in both tanks. However, I only see one deck fill. How does filling both tanks work and how do I ensure I get the clorox solution in both tanks? Thanks John
Attachments

John: model and year of your boat?
stuartsw said: John: model and year of your boat? Click to expand

Don S/V ILLusion
Stupid question but.... there aren't separate fills on deck for each tank?
even stupider question .... what's a Chlorox shock of the water tanks, and what's the purpose/how often do you need to do it?

Claude L.-Auger
Yes that is how I empty them also and it works fine. But you will not be able to get everything out as the outlet tubing is about 1 inch higher than the bottom of the tank. Not an issue as I used non-toxic antifreeze in the Winter and flush thoroughly after doing the Clorox treatment in the Spring. The H34 has 2 water deck fills: one about midship on port side, the other under the stern hinged step leading to the ladder. The clorox treatment is normally done when commissionning the system or if the system got contaminated and needs to be re-commissioned.
Don S/V ILLusion said: Stupid question but.... there aren't separate fills on deck for each tank? Click to expand
Claude L.-Auger said: Yes that is how I empty them also and it works fine. But you will not be able to get everything out as the outlet tubing is about 1 inch higher than the bottom of the tank. Not an issue as I used non-toxic antifreeze in the Winter and flush thoroughly after doing the Clorox treatment in the Spring. The H34 has 2 water deck fills: one about midship on port side, the other under the stern hinged step leading to the ladder. The clorox treatment is normally done when commissionning the system or if the system got contaminated and needs to be re-commissioned. Click to expand
WasabiRush said: Thanks much Claude. Ah, under the the step. I didn't look there. Do you find that the clorox solution and rinsing afterwards takes care of the antifreeze taste? Click to expand

drm1 said: even stupider question .... what's a Chlorox shock of the water tanks, and what's the purpose/how often do you need to do it? Click to expand
Justin_NSA said: You want Peggie's book: The New Get Rid of Boat Odors Click to expand

- DO let the solutions in the tanks sit for the recommended time.
- Do run water through all of the faucets and lines to spread the solution through out the system.
- Do take the boat out for a short trip about the bay. Your test boat run will stir the water about in the tanks. Might be a great time to let a new crew member try their chance at the helm.
- You can then begin the pumping out while you head back to the dock. I find that the tanks are just about empty when I get back to the slip.
Great advice here gentlemen. Thanks much.

you are better to use the lavatory sink for emptying the tanks. disconnect hot & cold lines at the water heater for a low point drain for the entire system with all valves open

Followed Peggie Hall's recommissioning water tank recommendations when we first took possession of our boat in 2002. Never had to do it since and the water remains clean and fresh tasting. Her procedure is published as follows: "Recommission the system at least annually This is all it takes to keep onboard water safe, and tasting/smelling as good as any that comes out of faucets on land: Fresh water system problems--foul odor or taste--are typically caused by allowing water to stagnate in the system. Although most people think only in terms of the tank, the plumbing is actually the source of most foul water, because the molds, mildew, fungi and bacteria which cause it thrive in damp dark places, not under water. Many people—and even some boat manufacturers—believe that keeping the tanks empty reduce the problem, but an empty water tank only provides another damp dark home for those “critters.” There are all kinds of products sold that claim to keep onboard water fresh, but all that’s really necessary is an annual or in especially warm climates, semi-annual recommissioning of the entire system—tank and plumbing. The following recommendations conform to section 10.8 in the A-1 192 code covering electrical, plumbing, and heating of recreational vehicles. The solution is approved and recommended by competent health officials. It may be used in a new system a used one that has not been used for a period of time, or one that may have been contaminated. Before beginning, turn off hot water heater at the breaker; do not turn it on again until the entire recommissioning is complete. Icemakers should be left running to allow cleaning out of the water feed line; however the first two buckets of ice—the bucket generated during recommissioning and the first bucketful afterward--should be discarded. 1. Prepare a chlorine solution using one gallon of water and 1/2 cup (4 oz) Clorox or Purex household bleach (5% sodium Hypochlorite solution ). With tank empty, pour chlorine solution into tank. Use one gallon of solution for each 5 gallons of tank capacity. 2. Complete filling of tank with fresh water. Open each faucet and drain cock until air has been released and the entire system is filled. Do not turn off the pump; it must remain on to keep the system pressurized and the solution in the lines 3. Allow to stand for at least three hours, but no longer than 24 hours. 4 Drain through every faucet on the boat (and if you haven't done this in a while, it's a good idea to remove any diffusion screens from the faucets, because what's likely to come out will clog them). Fill the tank again with fresh water only, drain again through every faucet on the boat. 5. To remove excess chlorine taste or odor which might remain, prepare a solution of one quart white vinegar to five gallons water and allow this solution to agitate in tank for several days by vehicle motion. 6. Drain tank again through every faucet, and flush the lines again by fill the tank 1/4-1/2 full and again flushing with potable water. People have expressed concern about using this method to recommission aluminum tanks. While bleach (chlorine) IS corrosive, it’s effects are are cumulative. So the effect of an annual or semi-annual "shock treatment" is negligible compared to the cumulative effect of holding chlorinated city water in the tank for years. Nevertheless, it's a good idea to mix the total amount of bleach in a few gallons of water before putting it into either a stainless or aluminum tank. People have also expressed concern about the potential damage to rubber and neoprene water pump parts. Again—the cumulative effect of carrying chlorinated water is far more damaging over time than the occasional “shock treatment.” And it’s that cumulative effect that makes it a VERY bad idea to add a little bleach to each fill. Not only does it damage the system, but unless you add enough to make your water taste and smell like a laundry, it’s not enough to do any good. Even if it were, any “purifying” properties in chlorine evaporate within 24 hours, leaving behind only the corrosive properties. An annual or semi-annual recommissioning according to the above directions is all that should be necessary to keep your water tasting and smelling as good as anything that comes out of any faucet on land. If you need to improve on that, install a water filter. Just remember that a filter is not a substitute for cleaning out the system, and that filters require regular inspection and cleaning or replacement. To keep the water system cleaner longer, use your fresh water...keep water flowing through system. The molds, fungi, and bacteria only start to grow in hoses that aren't being used. Before filling the tank each time, always let the dock water run for at least 15 minutes first...the same critters that like the lines on your boat LOVE the dock supply line and your hose that sit in the warm sun, and you certainly don't want to transfer water that's been sitting in the dock supply line to your boat's system. So let the water run long enough to flush out all the water that's been standing in them so that what goes into your boat is coming straight from the water main. Finally, while the molds, fungi and bacteria in onboard water systems here in the US may not be pleasant, we're dealing only with aesthetics...water purity isn't an issue here--or in most developed nations...the water supply has already been purified (unless you're using well-water). However, when cruising out of the country, it's a good idea to know what you're putting in your tanks...and if you're in any doubt, boil all water that's to be drunk or used to wash dishes, and/or treat each tankful to purify. It's even more important in these areas to let the water run before putting it in the tank, because any harmful bacteria will REALLY proliferate in water hoses left sitting on the dock."
Capt Robbie
water fill for port tank is near the port side window above the sink, Aft tank maybe in a few locations. Inside aft locket, under the teak cover for tiller access plate, or on top of the cockpit gunnel. Below deck in front of the port side water tank is a selector valve for which tank is to be used. Hope this helps
Thanks all for the responses. I did this on Saturday and for the most part, seems to be a success. I even tasted some water from the kitchen faucet. My only concern is I'm not certain I was able to completely fill the port side tank. It seemed to take a lot less time to fill and empty than the aft tank. Yet, the side tank is supposed to be 35 gallons and the aft tank 30. I filled it until the water overflowed out the fill cap and the hose from the deck to the tank was full. Is there a situation that would present those conditions yet the tank not be full? John
- This site uses cookies to help personalise content, tailor your experience and to keep you logged in if you register. By continuing to use this site, you are consenting to our use of cookies. Accept Learn more…
How To Clean Boat Water Tank? Without Removing It

Cleaning your boat’s water tank isn’t more complicated than cleaning anything else. You don’t have to be a professional or have special skills to do it.
The surprising thing is that a lot of boat owners still choose contractors to clean their boat water tank(s), which can cost up to many times the price of a DIY solution. To help you get the task done let’s walk through a simple step-by-step boat water tank cleaning process. knowing that boat water tanks come in different shapes, sizes, and places, some are reachable to remove or accessible inside to clean, and others are hard to get to. But regardless of its reachability or accessibility, and what materials are the tank(s) made of. There is always a convenient way to get the job done.
To make the task easy I will present two methods: Cleaning the water tank without removing it. Removing and cleaning the water tank.
Let’s begin with Cleaning the water tank without removing it:
How To Clean Boat Water Tank Without Removing It.
Cleaning the water tank without removing it is not as difficult or complicated a process as some think. Let’s see how:
- Remove all filter cartridges, aerators at all outlets .
- Turn off the water heater from the electrical panel. (If installed)
- Drain the tank completely through every faucet.
- Fill half of the tank with hot water. A temperature that does not cause any damage to the tank and water lines (check the manual). approx 50 Celsius – 122 Fahrenheit will be fine.
- Shake the tank safely as possible. Take the boat for a short trip, about 30 minutes, to churn the hot water inside the system, which helps loosen the stickiness of sticky filth inside. Or try any appropriate way to shake the tank.
- Drain the tank completely through every faucet. Drain it as fast as you can. Do it while the boat is moving if possible. To prevent any sediments from remaining inside.
- Fill half the tank with water and an appropriate cleaner. Bleach damages aluminum tanks and has some environmental concerns. Read more about bleach in The Guardian If your choice is bleach Do Not Use More than (approx half an ounce ( 15 Ml ) of household bleach per gallon of water).
Bleach alternatives are a mix of lemon and vinegar ( approx 4OZ – 120Ml ) per gallon. Or my favorite one the regular dish soap will be an effective and inexpensive solution.
- Fill the entire system with a cleaning solution. Run the water from each faucet until you can see or smell the solution at each outlet.
- Close and plug all faucets, outlets, and aerators. Plug all aerators and the tank’s air breathers. Leave the system pressurized with the cleaning solution in it for 4 to 12 hours.
- Drain the entire system and flush it thoroughly. Flush it with potable water. Fill and drain at least 2 times, or until you are sure there is no cleaning solution left in the tanks.”
- Clean and reinstall all aerators, and filter cartridges . Install new ones as appropriate. ( Recommended )
- Fill the tanks with potable water.
That’s How you clean a water tank on a boat without removing it.
Now your waters are clean and potable. You may still smell or taste something strange for a while as a result of the cleaning solution or chlorination but it should not be strong or very noticeable, otherwise, you are fine.
For additional protection, you can install Drinking-Water Filter & Purifier Systems. And keep in mind you have to clean the tanks once a year at least to keep the supply of potable water available.
As for the water tanks that you can remove , cleaning them is not complicated, just follow the following steps:
- Remove any filter cartridges and any aerators at faucets and outlets.
- Turn off the water heater (if installed) from the electrical panel.
- Remove all hoses and fittings connected to the tank.
- Remove the water tanks following the instructions manual.
- Brush, scrape, and wipe the tank from the inside wherever your hand can reach. Use a stick and wrap a rag over the top for places far from your hand.
- Install the tank in place and connect the lines.
- Fill the entire system with a cleaning solution (approx. one ounce per gallon).
- Run the water from each faucet until you can smell bleach at each outlet.
- Close all the faucets and outlets and plug all aerators and the tank’s air breather, and leave the system pressurized with the solution in it for 2 to 6 hours.
- Drain the entire system, and flush it thoroughly with potable water (fill and drain at least 2 times) until you are sure there is no residual solution left in the tanks.
- Clean and reinstall all the aerators and filter cartridges or install new ones as appropriate.
- Fill the tanks with potable water.
- How to clean a boat’s fuel tank
- How To Clean Boat Holding Tank
- How To Clean A Boat Engine Compartment
Boat Water Tank Cleaning Tips & Nots
- Algae, bacteria, and other contaminants can thrive in the entire water system, not just the tanks.
- Make sure there is no sediment left at the bottom, a yellowish layer on the inner walls, or any blackish green spots or dots anywhere you can see inside the tank
- If you removed the water tank(s) and cleaned it with your hands; no need to use more chemicals or keep them in the system longer.
- Bleach in these concentrations ( Half an ounce – 15 Ml ) and durations will not harm the tanks, plumbing, or pumps. And it will not require a lot of water to clear it out.
- Bleach causes damage to aluminum tanks and has some environmental concerns.
- Bleach causes damage to some types of watermakers. Read the instructions in the watermaker manual.
- The freshwater in your boat water tank will not always be fresh;
- During the cleaning process, it is noteworthy that repair and maintenance should be carried out if necessary.
Related Questions
How to know if the boat’s water tank is bad?

The boat water tank is bad if there are doubtless signs such as; odd water smell or taste or color, jammed pumps, clogged filters, visual inspection – sediments and dirt, or through water test .
How often should a boat water tank be cleaned?

You should clean the boat’s water tank at least once every two years – annually would be better. Or after a longer storage time than usual. Or if there are signs that a cleaning procedure is needed.
Final thought
Boat water tank problems can appear in several ways, the water tastes bad, looks dirty, has an unpleasant odor, water testing, or any combination of the four.
The freshwater in your boat water tank will not always be fresh; bad water source, bad filtrations, Leak into the tank, poor water circulation, rust flakes, paint chips, etc.
Which will eventually lead to contamination of the water with bacteria, algae, or chemicals.
That’s why it’s important to regularly clean out the tanks the right way, every time.
I hope this guide was helpful. Bookmark this page to remember and come back to it whenever you need it. Share this post to help someone else.
- Skip to primary navigation
- Skip to content
- Skip to primary sidebar
Header Right
Main navigation, how to clean a marine holding tank.
March 5, 2023 by Alek Eccles
Bottom line, if you are a boat owner with an on-deck toilet that gets used, proper upkeep of the marine holding tank is an important and necessary job. Whenever maintenance is regularly performed, it will make less work of this least pleasant of tasks, because as with many things, the longer you leave something, the worse it tends to get. And any holding tank problem that results in repairs is undesirable as it is often expensive and can leave you and your boat docked up on shore rather than out on the water.
In this guide to marine holding tanks and how to clean them, we will cover the good, general maintenance that is needed to keep your system clean and operating optimally. In addition, we will outline the basics, some common considerations, problems and troubleshooting that are frequent to help care for your boat’s septic tank.
First, let’s review the basics on marine holding tank systems.
Marine Holding Tanks 101: The Basics
The marine holding tank is also known as a blackwater tank and marine sanitation device. A blackwater tank is a container designed and designated to hold human wastes ( and this only ) that are flushed down a toilet. On boats, this is often referred to as a head.
There are laws* that cover the proper handling and disposal of wastes aboard marine vessels. If the boat is equipped with a head, law codes often require a Type III Marine Sanitation Device ( MSD: a.k.a. your holding tank ), to be installed as it is unlawful to directly discharge wastes unless in specific zones*.
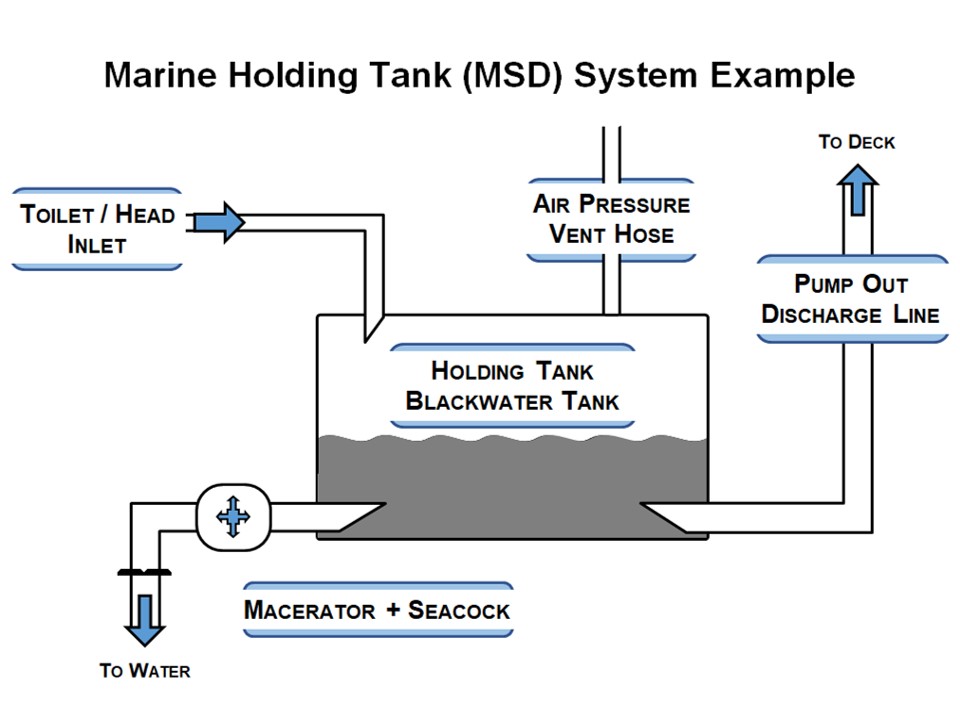
While more complex devices are available, most boats are fitted with a simple holding tank system that features only a few parts. The MSD will often include: (1) the wastewater tank, (2) head inlet, (3) air pressure vent hose, (4) pump out discharge outlet, and (5) often: a macerator and thru-hull, overboard seacock.
To define these parts of the marine septic tank system:
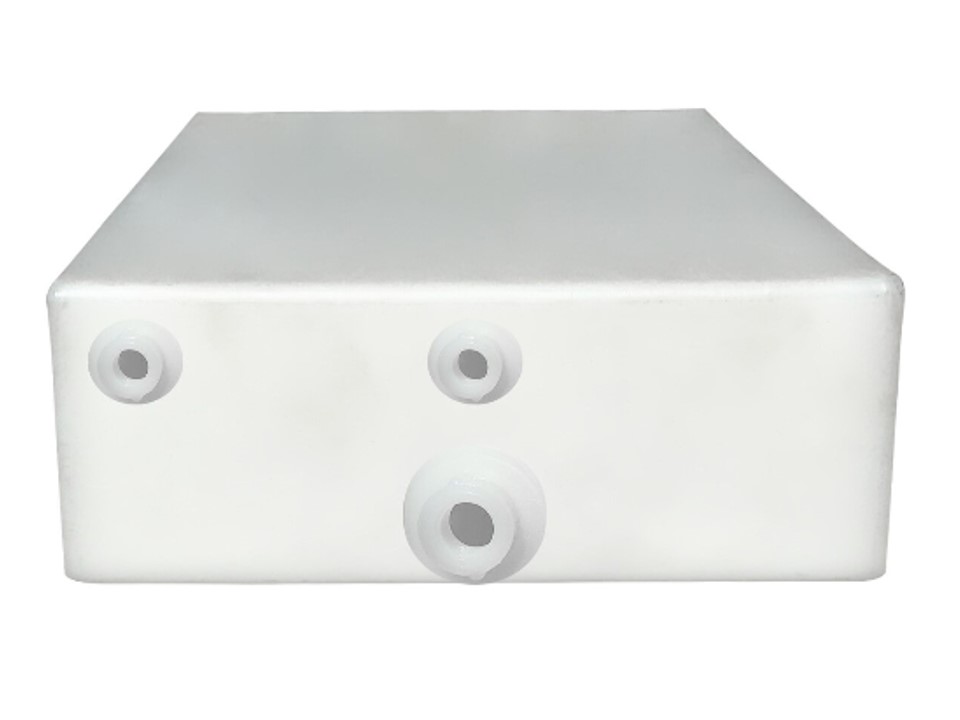
- Wastewater Tank: Holds liquid and solid wastes until time of proper removal. Commonly manufactured from polyethylene plastic with volumes frequent from as small as 3 gallons up to 280 gallons.
- Head Inlet : Connects the flush toilet to the holding tank for receipt of wastes.
- Air Pressure Vent Hose: Exterior port that prevents over-pressurization of the MSD and allows air flow for pumping of tank contents.
- Pump Discharge Outlet: All-important holding tank outlet and to-deck connection pipe for pump-outs when docked.
- Macerator and Seacock: Comparable to a sink garbage disposal, macerators chop and liquify wastes and allow overboard release via the seacock when in an approved discharge zone.
Marine Holding Tank Maintenance: Pumping & Cleaning
If a boat’s living quarters or restroom has an unpleasant or lingering smell, this can indicate it’s time to pump and/or clean your holding tank. It can also mean that maintenance needs done more often or that something is lacking from the regular routine. If you live for periods of time on your boat or are a weekender during the season, then your black water tank system is regularly used and caring for it is vital if you want to have an odorless cabin and a functional system.
If properly maintained, a marine holding tank should not experience hard tank deposits, calcium carbonate, or “concrete” type sludge. Waste and sludge should never be left so long in the holding tank they solidify as this becomes a different problem and will require a different, more work and cost intensive solution.
Steps to Tank Maintenance
Tank maintenance can be broken down into four parts: (1) Pumping, (2) Flushing, (3) Treatments, ( optional but helpful ), and (4) Troubleshooting ( when something’s not gone to plan ).
- Pumping: Marine holding tanks have plumbing that connects to the deck plate where they feature a pump-out valve. Pumping a black water tank is a matter of knowing when it’s time to pump and following the directions at the pump-out service station at port.
- Pump the holding tank when the tank gauge ( or a fair estimate ) indicates it’s no more than 2/3 full or when a bothersome odor is hanging about the boat.
- Pump out directions tend to be fairly straightforward and are often posted at the equipment. In general, pumping includes: (a) opening the boat’s on-deck discharge port, (b) connecting the service pump plumbing to the boat fitting, (c) opening of any valves if present, (d) turning on the pump, (e) pumping until sight glass pumps clear, (f) cleaning, returning and/or shutting off the service pump, and (g) ensuring your boat’s deck fitting is capped and valves are closed.
- Flushing: Wastes that enter the holding tank are water soluble or will suspend in water, which means they can be removed by flushing the tank. To flush, first pump the tank dry, then fill with freshwater and re-pump.
Flushing promotes further break up and removal of any solid wastes left behind after the initial pump out. This process may need performed multiple times. Repeated flushing of your MSD system is often all that is needed to dislodge and clean out a layer of accumulated tank sludge.
- Treatments: Common marine holding tank treatments include enzyme and/or nitrate additives. While not necessary for a healthy, operational tank, additives promote tank cleanliness, reduce odors and can make regular cleaning easier by helping to break down wastes and sludge.
- Troubleshooting: Sometimes MSD maintenance does not go as expected. When problems arise: do a step-by-step troubleshoot. Some common problems with marine holding tanks:
(1) Loss or insufficient amount of suction can be due to a pump priming problem or a bad pump diaphragm. In these instances, ask for help or service from the pump station owner.
(2) Tank contents are not being removed by the pump can be due to a clogged outlet plumbing on the holding tank, or an unopened or clogged tank vent line, which can result from debris, insect activity, toilet tissue or wastes within the vent plumbing. Both cases can often be fixed using a plumber’s snake.
(3) Sludge layer remains after flushing the holding tank can be a result of too much time between maintenance. Sometimes filling the holding tank with clean water and agitating the water by chopping the boat can break up materials for their removal. If this doesn’t work, add a small amount of liquid detergent and repeat the agitation and flushing process.
Important Maintenance Notes / Considerations
- Drain cleaners are a definite no for a marine holding tank. Using them can actually increase the buildup of scale within the tank ( due to chemical reactions ) or it can attack plumbing components and parts ( due to the chemicals in the cleaner ), causing damage that can lead to costly failure and replacement of the system.
- Preferably use freshwater rather than seawater to flush onboard toilets as well as to prime the holding tank. The use of seawater can react with chemicals associated with human wastes and its breakdown ( uric acid ) that will lead to scale deposits ( calcium carbonate ), which can be fairly difficult to remove.
Final Care Considerations for Marine Holding Tanks
- Always: use bathroom toilet paper listed for marine vessels, RVs, or septic tanks only. These types are designed to break down and apart quicker, making it less likely to experience a clog or other issues.
- Never: flush anything other than wastes down the head: biodegradable or not. The entire MSD system and pump-out stations are intended to handle human wastes only. Food, personal care or hygiene items can quickly cause plumbing to clog, leading to sometimes difficult and costly fixes that can leave your holding tank (and boat) out of commission.
- Sometimes: marine black water tanks need replacing. Boat owners often choose to buy a new holding tank whenever it was neglected by a previous owner, when improper activity has caused damage, when extended use calls for its replacement, or when they want to upgrade to a larger volume tank.
*Common marine sewage laws and regulations:
- Boating vessels with a toilet installation must have that toilet fitted to a full Marine Sanitation Device, where Type III designs are most common but other treatment methods can be acceptable.
- A general guideline at the time of this writing, untreated waste is illegal for release within three (3) miles of coastal shores and within all inland waters such as lakes and rivers. This may vary by region.
- Certain protection areas are prohibited discharge zones even for treated wastewater. Always verify your sailing zone prior to disposal.
Takeaway | Cleaning a Marine Holding Tank
Caring for your boat’s onboard septic tank may not be the most pleasant responsibility, but you, your shipmates and your holding tank will thank you when it is properly maintained. And thankfully, if regularly maintained, caring for a marine holding tank can be a fairly simple and easy process only needing to be pumped, rinsed and flushed. In most cases, tank treatment additives are not necessary and only assist in making tank maintenance easier. Deep cleaning of a tank is mostly reserved for when upkeep has been overlooked or in neglected tanks.
We hope our how-to guide has helped in better understanding your boat’s blackwater holding tank and how to clean it. If you are in need of a replacement tank, we provide a range of long service, top-of-the-line marine holding tanks made by some of the industry’s leading manufacturers and suited for most vessels up to 280 gallons. If you have any questions, comments or needs, don’t hesitate to contact us . All the best, and as always: happy boating!

About Alek Eccles
Alek Eccles is a technical writer and professional content creator. Education in english and science; experience in chemical storage, standards; pharmaceutics; environmental assessment and stewardship; governmental regulations and codes. Alek seeks to bring increased understanding to technical, chemical, and biological industries, systems, and concepts; rainwater harvesting; plastics/thermoplastics; as well as containers used for general storage, handling, and transport.
Please verify you are a human
Access to this page has been denied because we believe you are using automation tools to browse the website.
This may happen as a result of the following:
- Javascript is disabled or blocked by an extension (ad blockers for example)
- Your browser does not support cookies
Please make sure that Javascript and cookies are enabled on your browser and that you are not blocking them from loading.
Reference ID: 4f2553ed-e4cb-11ee-8459-d2d8aa6d4b32
Powered by PerimeterX , Inc.
- New Sailboats
- Sailboats 21-30ft
- Sailboats 31-35ft
- Sailboats 36-40ft
- Sailboats Over 40ft
- Sailboats Under 21feet
- used_sailboats
- Apps and Computer Programs
- Communications
- Fishfinders
- Handheld Electronics
- Plotters MFDS Rradar
- Wind, Speed & Depth Instruments
- Anchoring Mooring
- Running Rigging
- Sails Canvas
- Standing Rigging
- Diesel Engines
- Off Grid Energy
- Cleaning Waxing
- DIY Projects
- Repair, Tools & Materials
- Spare Parts
- Tools & Gadgets
- Cabin Comfort
- Ventilation
- Footwear Apparel
- Foul Weather Gear
- Mailport & PS Advisor
- Inside Practical Sailor Blog
- Activate My Web Access
- Reset Password
- Pay My Bill
- Customer Service

- Free Newsletter
- Give a Gift
How to Sell Your Boat

Cal 2-46: A Venerable Lapworth Design Brought Up to Date

Rhumb Lines: Show Highlights from Annapolis

Open Transom Pros and Cons

Leaping Into Lithium

The Importance of Sea State in Weather Planning

Do-it-yourself Electrical System Survey and Inspection

Install a Standalone Sounder Without Drilling

Rethinking MOB Prevention

Top-notch Wind Indicators

The Everlasting Multihull Trampoline

In Search of the Snag-free Clew

What’s Involved in Setting Up a Lithium Battery System?

Reducing Engine Room Noise

Breaking Point: What Can Go Wrong With Your Yanmar?

Mildew-resistant Caulks for Boats

Can We Trust Plastic Boat Parts?

Repairing Molded Plastics

Mailport: Marine plywood, fuel additives, through bolt options, winch handle holders

The Day Sailor’s First-Aid Kit

Choosing and Securing Seat Cushions

Cockpit Drains on Race Boats

Rhumb Lines: Livin’ the Wharf Rat Life

Resurrecting Slippery Boat Shoes

Shoe Goo’s Gift to Sailors

Tricks and Tips to Forming Do-it-yourself Rigging Terminals

Marine Toilet Maintenance Tips

Learning to Live with Plastic Boat Bits

The Ultimate Guide to Caring for Clear Plastic
- Boat Maintenance
Cleaning the Holding Tank
Prevent solids buildup with healthy-head habits..

Weve noticed an odor and a buildup of caked-on solids in the holding tank. My thought is to fill the holding tank with fresh water and the right additive, then let that slosh around underway, and then pump it out. What do you suggest for an additive?
Peter Coburn Aria, Alden Challenger Yawl www.northpointyachtcharters.com Rockland, Maine
While there are a few additives that we can recommend to prevent solids buildup and holding-tank odor, none will be particularly helpful as a single-dose solution to dissolve buildup.
Our December 2013 tank-vent filter test found that after 30 months of testing, the only factor that strongly correlated to clumping tank solids was lubricating the head with vegetable oil or mineral oil. In tests, some of the deposits would not come off, even with a directed hose blast. Solid waste is mostly water, and as such, it dissolves in water quickly. Unless you have used oil in the head, your buildup is most likely from toilet paper or calcium carbonate deposits (the result of mixing salt water and uric acid), if you use seawater to flush. If the buildup has completely hardened, theres little hope for removing it, and you can either live with it or shop for a new holding tank. If the buildup is still sludgy, you have a few options.
Perhaps the easiest fix-but one with a higher ick-factor-would be to empty the holding tank, flush it (and sanitation hoses) with fresh water, and then spray the inside of the tank with a high-pressure hose. This works best if your tank has an accessible inspection port like the holding tanks we reviewed in the February 2012 issue ; a hose spray wand may also make this easier. Do not use a drain cleaner in the sanitation system; it can cause more scale buildup and can damage plumbing parts.
Holding tank maker Dometic/Sealand recommends that boat owners empty the tank, then fill it about halfway with fresh water, and add 8 ounces of a liquid, bleach-free, biodegradable laundry detergent to the water before getting underway, preferably for a few hours of sailing in choppy conditions. Sealand Communication Manager Patrick Snyder also suggested adding a large quantity of ice to the tank along with the detergent, to enhance the cleaning action while underway; ice should be added through the access port, if possible.
To avoid future buildup and odors, follow the tank cleaning with healthy-head best practices: add water to the toilet bowl before any solids deposit is made; use only limited amounts of quick-dissolve or single-ply toilet paper (see PS June 2011 online ); regularly add a holding-tank treatment like the PS Recommended Odorlos or PS Best Choice Bactank T3 to the tank; lubricate the head per maker instructions, avoiding oils; be sure the tank is properly vented; flush the tank with fresh water every four to five pumpouts, or more often if you can.
PS prefers the enzyme and biological (bacterial) tank treatments. Odorlos and Bactank T3 were among the top picks in our most recent tests (see PS December 2012) . Marine sanitation guru and author of Getting Rid of Boat Odors, Peggy Hall (via www.sailboatowners.com ) also recommends using Odorlos as a regular holding tank treatment. (The liquid version of Odorlos is the best-selling form, but cruisers may prefer the powder since it requires less storage space.) A bacterial-spore powder, Bactank T3 out-performed Odorlos in our tests.
For more on marine heads and troubleshooting head odor, check out the PS ebook series Marine Sanitation Systems ( www.practical-sailor.com/books ).
RELATED ARTICLES MORE FROM AUTHOR

Mailport: Aftermarket exhaust; window replacement; epoxy blurp
Leave a reply cancel reply.
Log in to leave a comment
Latest Videos

How To Make Starlink Better On Your Boat | Interview

Catalina 380: What You Should Know | Boat Review
- Privacy Policy
- Do Not Sell My Personal Information
- Online Account Activation
- Privacy Manager
Yachting Monthly
- Digital edition

What you need to know about a yacht’s black water waste tank
- Toby Heppell
- March 24, 2023
It is now mandatory in most countries to make provision for sewage to be pumped ashore rather than disposed of at sea. So it may be time to install a black water waste holding tank, writes Duncan Kent

Prior to the new millennium, little thought was given to waste disposal from a vessel. Anything you didn’t want on board invariably went straight over the side, including human waste. Thankfully, these days it’s a different matter altogether. Rubbish is widely recycled worldwide, so keeping it on board until going ashore is commonplace, even when ocean sailing. However, black water (sewage) disposal is not such a simple problem to solve, especially on smaller vessels, and it’s of particular concern when you are coastal cruising, anchoring or mooring close to the shore.
Current waste tank regulations
Given the increasing popularity of many northern European, Mediterranean, Pacific and Caribbean anchorages today, I’m convinced no responsible yacht owner would be against banning the direct discharge of black water within at least three miles of the coast. Nothing spoils an early morning dip in crystal clear water more than coming across an unmentionable floating object!
At the time of writing, there are still no mandatory regulations concerning black water disposal at sea from privately owned leisure craft in UK waters, apart from the legal requirement to provide pump-out facilities on inland waterways, but the situation is rapidly changing as other countries update their rules.
Since 2006, the EU Recreational Craft Directive (RCD) has required all new vessels to ‘have provision for a holding tank to be fitted’, although that isn’t the same as actually having a holding tank fitted. Besides, this only applies to new vessels and simply requires a ‘diverter valve’ to be installed into the discharge pipe to enable the waste to be piped into a holding tank.
That said, each country has its own rules about this and some are far stricter than others. For instance, Norway has banned the discharge of sewage within 300m of its coastline, whereas Germany insists you’re 12 nautical miles away before you even think about it. And if you’re even spotted with bubbles emanating from your boat in a Turkish marina you could be fined massively and possibly even imprisoned!
Generally, a holding tank doesn’t necessarily have to be permanently installed (although thankfully most boatbuilders today do).

UK black water regulations currently only apply to inland waters
In theory you could simply divert the waste into a freestanding jerry can or similar for disposal ashore, but this could end up being very unpleasant in rough seas and awkward to empty ashore without considerable mess.
Many boatbuilders that do install them from new, however, often only do so for a single head, leaving others on larger, multi-head yachts to be effectively unusable in prohibited sea areas.
Waste tank system design
The most common setup in new production boats is to have all the waste go directly into the holding tank, which will have a pipe and deck fitting at the top for pumping out shoreside, like most inland waterways craft have. Seagoing vessels, however, will also have a large diameter outlet at the bottom of the tank, complete with a seacock to allow the waste to gravity-drain overboard when outside the local limit.
This isn’t always the easiest to provide if retrofitting a system, though, as hull and deck fittings ideally need to be aligned (for rodding if necessary) and clear of any other fittings. For this reason, some boat owners simply incorporate a diverter valve into the existing outlet hose from the toilet, allowing the waste to either be pumped directly into the sea or alternatively into a remotely positioned holding tank.

Quick switch: send waste overboard or into a tank with a diverter valve
If this tank only has a deck plate, when the tank is full you are compelled to find a pump-out station, rather than simply sail offshore to empty it.
Tank size: The size of the holding tank will usually be a compromise between the ideal capacity and the space available in a convenient locker.
It should be at least 20 litres capacity, but ideally you should allow for around five litres per person/per day for two days. This means a cruiser, regularly used by a couple plus two guests, should work on a minimum capacity of around 40 litres. Too small and you’ll need to empty it too often; too large and it will add considerable extra weight and use up valuable space.
Location: Most choose to utilise an under-bunk stowage bin as the location for a remote tank, although some boats might have enough room inside the heads. Ideally, it should be positioned as close to the toilet as possible in order to keep hose runs short, but not so close as to force tight bends into any of the pipework. Bear in mind that the longer the inlet hose, the more water you will need to pump down it to clear the waste.
Thought must also be given as to the accessibility of any pumps or diverter valves incorporated into the system and the ease with which all areas can be reached for seasonal cleaning or the clearance of the almost inevitable blockage.

A typical holding tank installation
There are numerous companies producing tanks capable of storing black water. These tanks can be manufactured from stainless steel, GRP or plastic, the latter being either flexible or rigid. Steel tanks are excellent in many respects, but sooner or later their welded seams will begin to rust, expedited by the corrosiveness of the waste. GRP is lighter than steel and almost as odour-free, provided the moulding is perfectly executed and there is no trace of porosity. By far the easiest material, especially for smaller craft, is thick-walled plastic.
Retailers sell a bewildering range of plastic tanks, even some multi-purpose tanks supposedly fit for fuel, water or waste. The truth is many aren’t up to the job so care must be taken when selecting one to make sure it’s suitable for black water.

Dometic’s 15 HTS polyethylene holding tank has 6.3mm walls and costs around £600
It is often difficult to spot the difference between a polyethylene (PE) tank (for fuel, fresh and grey water) and a polypropylene (for black water), but the latter is more resistant to corrosion and odour permeation. Wall thickness also needs to be at least 6mm (1/4in), preferably 8mm (3/8in).
A flexible tank can sometimes solve a tight space problem, but in order to avoid the bladder chafing through on a sharp edge, a smooth-sided box must first be built from plywood and GRP. This creates work and limits overall capacity, so in most cases a rigid tank will prove easier to install.
Choosing a standard tank, many of which are available off the shelf in odd shapes and sizes to fit bow and bilge lockers, will save you money over having a custom tank manufactured to your own specifications.

Modern yachts use gravity tanks to discharge waste
Ancillary equipment – Pumps
Whether you decide to go electric or manual, a tank discharge pump must be man enough for the job. It’s no use using 38mm (1½in) pipes, connectors, and hull fittings if the pump only has 25mm (1in) inlet/outlet spigots. Most manufacturers produce a pump specifically designed for the purpose, usually a large-bore, high-capacity diaphragm device that can be operated manually or electrically, with an integral, non-return valve in its outlet.
It’s also possible to buy and fit 12V macerator pumps that grind up the waste while pumping it out. Their advantage is that a slightly smaller diameter outlet hose can often be used, and the chance of a blockage is reduced. They do, however, use more water than a manual pump, thereby filling the holding tank more quickly.
In modern boats, gravity is usually used to discharge the tank overboard. Although to avoid the danger of blockages with this method the tank outlet and skin fitting need to be large, usually 75-100mm (3-4in) in diameter, which is often not a practical option on a small boat.

New gauges can now indicate the exact level of waste in your holding tank
Ancillary equipment – Valves
Diverter valves are widely available from numerous marine plumbing equipment suppliers and are usually designed for bulkhead mounting. For systems that are pumping out with a head higher than 1m, installing a non-return valve into the exit hose will be essential to stop the contents back-feeding. Once again all valves need to be 38mm (1½in) diameter.
Ancillary equipment – Pipework
This is an important part of the installation, not just for safety reasons, but to ensure no nasty odours can pervade the living quarters. All hoses must be of non-permeable, sanitation grade, flexible PVC and the genuine article will normally be marked accordingly. It’s not particularly cheap, but it’s worth every penny.
As with any sea toilet installation, if the bowl or holding tank are below sea level at any time all pipework connected to a skin fitting must contain a swan-neck bend with an anti-syphon valve at the top. These are freely available in most chandlers for a range of hose diameters. All joints must be double-clipped using good quality, stainless-steel hose clips.

A remote pumped waste tank helps if the layout is awkward
Level gauges: Both electrical and mechanical indicators are available for waste tanks, which differ slightly from the usual water tank sensor in that the sensors are encased to prevent solids from fouling the mechanism.
Gauges are available that indicate the exact level of waste in the tank, but for most installations a simple warning light when the tank is nearly full is adequate.
Ventilation and odour prevention
Venting the tank: The typical odours experienced with poorly installed holding tanks are usually caused by anaerobic bacteria forming in an oxygen-starved environment.
The key to preventing these smells emanating from the tank is ventilation. Supplying oxygen to the tank allows the aerobic bacteria, found naturally in human waste, to carry out the job of breaking itself down. Any gases produced in this process will then be dispersed into the outside air via an overboard vent, preferably installed away from the cockpit area.

Installing a holding tank can be tricky on smaller yachts
Commercially produced tanks are usually supplied with pre-formed inlets and outlets. One of these, positioned as high on the tank as possible, should be the ventilation pipe connection. The vent should ideally exit the tank vertically to prevent any solids blocking the pipe and should then continue to deck level or onto a shell-type skin fitting high on the topsides. The pipe run needs to be kept as short as possible and there should be no tight bends or kinks restricting the airflow. An odour-reducing, active carbon filter can also be installed into the vent pipe without restricting the airflow to the tank.
Water treatment
Water treatment devices, such as the Seasmart sanitation reservoir, are available to kill bacteria in the seawater as it is drawn into the toilet.
The device is plumbed into the inlet hose and contains an environmentally friendly sanitation fluid which, as well as combating incoming seawater bacteria and odour, also claims to reduce the build-up of limescale without having a detrimental effect on the natural aerobic bacteria in the tank.
Simple additives are also available that should eliminate odour from holding tanks and also encourage the breakdown of the waste by natural bacteria. But, whichever additive you choose, don’t be tempted to use domestic toilet cleaner or bleach in either the toilet or the waste holding tank.

US national symbol directing boaters to the nearest pump out station
International black water regulations
Although the UK hasn’t, as yet, implemented any regulations regarding black water waste or holding tanks for recreational craft beyond its inland waterways, the situation internationally is now developing fairly rapidly, and unevenly, with some countries taking a much stricter stance than others.
- France – Boats built after 1 January 2008, either French or foreign flagged, must be fitted with a treatment system or retention tank for black water if they want to access French rivers, ports, moorings or anchorages. Users of older vessels not equipped with treatment systems or holding tanks for black water must comply with the rules that prohibit black water discharge in ports and designated anchoring spots, and therefore use shoreside toilets. It’s forbidden to flush black water into canals and rivers.
- Netherlands – It’s prohibited to discharge black water from any pleasure boat in any inland waterway, lake, or territorial waters.
- Denmark – Boats built before 1 January 1980 do not need a holding tank and can discharge sewage two miles from shore. Boats built after 1 January 1980 but before 1 January 2000, less than 10.5m LOA or with a maximum beam of less than 2.8m, do not need to have a holding tank and can discharge sewage two miles from the shore. All boats built after 1 January 2000 must have a holding tank that can be emptied through a deck fitting.
- Finland – The discharge of untreated sewage from recreational craft is prohibited less than 12 miles from shore.
- Sweden – The discharge of black water and sewage into lakes, inland waters and territorial waters less then 12 miles from shore is strictly prohibited, with spot fines applicable.
- Spain – Vessels cannot discharge untreated sewage within 12 miles from shore.
- Greece – While not actually a legal requirement in Greece, regulations make having a holding tank a practical requirement. Caution should also be exerted when disposing of grey water.
- Turkey – The discharge of any kind of waste may be considered illegal.
- Norway – Discharge from toilets or holding tanks closer than 300m from shore is strictly prohibited.
- Belgium – It is prohibited to discharge or dump any solid or liquid materials which may pollute the water both inland and at sea.
- USA – Federal law states that untreated sewage cannot be discharged, from either a toilet or a holding tank, in inland waters or coastal waters less than three miles from shore.
Enjoyed reading this?
A subscription to Yachting Monthly magazine costs around 40% less than the cover price .
Print and digital editions are available through Magazines Direct – where you can also find the latest deals .
YM is packed with information to help you get the most from your time on the water.
- Take your seamanship to the next level with tips, advice and skills from our experts
- Impartial in-depth reviews of the latest yachts and equipment
- Cruising guides to help you reach those dream destinations
Follow us on Facebook , Twitter and Instagram.
You are using an outdated browser. Please upgrade your browser to improve your experience.
- Water Tanks & Purification
Accumulator Tanks | Bilge Pump Switches | Bilge Pumps | Calorifiers (Water Heaters) | Freshwater Pumps | Pump Spares | Shower Pumps | Sinks, Taps & Showers | Wash Down Pumps | Water Tanks & Purification |
We stock a range of solutions for storing water aboard your boat, from flexible water tanks from Plastimo to the rigid Force 4 Diablo Smart Tanks. We also sell a range of water filters and purifiers to keep your fresh water tanks and pipes clean and free from bacterias.

- Chandlery Below Deck
- Engines Inboard & Outboard
- Fuel Tanks & Cans
- Gauges & Engine Room Equipment
- Holding Tanks & Accessories
- Jerry Cans, Tanks & Fuel Supply
- Pumps & Water Systems
- Showers, Sinks & Taps
- Strainers & Filters
- Toilet Cleaning & Chemicals
- Toilets & Accessories
- £6.00 - £56.00
- £56.00 - £106.00
- £106.00 - £156.00
- £156.00 - £206.00
- £206.00 - £256.00
- £256.00 - £330.00
- Triangular 100 Litre
- Triangular 55 Litre

- 12V Batteries
- Accessories
- Fuse Holders
- Galvanic Isolators
- Gauge/Instruments
- Isolation Switches
- Switch & Circuit Breaker Panels
- Switches/Buttons
- Plugs, Sockets & Adaptors
- Inverters & Chargers
- Combi & Multi
- Bulb Adaptors
- Bulbs, Tubes & LED Lamps
- Bulkhead Lights
- Downlighters
- Gimbal Lights
- Lighting Spares & Accessories
- Navigation Lights
- Solar Lights
- Striplights
- Torches & Lanterns
- Tunnel/Head Lamps
- Warning Lights
- Low Voltage Appliances
- Rectifiers & Converters
- Solar Panels
- Controllers & Remotes
- TV Equipment
- Aerials & Satellite Dishes
- Televisions
- Aerial Poles & Brackets
- Spare Parts

- Electric Heating
- Stoves & Accessories
- Consumables
- Flue & Collars
- Hats & Caps
- Heat Proofing
- Back Boilers
- Stove Spares
- Diesel Heating
- Eberspacher Hydronic
- Eberspacher Spares
- Gas Heating
- Alde Compact Systems
- Alde Spares
- Water Heating
- Water Heater Spares

- Aerosol Paint
- Antifouling
- Bilge Paint
- Brushes & Accessories
- High Temperature Paint
- Hull & Tank Blacking
- Non Slip Paint
- Paint Additives
- Thinners & Strippers
- Top Coat Gloss
- Undercoat & Primer
- Varnish & Wood Treatments

- Cleaning & Degreasing
- Hygiene & Protection
- Clean & Protect
- Damp Absorption
- Deionised Water
- Fuel Additives
- Lamp Oil / Meths
- LPG Consumables
- Oil & Grease
- Sealants & Adhesives
- Adhesive & Filler
- Fibreglass Repair
- Self Adhesive Film
- Tapes & Sealing Strips
- Insulation Tape
- Non Slip Tape
- Repair Tape
- VELCRO® brand
- Window/Porthole & Hatch
- Toilet Chemical
- Toilet Paper
- Water Treatments

- Cabin Fittings
- Windscreen Wiper Systems
- Window Blinds
- Table/Desmo Legs
- Knobs & Handles
- Hooks, Fasteners & Catches
- Hatch Runners
- Hasp and Staple
- Froli Bed System
- Curtain/Fiddle Rail
- Wardrobe Fittings
- Wall Panelling
- Deck/Hull Fittings
- Bollards/Cleats
- Canopy Fittings
- Cabin Steps
- Deck Fillers & Sockets
- Deck Glands
- Decklift Rings
- Flags & Flag Pole Sockets
- Hatch Lifters
- Houdini/Escape Hatch
- Locker Doors
- Nonslip/Tiles
- Rowlock Sockets
- Skin Fittings
- Ventilation
- Ducting Hose
- Extractor Fans
- Circular Vents
- Clamshell Vents
- Louvre Vents
- Vent Liners
- Dorade Boxes
- No-Smell Vent Filters

- Detectors & Alarms
- Fire Safety
- Smoke Alarms
- Fire Extinguishers and Suppression Systems
- Fire Blankets
- On The Water
- Buoyancy Aids
- Lifejackets
- Life Saving
- Recovery Magnets
- Gas Bottle Securing
- Straps, Bungees & Cargo Nets

- Steering & Controls
- Outboard Engine Tie Bars
- Bow Thrusters
- Steering Wheels
- Engine Controls
- Hydraulic Steering
- Tanks & Accessories
- Tank Accessories
- Adaptor Plates
- Engine Driven Pumps
- Expansion/Header Tank
- Hydraulic Pipe
- Oil Coolers
- Pipe Unions
- Drive Belts
- Drive Plates
- Engine Mounts
- Exhaust System
- Dry Exhaust Systems
- Wet Exhaust Systems
- Air Filters
- Fuel Filters
- Oil Filters
- Fluid Transfer
- Fuel System
- Cav Fuel Filters
- Gauges & Instruments
- Gearbox Spares
- Reconditioned Gearboxes
- Marinising Parts
- Rudder Bearings
- Rudder Stock
- Sound Insulation
- Centre Tube / Bearing
- Gland Packing
- Propshaft Nuts
- Stuffing Box
- Weld In Boss

- Chain Hardware
- Rigging/Straining Screw
- Shackles & Links
- Fender Hooks
- Fender Lines
- Mooring Equipment
- Poles & Hooks
- Ropes & Bungees
- Bungees & Straps
- Windlass & Keys

- Appliance Spares
- Legacy Spares
- Stoves / Belling
- Thetford/Spinflo
- Universal Spares
- Voyager Cooker Parts
- Worcester Bosch
- Dishwashers
- Kitchen Sinks
- Kitchen Taps
- Kitchenware
- Laundry Equipment
- Ovens & Hobs
- Freestanding
- Refrigeration
- Fridges & Freezers

- Towel Rails
- Shower Doors
- Bottle Spanners
- Changeovers
- Cylinder Regulators
- Gas Fittings
- Accumulators
- Calorifiers
- Finned Radiators
- Immersion Heater
- Pressure Relief Valves (PRV)
- Radiator Key
- Thermostatic Valves
- DZR Brass Fittings
- Fibre Washers
- Ball Valves
- Brass Fittings
- Camlock Fittings
- Hose & Fittings
- Non Return Valve
- Pipe & Hose Clips
- Waste Fittings
- Water Filters
- Pushfit Plumbing & Fittings
- Gate Valves
- Taps, Mixer Valves & Shower Equipment
- Bath and Basin Taps
- Outside Taps
- Shower Heads and Hoses
- Shower Mixer Valves
- Bilge Pumps
- Circulation Pumps
- Manual Pumps
- Pressure Pumps
- Spares And Service Kits
- Strainers/Filters
- Submersibles & Inlines
- Washdown Pumps
- Waste Pumps

- Store Gift Vouchers
- Licence Holder
- Maps/Guides
- Tables, Chairs & Storage
- Towing Accessories

- Baysan Marine
- Bullet Polish
- Craftmaster
- Eberspacher
- General Ecology
- International
- Muddy Waters
- Python-Drive
- R&D Marine
- Ring Automotive
- Sterling Power
- Treadmaster
- Victron Energy
LIVE Stock Figures
Free UK Delivery orders over £120 (inc vat) orders over £100 (ex vat)
24-48 Hour Dispatch (order before 4pm)
Expert Help & Advice
Free UK Mainland Delivery when you spend over £120 (inc VAT)
- All Consumables
Your Selection
Get offers in your inbox.
We’d love to keep you updated on the latest news and offers by email.
By submitting your details you consent to our Privacy Notice .
This site is protected by reCAPTCHA and the Google Privacy Policy and Terms of Service apply.
IMAGES
COMMENTS
Carefully regulated chlorination is the most sensible treatment. Tank cleaning chemicals function a little differently than bleach and detergent, dissolving more material without agitation, but not loosening heavier deposits as well as detergent with light agitation. ... Rent boat water tanks are sometimes pretty bad smelling, leaving me to ...
Don a sanitary rubber glove and swab your finger across the inside of the tank. If it feels slimy or emits an odor, the tank's interior needs to be scrubbed with detergent, rinsed and sanitized. | |The bottom right hose in this image relies on steel wire reinforcement, which unfortunately is rusting. Seek other alternatives.|.
3. Measure out enough 5% bleach to make a 50 ppm solution in your tank. The cheapest and easiest way to sanitize your boat water tank is with household chlorine bleach. Use a 5% chlorine bleach product and pour enough into a bucket or other container to make a 50 ppm (parts per million) solution, based on the size of your tank.
How to clean your boat's freshwater tank: Drain the tank completely. Measure 1 teaspoon/gallon of household bleach (aluminum) or vinegar (plastic) into the tank and add fresh water until it's full. Let it sit for 24 hours to sterilize, then drain the water. Fill with fresh water and drain repeatedly until all the bleach/vinegar odor is gone.
The tank water was unpleasant to drink - and adding any of the treatments to it served only to alter the taste rather than improve it. All of the filters tested improved the flavour and aftertaste, however.. The Seagull IV and Nature Pure QC filters gave by far the best taste improvement, and also remove bacteria and other substances, making even contaminated water safe to drink.
In addition, try to drain your tank somewhere that won't negatively affect the environment. Then, you can remove the old water to prepare for cleaning. Turn on your water pump, open all of the taps, and let the water drain out. Clean Out the Tank. The key to cleaning a fresh water tank is to allow the new, clean water to do the work.
To clean sailboat water tanks, the first step is to empty the tank and rinse it with fresh water. Next, mix a solution of 1 cup of bleach and 1 gallon of water and pour it into the tank. Allow the solution to sit in the tank for 1-2 hours and then rinse the tank thoroughly with fresh water. Finally, use a brush to scrub the inside of the tank ...
A. It's pretty straightforward, but be forewarned: it takes time. Drain the water system completely by opening all the faucets (hot and cold), and pump until the tank (s) are empty. Pour five or six gallons of non-toxic (propylene glycol) antifreeze into the tank. Choose antifreeze with a freeze rating of at least -50 degrees Fahrenheit.
As a precaution, when you're away from your boat, close the underwater seacocks. Potable Water Tank (14, 15, 16) — Should be treated periodically with a product such as Star brite AQUA Water Treatment & Freshener to remove odors, scale, and bad taste. Also, thoroughly flush tank with clean water and pressure nozzle.
Prepare a chlorine solution using one gallon of water and 1/2 cup (4 oz) Clorox or Purex household bleach (5% sodium Hypochlorite solution ). With tank empty, pour chlorine solution into tank. Use one gallon of solution for each 5 gallons of tank capacity. 2. Complete filling of tank with fresh water. Open each faucet and drain cock until air ...
Mix the proper amount of bleach within a 1-gallon container of water. This will provide better mixing and reduce spot corrosion of aluminum tanks. Pour the solution (water/bleach) into the tank and fill the tank with potable water. If possible, allow some solution to escape though the vent. (If the vent is exterior, prevent any spillage into ...
In Practical Sailor 's report on winterizing with alcohols versus glycols, it became clear from our testing that under-treatment was a leading cause of water tank contamination. The combination of weak solution and mild temperatures in fall and spring proved especially hospitable to growth. Much of your winterizing success will depend on the ...
1. Prepare a chlorine solution using one gallon of water and 1/2 cup (4 oz) Clorox or Purex household bleach (5% sodium Hypochlorite solution ). With tank empty, pour chlorine solution into tank. Use one gallon of solution for each 5 gallons of tank capacity. 2. Complete filling of tank with fresh water. Open each faucet and drain cock until ...
If you fill your boat's water tank from external sources, such as your marina's water supply, ensure the water quality is suitable for consumption. ... tank. If your boat is in a less developed country, where the quality of municipal water may be dicey, consider using water treatment methods like filters or purifiers and/or boil your water ...
Each spring we need to commission our fresh water holding tank to rinse out antifreeze from winterizing, clean out the water tank, add water purifier & clean...
Replace housing with filter element removed. Activate pump and open faucets one at a time. Once all faucets run clear, empty the water tank and refill with tank and hose cleaner. Let stand several hours, then pump the tank dry, replace the water filter element, and refill the tank with clean water.
Plug all aerators and the tank's air breathers. Leave the system pressurized with the cleaning solution in it for 4 to 12 hours. Drain the entire system and flush it thoroughly. Flush it with potable water. Fill and drain at least 2 times, or until you are sure there is no cleaning solution left in the tanks.".
Both cases can often be fixed using a plumber's snake. (3) Sludge layer remains after flushing the holding tank can be a result of too much time between maintenance. Sometimes filling the holding tank with clean water and agitating the water by chopping the boat can break up materials for their removal.
Holding tank treatments use a variety of methods to mask or eliminate offensive odors created as waste is broken down in your marine sanitation system. They come in four basic formulations. Our chemical based ExterminOdor Holding tank treatment controls odors and gassing without using formaldehyde. Chemical treatments are the most popular ...
Holding tank maker Dometic/Sealand recommends that boat owners empty the tank, then fill it about halfway with fresh water, and add 8 ounces of a liquid, bleach-free, biodegradable laundry detergent to the water before getting underway, preferably for a few hours of sailing in choppy conditions. Sealand Communication Manager Patrick Snyder also ...
Retailers sell a bewildering range of plastic tanks, even some multi-purpose tanks supposedly fit for fuel, water or waste. The truth is many aren't up to the job so care must be taken when selecting one to make sure it's suitable for black water. Dometic's 15. HTS polyethylene holding tank has 6.3mm walls and costs around £600.
We stock a range of solutions for storing water aboard your boat, from flexible water tanks from Plastimo to the rigid Force 4 Diablo Smart Tanks. We also sell a range of water filters and purifiers to keep your fresh water tanks and pipes clean and free from bacterias. Check out the Force 4 guide to maintaining your boat's fresh water system ...
Water Purifying Tablets & Treatments for Boat Drinking / Fresh Water Tanks from leading brands: Star Brite, Elsan, Clean Tabs Aqua Tabs, Puriclean, Aquasol