Yachting Monthly
- Digital edition


Yacht rigging: your essential pre-season rig check guide
- Duncan Kent
- February 7, 2023
Few things are more important during the spring fit-out than a thorough yacht rigging and spar inspection. Duncan Kent runs through the priorities
During the spring fit-out we often appear to lavish far more attention on the engine and electrical systems than we do on the rig, despite the latter presenting a much greater risk to both yacht and crew should it fail in any way. However, because a yacht’s standing rigging has so many possible weak points it can be tricky to predict when any part of it is about to break. Close inspection should be a mandatory element of the pre-season preparations and checks.
A detailed rig check will rarely take more than a couple of hours to complete and should really be carried out prior to any long passage or extended cruise.
There are a number of telltale signs that should be looked for before, or soon after you launch for the new season, and several maintenance tasks that can be carried out to prolong the life of the rigging.
When inspecting your rig, it makes good sense to make an inventory of all the parts and their dimensions, as well as taking photographs of them.
It’s always advisable to un-step the mast every few years to check it over thoroughly at ground level. It makes close inspection of areas like the spreader roots, mast terminals and halyard sheaves much easier. If you are in any doubt about the condition of any part of the rig, it’s worth getting your local rigger to come and have a look.
This level of inspection may also keep your insurance company happy to continue covering an ageing rig, so it is worth doing every few years.

The mast step is a cast fitting under heavy loads and needs a thorough check
I always start the pre-season rig checks by inspecting the spars, commencing with the mast step and foot. The high compression forces on the mast step can put severe strain on both the T-bar (the plate on the deck) and step (the cast fitting that takes the loads in the bottom of the mast tube), particularly if there is any imbalance in the rig tension.
This is also an area where the salt water can gather in a pool, making it very prone to corrosion. Look closely at any rivets around the base and at the mast section itself for signs of corrosion or cracks. Get them looked at by a professional if there are working signs, to evaluate what repairs may be necessary.
With keel-stepped masts it’s especially important to check for corrosion at the foot as often they sit in the damp bilge and, being out of sight, are often overlooked. The same with the deck seal which, if leaking, will cause water to dribble slowly down the mast, creating a puddle at the foot. Replace any seals that are looking worn or perished.
With regards to the boom, first and foremost is the gooseneck. This is a common weak spot on any rig and one that has to withstand massive forces in several different directions when under sail. If it fails it can cause considerable damage, especially if it tears itself out of the mast, which will then be severely weakened. Always remove the main pivot bolt as, though it might look OK from the outside, salt water can drip into and settle inside the guide holes, seriously corroding the bolt just where it can’t be seen.

The gooseneck may look OK but it’s best to remove the securing bolt to check it
As with all the other mast fixtures, check closely for hairline cracks around the gooseneck fitting, either on the mast or on the fitting itself. This is best done using a dye, which will help make cracks more visible to the naked eye.
Other notoriously weak points on the boom are the vang fittings. They undergo similar stress levels under way, so it’s wise to give them the same once-over as the gooseneck.

All mast attachments and their locations are worth recording
Make a rig check inventory
When inspecting your rig for the first time it’s a good idea to make an inventory of all the components and their dimensions. Use a pair of Vernier callipers to note wire and pin diameters and measure the wire lengths as accurately as possible between pin centres at each end with full tension still in the rig.
For later reference, photograph each wire end, terminal, and mast attachment. The same for the lower ends, turnbuckles, toggles, and chain plates, taking note of the positions of the turnbuckles.
If wire stretch means they’re turned up so tight as to not have any further adjustment, compensate for that in your wire length measurement if replacing. The turnbuckles should capture one third of the screw length when fully tensioned.

Check chain plates for corrosion
Turnbuckles
Back at deck-level the turnbuckles (bottle screws) and chain plates must be closely inspected for cracks, rust, wear or distortion. The former require careful scrutiny as they can often sustain damage from misalignment, particularly if a seized toggle has been preventing free movement. They can also crack under the constant tension, particularly if the rig has been pumping in rough seas.
If they have had plastic covers or been taped up there’s a good chance that trapped water might have caused corrosion, so remove and check underneath. Screw threads and locking nuts often need cleaning and regreasing. Slacken them off, giving them a few turns each way and removing clevis pins for inspection, before re-tensioning the stay and locking it off. Replace worn toggles, clevis pins, split pins or rings.

Don’t forget to uncover spreader ends to check wires and terminals
Chain plates
Finally, inspect the chain plates for cracking or distortion and tap the hull or deck around the plate lightly to and tap the hull/deck around the the plate lightly to ensure the laminate hasn’t absorbed water from leaky, dried-up sealant. Put a foot next to the chain plate and as you stand on it, check there is no flex in the deck. Go below decks, if you can, to check the bolts securing the chain plates to the hull, and now and again draw the bolts to check for cracks and corrosion. Do the same checks for forestay and backstay, especially if rust is visible. Ensuring any through-deck fittings are properly sealed will help prevent water ingress.

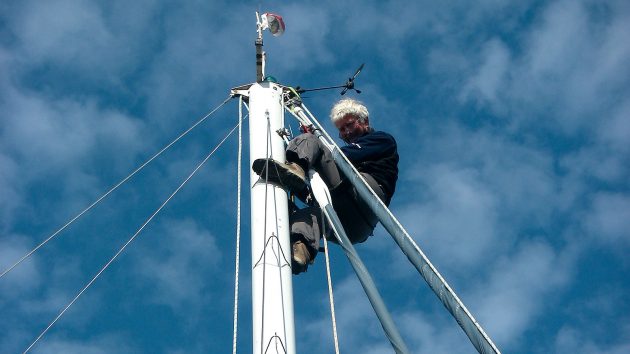
Choose a calm, dry day to inspect the masthead using the bosun’s chair
At the masthead
Once you’ve done all you can at deck level it’s time to go up the mast , so dig out the bosun’s chair and find a trusted mate to help. Most masts feature integral sheaves that rarely get checked during the season.
Remove the axle pins and sheaves to check for bearing wear and any flat spots that might indicate previous seizure. On reassembly replace any retaining pins or rings and ensure the sheaves spin freely.

Check for damage in the wire at the terminal end
The same goes with external halyard blocks, and you’ll also need to ensure any swivels are rotating freely. Remove any shackles, check for wear or distortion, then clean, lubricate and refasten them, replacing any that are worn or distorted.
Finally, securely seize them with new wire, ensuring there are no sharp wire ends to snag on lines or sails.
Next, check the mast fittings where backstay and forestay connect, ensuring clevis pins are straight and secure and the holes are not elongated.
Inspect the area around tang plates and toggle fittings for cracks, using a magnifying glass and dye.

Checking shroud tension with a gauge
Another common area of rig failure is where the shrouds are secured to the mast. Various connection methods are used, but all should be checked closely for wear, corrosion and/or cracking. Any sign of wear on T-ball type joints (often the indication of an under-tensioned or misaligned rig) means the terminal, socket, or both should be replaced.
Also, look to see if there is any rust or broken wires as the shroud enters the terminal. This will be easier if you slacken the tension off the wire, allowing you to wiggle the wire about.
As you work your way down the mast on the bosun’s chair, check the mainsail track is clean, straight, and well secured, giving it a good spray of track lubricant as you descend. At the spreaders inspect the roots and tips for corrosion or damage (particularly if they have plastic end caps) and ensure the spreaders aren’t bent or distorted.
Retuning the rig
When you’re happy everything is in a serviceable condition it’s a good opportunity to retune your rig, especially at the start of the season. If you do it yourself you should begin at the bottom, working your way up from the lowers, inters (if you have them), cap shrouds and finally the back- and forestays.
Adjusting the shrouds in pairs, first slacken them right off and then make a few turns on the turnbuckle one side, before going to the other and applying an equal number on the opposite shroud. Keep the balance equal on each side by counting the turns on each turnbuckle. This way you won’t risk deforming the mast or misaligning a fitting.
If you’re concerned about getting the tuning spot on, especially if racing is your thing, then it’s probably worth investing in a rig tension gauge such as a Loos gauge so you can tune your boat rigging effectively.
Yacht rigging Inspection checklist
- Mast and boom for cracks and corrosion
- Spreader roots and ends for damage
- Integral masthead and boom sheaves for seizures and flat spots
- Corroded or broken shroud wires
- Cracked, seized or rusty turnbuckles
- Toggles for wear and distortion
- Alignment of shroud fittings
- Furler and swivel bearings for wear and lubrication
- All shackles for wear and distortion, replacing seizing wire
Rig maintenance tips
- Ensure any taping of screws or pins cannot trap water, which will in time cause corrosion
- If you are taping over sharp edges, self-amalgamating tape will last longer than electrical tape
- Wash all moving parts with fresh water to remove salt residue
- Use a silicone-based lubricant regularly to keep moving parts free-running
- Avoid contact between dissimilar metals – use an anti-corrosion paste when using screws or rivets, and use plastic tape to create a barrier layer between fittings
- Rake out and renew sealant around through-hull fittings to prevent water ingress. If you are taking your rig down, take the opportunity to remove deck fittings and re-bed on new sealant
- Get your rig professionally inspected every three years, and let your insurance company know you’ve had the all-clear
Enjoyed reading this?
A subscription to Yachting Monthly magazine costs around 40% less than the cover price .
Print and digital editions are available through Magazines Direct – where you can also find the latest deals .
YM is packed with information to help you get the most from your time on the water.
- Take your seamanship to the next level with tips, advice and skills from our experts
- Impartial in-depth reviews of the latest yachts and equipment
- Cruising guides to help you reach those dream destinations
Follow us on Facebook , Twitter and Instagram.
- BOAT OF THE YEAR
- Newsletters
- Sailboat Reviews
- Boating Safety
- Sailing Totem
- Charter Resources
- Destinations
- Galley Recipes
- Living Aboard
- Sails and Rigging
- Maintenance
- Best Marine Electronics & Technology
How to Inspect and Tune a Sailboat Rig
- By Ralph Naranjo
- Updated: May 14, 2020

Major mast failures usually begin as minor hardware problems. At least that’s what scrap-bin forensics seems to confirm. So, instead of dreading a dismasting, prevent it with a sensible approach to rig maintenance.
Some sailors inspect their masts and rigging with the spar stepped, but most recognize how much will remain unseen. Riggers recommend that the mast come out every few years and be placed on a pair of sturdy sawhorses ready for close-up scrutiny. My DIY approach focuses on hardware junctions and points where load paths intersect. Packed in my rigger’s bag are the usual hand tools, plus a Scotch pad, a quality magnifying glass and a small digital camera to record the findings. The old rule of thumb is that standing rigging has a decade’s, or one circumnavigation’s, worth of reliability; it’s a benchmark that remains valid today.
Another important issue is the rigging’s designed safety factor, or how much stronger the components are than they need be. The catch here is material deterioration over time, and the fact that there’s a direct correlation between stronger structures and increased reliability. For example, by increasing 1-by-19 shrouds and their attendant hardware from 5/16 inch to 3/8 inch, the higher safe working load translates into a longer life span. It’s a legit assumption, but doing so is both costlier and adds weight aloft, which can rob performance. The same tenets apply for a larger-diameter spar section and greater wall thickness. Engineers and naval architects try to balance these competing factors.

Some decades ago, I watched the deck-stepped spar of my first little cruising sloop drop into the drink. It drove home the fact that it really is the little things that count. In that case, it was a stainless- steel toggle, connected to an upper shroud turnbuckle, which had endured a few too many on-off load cycles. A tiny, nearly invisible crack had opened up, and salt spray had found a new home. The resulting corrosion tipped the scale and led to a dramatic failure. Since then, rig scrutiny has become my obsession.
The old rule of thumb is that standing rigging has a decade’s, or one circumnavigation’s, worth of reliability.
Wire and rod end fittings need a close look, especially in areas where there are brown stains and signs of cracks, pitting or other surface deterioration. This includes an evaluation of clevis-pin holes that should be circular, not elongated. Confer the same level of scrutiny to the clevis pins themselves. Don’t confuse stainless-steel clevis pins with chrome-plated bronze pins. The latter are just fine when used in bronze fittings, but when a bronze clevis pin is placed in a stainless-steel chainplate hole, the bronze pin can be carved away by the much harder stainless-steel chainplate.
My inspection process includes a rigging-wire wipe-down with a rag that easily snags on tiny cracks. It includes careful scrutiny of hardware junctions. I search for signs of chafe, especially where fiber or wire running rigging makes directional changes at sheave boxes, and around where the headsail furler’s top swivel rides. Looking closely at masthead exit points, I check for sheave wobble, excess side play and signs of pulley damage.

This is also the time to sort out halyards that are rubbing against external or internal obstructions. I use a bright, narrow-beam LED flashlight for a good visual inspection of the internal portion of the mast. Not only will it pinpoint screws and sheave boxes that might be causing chafe, but it also will help you untangle crossed halyards and confirm fairleads. While working at the heel end of the spar, look closely for corrosion and a condition riggers call “elephant foot.” It’s an actual wrinkling of the alloy tube section caused by too much compression and a too-thin wall section. It’s most often seen on raceboats with powerful hydraulic mast-adjusting systems, and on cruising boats that have pounded into too many steep wave faces.

Roller furling foils hide the wire or rod on which they spin. Rigging end fittings and terminals can usually be inspected, but a broken strand of wire inside the foil might initially go unnoticed, at least for a little while. This is another reason why offshore cruisers opt for a cutter or solent rig that adds a second stay for some extra insurance. Following the once-a-decade rule, it makes sense to completely disassemble furling systems, and replace the wire along with any worn bearings, bushings or plastic spacers.
My inspection process includes a wire wipe-down with a rag that easily snags on tiny cracks. I search for signs of chafe everywhere.
Keep in mind that when the mast is unstepped, many roller furling drums and head foils (especially on boats with deck-stepped rigs) extend beyond the heel of the spar. If the yard doesn’t splint and immobilize the extended foil and drum, do it yourself. All it entails is a couple of 2-by-4’s, or a pair of old oars lashed or duct-taped to the mast just above the heel. This double splint should extend to the base of the roller-furling drum where it too is lashed or taped. It keeps the drum from dangling and bending the foil during transport, and while the rig is stored on a mast rack.

Spreaders also deserve a really close look. All too often, excess anti-chafe protection results in the spreader tips becoming a water trap that turns into a hidden corrosion bath. So, when the rig is down, cut away the spreader-tip padding, and use white vinegar and a plastic scrub pad to get rid of any white powdery oxidation. Remove the spreaders from the spar, and inspect the area where spreader bases make contact with the mast. Look for compression damage to the mast wall and signs of corrosion damage. If all is well, reassemble using one of the tried-and-proven water-resistant lubricants. I’ve settled on Lanocote, McLube Sailkote and Super Lube, using Boeshield T-9 and WD-40 as my go-to spray protectant and penetrant. Throw away the old cotter pins, and use new pins on all of the reassembled rigging.

“She’ll be right, mate,” was the favorite phrase of an old Kiwi friend, but it isn’t good advice when it comes to keeping the rig where it belongs. Don’t shy away from calling in a qualified rigger to handle larger problems.

Most boatyards will restep spars but won’t tune the rig. Their goal is to set up the mast and rigging to approximate how it arrived. Occasionally, they hit the mark and even replace the mast wedges appropriately. Otherwise, I wait for a flat calm to make sure that the boat has no list. This involves using a tape measure to confirm the athwartship trim (waterline to rail-height port equals waterline to rail-height starboard). Then I check the perpendicular and rake of the mast using the main halyard with a makeshift plumb bob (dive weight) attached. The retune requires loosening the turnbuckles and incrementally retensioning the rigging. Small amounts of headstay and backstay adjustment relocates the masthead, causing the makeshift plumb bob to move significantly. I use prior measurements from previous mast-tuning successes to set the rake to a sweet spot that, in the past, delivered a minimal amount of weather helm.

With the rake set, I insert a set of teak or high-density hard-rubber wedges between the mast and the mast partners. These wedge-shaped spacers have a top flange that prevents them from falling into the bilge when the mast compresses on one side of the partners and opens the gap wider on the other. With all the wedges set, I incrementally add tension to the rig, tightening headstay and backstay first, while carefully maintaining the rake angle. Next, I adjust the upper shroud (or V1), working from side to side to keep the mast perpendicular. Finally, I snug up (but not overtension) the lower and intermediate shrouds. This static tuning sets the stage for an underway final tune, during which I check how well the spar remains in column. Leeward bends and S-curves are problematic and must be minimized. Boats with discontinuous rigging have shrouds that are not one continuous wire run. They utilize turnbuckles located above spreaders that must be individually adjusted to eliminate side bend.
During sea trials, make sure the leeward standing rigging is not overly slack and flopping around like loose spaghetti.
Intentional fore and aft mast bending can influence sail shape, and is put to good use aboard raceboats. Adding such complication to most cruising boats, which are normally steered by an autopilot, makes less sense. In-mast furling spars are least happy with powerful hydraulic backstays bowing the mast. So, get sound advice from a rigger/mast builder before adding hydraulic sail-shaping gear.

A sea trial should follow your static mast tune. And as you beat to windward in a modest 10- to 15-knot true breeze, check the leeward standing rigging. Make sure it’s not overly slack and flopping around like loose spaghetti. If so, add more shroud tension to both sides. A tension-testing gauge will work, but many sailors do fine estimating by hand. Cruising-boat rigs shouldn’t have the same amount of rig tension as a raceboat beating to windward. However, if your sailboat’s mast is deck-stepped, make sure the coachroof isn’t deforming due to the compression load. A compression post, ring frame or other rigid structure should be spreading such loads. If you’re unsure of the correct rig tune, arrange a session with a rigger or sailmaker—and start the season in optimized trim.
Technical expert Ralph Naranjo has inspected the rig on his Ericson 41, Wind Shadow , on countless occasions.
- More: fitting out , hardware , How To , mast , rigging
- More How To

3 Clutch Sails For Peak Performance

It’s Time to Rethink Your Ditch Kit

8 Ways to Prevent Seasickness

How To De-Winterize Your Diesel Engine

The Moorings Expands in Croatia

C-Map Updates North America Charts

New to the Fleet: Italia Yachts 12.98

St. Vincent Court Orders Deportation For Hijacking Suspects
- Digital Edition
- Customer Service
- Privacy Policy
- Terms of Use
- Email Newsletters
- Cruising World
- Florida Travel + Life
- Sailing World
- Salt Water Sportsman
- Sport Fishing
- Wakeboarding
Many products featured on this site were editorially chosen. Cruising World may receive financial compensation for products purchased through this site.
Copyright © 2024 Cruising World. A Bonnier LLC Company . All rights reserved. Reproduction in whole or in part without permission is prohibited.
Service Locator
- Angler Endorsement
- Boat Towing Coverage
- Mechanical Breakdown
- Insurance Requirements in Mexico
- Agreed Hull Value
- Actual Cash Value
- Liability Only
- Insurance Payment Options
- Claims Information
- Towing Service Agreement
- Membership Plans
- Boat Show Tickets
- BoatUS Boats For Sale
- Membership Payment Options
- Consumer Affairs
- Boat Documentation Requirements
- Installation Instructions
- Shipping & Handling Information
- Contact Boat Lettering
- End User Agreement
- Frequently Asked Questions
- Vessel Documentation
- BoatUS Foundation
- Government Affairs
- Powercruisers
- Buying & Selling Advice
- Maintenance
- Tow Vehicles
- Make & Create
- Makeovers & Refitting
- Accessories
- Electronics
- Skills, Tips, Tools
- Spring Preparation
- Winterization
- Boaters’ Rights
- Environment & Clean Water
- Boat Safety
- Navigational Hazards
- Personal Safety
- Batteries & Onboard Power
- Motors, Engines, Propulsion
- Best Day on the Water
- Books & Movies
- Communication & Etiquette
- Contests & Sweepstakes
- Colleges & Tech Schools
- Food, Drink, Entertainment
- New To Boating
- Travel & Destinations
- Watersports
- Anchors & Anchoring
- Boat Handling
Inspecting Your Boat's Mast and Rigging
Advertisement
Keep your sailboat in top shape with this useful advice on inspecting your boat's mast and rigging.

Surveying Your Rig
What to look for and why.
Whenever a mast tumbles overboard, the two seemingly obvious offenders are the mast itself — the aluminum extrusion — and the wire stays and shrouds that support the mast. In practice however, these are rarely the culprits. The offenders, in most cases, are the tangs, turnbuckles, and chainplates and the smaller, but no less significant, screws, bolts, terminal fittings, clevis and cotter pins that hold everything together. These can be inspected in a couple hours or less. All you need for an inspection is a magnifying lens, a mirror, some toilet paper, your fingernails, a boatswain's chair, and a pair of reasonably good eyes.
Download the Rigging Checklist in PDF format.
Whenever you inspect a fitting, look for obvious problems like rust and distortion and use the magnifying glass to find smaller cracks. Rust, especially rust that you can feel, and even slight distortions or cracks should be considered serious, and the component replaced. Use your fingernails to feel for cracks and check the thinnest part of the fittings extra carefully, as this is where failure is most likely to occur. If a fitting has been painted (a bad idea), strip off the paint.
Chainplates
Turnbuckles and chainplates must be angled so that loads are in a direct line with stays and shrouds. Toggles, which act like universal joints to allow movement in all directions, should be used with turnbuckles but they cannot be relied on to compensate for a misaligned chainplate. A chainplate that is not aligned has a tendency to work until it eventually breaks. Besides eyeballing the shroud/chainplate alignment, misalignment is sometimes indicated by damage to the surrounding gelcoat.

Chainplates can corrode and fail either above, within, or below the deck. Corrosion at the chainplate above may have been only detected by removing the toggles to inspect around the eye.

The chainplate above failed within the deck, where salt water had leaked down and initiated crevice corrosion where hidden from view.
If chainplates are bolted to a bulkhead, as is often the case, inspect the bulkhead for signs of weakness — discoloration, delamination, and rot. Chainplates are highly stressed, and will work and cause leaks where they come through the deck. Water can then enter the bulkhead and eventually cause it to rot. Probably the best, although maybe not the prettiest, place to secure a chainplate is to the outside of the hull. Chainplates that are only bolted to flanges under the deck, and are not secured to a structural member down below, are the least desirable installation.
Turnbuckles
Open turnbuckles are easier to inspect and don't retain moisture, which encourages corrosion. Closed turnbuckles retain moisture in the barrel and have of a tendency to freeze up, but they also are better at retaining lubricant.

Fatigue and crevice corrosion broke this pair of threaded terminal fittings along the crevice between the lock nut and the turnbuckle body, illustrating why disassembly of the turnbuckle is necessary to inspect hidden trouble spots most likely to fail.
Turnbuckles should be wiped clean and lubricated at least once a year; more often if they are open or are adjusted frequently.
Teflon is better for lubricating turnbuckles than oil or grease because it doesn't hold grit that abrades the threads. Oil or grease, however, are certainly better than nothing.
Most turnbuckles are tightened by turning the shank or barrel clockwise. Incidentally, you should never stress your rig by over-tightening the turnbuckles. If the turnbuckle squeaks stop tightening — this is a sign of over-tightening and poor lubrication.
If you boat has open turnbuckles, be sure to leave at least 3/4" of thread visible in the barrel and replace the old cotter pins. A cotter pin should be large enough to fit snugly into the hole and long enough to be bent half way back around. Rigging tape should then be wrapped around the pin to protect your sails, fingers, toes, etc.
Many closed turnbuckles can't be cottered and rely instead on locknuts. Experts warn that over-tightening the locknuts places too much stress on the threads.
Terminal Fittings
Most sailboats rely on swage fittings at the terminals, but these fittings are not necessarily the most reliable, especially in warmer climates where they have a history of failure. Swage fittings are made by compressing a tube onto the wire under great pressure, a process that must be done exactly right to assure a strong bond. If the swage has to be pressed several times (a bad practice) before the wire is secure, there is an increased chance that the swage has been weakened and could crack.
There are other types of terminal fittings, such as Noresman and Sta-Lok, which are more expensive and less common than swage fittings but are highly touted by many sailors for their durability. Norseman and Sta-Lok fittings can be installed or repaired by the boat owner — an obvious advantage, especially for making emergency repairs on long cruises.

Cracked swage fittings are not only the most common kind of rigging failure, but also the most visible. This one should have been noticed and replaced long ago.
Careful inspection of all terminal fittings is a must. Cracks are usually microscopic when they begin, so use your magnifying glass. Also, you can sometimes feel a crack with a fingernail that cannot be seen.
Cleaning the fitting with metal polish helps brighten the fitting to make inspection easier and using one of the three-part spray products on the market also helps you see cracks. The latter are highly touted by their manufacturers but they are not infallible. The first part cleans the fitting; the second part is a dye that penetrates the crack; and the third part is a developer. The dye, incidentally, can stain gelcoat, so be careful.
Terminal fittings, especially swage fittings at the deck, are prone to rust where the wire enters the swage. Rust indicates a serious problem and the swage and possibly the wire should be replaced. Some skippers like to use gel or wax to prevent water from entering the swage. While this may be effective for a while, it probably won't keep water out for long and could very well trap water inside, encouraging corrosion.
The Mast and Boom:
Welds and rivets.
Aluminum welds on the mast and boom should be inspected, especially where there may be a lot of stress. Look at the ends of the welds first, as aluminum welds fail from the ends of the weld inward. Welds that are not done correctly have sharp edges and crevices which encourage corrosion. Any welds that are cracked or badly rusted should be rewelded immediately.
Rivets should be examined, and any that are loose or missing should be drilled out and replaced with the next-larger size. Also, if one or two rivets holding a cleat or gooseneck are loose, it is a good idea to replace all of the rivets with the next-larger size, not just the ones that are missing.
Galvanic Corrosion
Galvanic corrosion occurs when stainless steel or bronze fittings — cleats, tangs, winches — are installed metal-to-metal on an aluminum mast.
Every few years, mast fittings should be rebedded with zinc chromate paste, polysulfide, teflon, nylon, or tufnol (plastic) to protect the mast from galvanic corrosion. Silicone does a good job of protecting the mast, but the fittings may be difficult to get off later. And in a pinch, Rolf Bjelke aboard the steel ketch Northern Light in the Antarctic, used a plastic coffee can lid to bed a halyard winch.
If a mast is painted, look for bubbles near fittings, which indicate corrosion. On an unpainted mast, look for white powder and pockmarks around fittings. Some powder, which is oxidized aluminum, is normal on an aluminum mast and is usually not significant. But heavy concentrations of powder, bubbles and/or pockmarks, especially deep pockmarks, indicates a serious problem that threatens the integrity of the rig. Contact a rigger or surveyor if you suspect a problem.
Whether it is stepped on deck or on the keel, the base of a mast — a maststep — should be the same material as the mast. Because water that is outside the boat usually finds its way into the bilge, a mast that is stepped on the keel is especially prone to corrosion when the boat is used in saltwater. A rigger in Maryland likes to tell the story about an owner who complained that the stays and shrouds that couldn't be tightened. He thought they had stretched. It turns out that the maststep had corroded so badly that the mast was "sinking" into the bilge.
A mast that is stepped on deck can cause problems if the load isn't supported properly down below. This is sometimes a design problem, but most often it is because a bulkhead or support stanchion has failed — shifted, rotted, delaminated, etc. Look down below for indications of movement, including jammed doors, broken bonds, and splitting wood. A sagging cabin top is a strong indication that adequate support isn't being provided.
Besides corrosion, maststeps can be damaged when the mast is cocked to one side and the heavy compression load is not evenly distributed. Indications of uneven compression load include cracking and/or crushing of the mast's base. The problem can be avoided by keeping your rig tuned — adjusting the stays and shrouds to make the mast straight. If the base of the mast has already been damaged, don't despair, it can either be cut down slightly and restepped or, if the problem is more serious, the damaged portion can be cut down and an extrusion added. Either way, the boat should not be sailed until a rigger is contacted and the problem has been corrected.
Wood masts have a lot of eye appeal but require more upkeep than aluminum masts. Wood masts are usually made of spruce, a material that is light and flexible, but prone to rot.
Rot is easier to detect when a mast is varnished. Painted masts hide rot, but only for awhile. Any areas that are badly discolored on a varnished mast, or won't hold paint on a painted mast, are suspect and should be sounded with a hammer for indications of soft wood. Rot is most likely to appear around fittings, the masthead, mastboot, spreaders, and especially at the maststep. These areas should be inspected twice a season and treated or caulked as necessary. Weep holes, used to drain water at the base of a box mast, can become plugged with debris, leaving water to fester inside the mast. Weep holes should be checked periodically with a coat hanger to prevent blockage.
Inspecting Aloft
Most people have a natural aversion to hanging from a rope at the top of a swaying mast. If possible, inspect your mast while it is unstepped. If you do go aloft, make sure there are experienced hands below to hoist you up. A snap shackle, if one is used on the halyard, can be made safer by taping the lanyard to prevent its accidentally opening. Also, if the boat is in the water, you'll want to moor it where it won't get tossed around by a passing boat wake.

Stress cracks often form at bends of fittings, such as the under side of upper T-ball terminals.

Zero in with a magnifying glass to detect cracks and discoloration before they fail.
Take tools: screwdrivers, pliers, a small hammer, lubricant, the mirror, extra cotter pins, and rigging tape. Put them all in a tool pouch or boatswain's chair with tool pockets and Velcro flaps. Whenever possible, use lanyards on the tools. The only thing worse than making the crew haul you up and down the mast getting tools you forgot is to drop a tool on someone's head. (You can also help the grinder's morale by using your feet and hands to help hoist yourself up.)
First stop is the spreaders. (While you're working, have the tailer cleat-off the halyard.) Make sure the ends of the spreaders bisect the shrouds at equal angles and are secured properly to prevent slipping. Skewed spreaders have been responsible for many dismastings. Tape or spreader boots, used on the spreader ends to prevent damage to the sails, should be removed temporarily so that the spreader ends can be inspected and the connection tightened as necessary.
Some skippers paint the top of the spreaders, even aluminum spreaders, to reduce damage from sunlight. This is a necessity with wooden spreaders, unless you go aloft every month and add a coat of varnish. Remember, you can't see the tops of the spreaders from down below.
Like their counterparts the chainplates, fork tangs, used to secure the shrouds to the mast, should be angled so that loads are in a direct line with stays and shrouds. Cotter pins should be taped so that they don't shred flailing sails or snag a halyard. Shrouds that use "T" terminals should be examined for stress cracks where the bend occurs and for elongation of the slot. Either problem indicates the shroud or fitting should be replaced.
The last stop, before you begin your descent, is the masthead. If you are even slightly acrophobic, the masthead can be a very scary place. Avoid looking down.
The mirror (remember the mirror?) is especially useful for inspecting fittings at the masthead that would otherwise be inaccessible. Look at the halyard fittings, especially the sheaves, which wear over time and can be crushed or split by the strain of the genoa. Even if it's healthy, a squirt of two of lubricant can help whenever the sail is raised. Wind indicators and radio antennas should also be checked for loose mounts and connections.
On the way down check the rivets and/or screws used to secure the mast track. Replace any that are missing or suspect. While you're at it, you may as well lubricate the track (use teflon) to make raising and lowering the sail less of a chore.
Standing Rigging: Stays and Shrouds
Stays and shrouds should have some "give", but not too much, when pressure is exerted with the palm of your hand. A stay that is too tight feels rigid. A stay that is too loose feels limp. Make sure any necessary adjustments are done evenly so the mast doesn't get cocked to one side. And adjustable (mechanical or hydraulic) backstays should be slackened when not in use. Remember, turnbuckles should have sufficient thread inside the barrel — at least 3/4" — and cotter pins to prevent their coming loose. (Be sure and wrap fresh tape around the cotter pins when you're done.)

This is what 1x19 wire looks like at the upper headstay terminal fitting after it has been twisted back and forth a few times from "halyard wrap". Even slight damage from minor episodes warrants replacing the wire.
Wire should be inspected for broken strands or "fishhooks" by wrapping some toilet paper around the wire and running it up and down. If the paper shreds, the wire is nearing the end of its useful life and should be replaced. Check the wire where it enters the swage fittings for rust, which also indicates weakened wires that should be replaced.
Replace Your Standings Rigging: $$$?
Lets play "what if". What if a small voice inside you says your rig is living on borrowed time: you've found rust, cracks, failed welds, and fishhooks?
As a general cost guideline, replacing the standing rigging on a typical 30 footer with 1/4" wire rigging will cost about $1,200. That price includes turnbuckles but not unstepping the mast. The cost of replacing the standing rigging on a 40-foot cruising boat with 3/8" wire could be almost twice as much. Incidentally, it pays to get estimates, as prices can very significantly. Our estimates to replace the standing rigging on a 30-foot boat, for example, were as high as $2,800.
Professional Inspections
If you're not confident in your ability to inspect your boat's rig, you can hire a professional — a rigger or surveyor — to do it for you. Riggers specialize in rigging, which is an advantage, but they could be biased since they also sell rigging. An inspection, including going aloft, should be under $100 for a 30' boat.
Related Articles
The truth about ceramic coatings for boats.
Our editor investigates the marketing claims of consumer-grade ceramic coatings.
Fine-Tune Your Side Scan Fishfinder
Take your side-scanning fishfinder off auto mode, and you’ll be spotting your prey from afar in no time
DIY Boat Foam Decking
Closed-cell foam flooring helps make boating more comfortable. Here’s how to install it on your vessel
Click to explore related articles
BoatUS Editors
Contributor, BoatUS Magazine
Award-winning BoatUS Magazine is the official publication of Boat Owners Association of The United States. The magazine provides boating skills, DIY maintenance, safety, news and more from top experts.
BoatUS Magazine Is A Benefit Of BoatUS Membership
Membership Benefits Include:
Subscription to the print version of BoatUS Magazine
4% back on purchases from West Marine stores or online at WestMarine.com
Discounts on fuel, transient slips, repairs and more at over 1,200 businesses
Deals on cruises, charters, car rentals, hotel stays and more…
All for only $25/year!
We use cookies to enhance your visit to our website and to improve your experience. By continuing to use our website, you’re agreeing to our cookie policy.

Rig check – how to prevent failure at sea
by Simon Jollands | Boat Handling , Boat Maintenance , Preparation
Regular rig checks prevent the risk of mast and rigging failure at sea. This includes regular rig inspections of the spars, rigging and fittings, especially before a major passage at sea.
Most rig failures are caused by poor maintenance and breakage of the fittings and connectors, especially those that attach the shrouds to the mast, rather than the actual spars or rigging themselves failing. A quick visual rig check is sometimes all that it takes to deal with a potential problem. However, attention must also be given to reducing metal fatigue through correctly adjusting and tuning the rigging.
Rig inspections
A more thorough inspection of a yacht’s spars and rigging should be carried out at regular intervals by a trained rigger, ideally on an annual basis, or as recommended by the manufacturer. It is also advisable to do an inspection before a major sea passage. The inspection will comprise a visual inspection, sometimes aided by ultrasound tools, where wear is recorded and monitored for future inspections. The inspection will look for items such as cracks in rigging components, misalignment of stays and corrosion. Rig tensions should be checked and adjusted as necessary. A written record should be completed listing existing or potential concerns.
Every 5 years or so, more thorough rig checks should be carried out, which involve disassembly of the rig. This may include Dye Testing or Liquid Penetration Inspections which reveal surface flaws not visible to the naked eye.
Here’s a useful checklist of things to look out for that we’ve put together with the help of the KZ Marine Group in Auckland, New Zealand:
- Deck check – split pins, adequacy of threaded fittings, chafe or breakage of stranded wires, rig cracking, rust streaking, condition of mast collar sheaves, halyard alignment, halyard chafe guards, forestay condition.
- Masthead – halyard sheaves rotate freely and are sound, bushes, split pins intact, electrical wires are clamped correctly and are chafe free, lights are operating, halyard shackles in good condition, Windex and wind gear operating correctly.
- Forestay – roller furling headstay, halyard leads at correct angle to swivel car, inspect halyards for wear on sheaves, fairleads and check swivel cars, mast tang pin hole, corrosion around mast tangs, threaded fittings, no broken strands of wire, signs of cracking or rust.
- Mast stay wires and mast fittings – no broken strands of wire, no visible signs of cracking along swage section, no signs of rust streaking, Tbar plates have retaining plugs or locking tabs, corrosion around mast tangs, fastenings secure, threaded fittings are sound, rigging screws locked.
- Spreaders – no visible signs of cracking , fastenings secure, no signs of rust streaking, broken wire strands, lights are working, wires clamped correctly, no chafe, no corrosion,
- Gooseneck, Vang and Knuckles – check for signs of corrosion, split pins are protected to safeguard sails, fastenings secure, excessive wear or elongation of fittings.
- Chainplates – check for excessive wear on spacers or bushes, signs of elongation in pin holes, alignment with stay angles, evidence of fracture at deck level, are fastened securely below deck to the hull.
- Spinnaker pole ring – attachment points secure, signs of corrosion around mast tangs.
- Insulators – check for sunlight degradation of plastic insulators, aerial wire securely fastened and in good condition.

[fts_facebook type=page id=820902544629856 access_token=EAAP9hArvboQBAMMusRb1XctIwYq9fUcSZCVNDQAMjkZCiqAIMiZBkawPJZB3VkeSsH6gCIDfIZAslzZBRAEXYdesg0fu11YIst1FXtABBwdULjOsYFGUYqNujLSxRIWxKAcqm7bb9dmAgzJDZCVhkRj6r9useCQqJr4wJnxkBv909ySYxqj7hYl posts=4 height=650px description=no posts_displayed=page_only]
Recent Posts
- DIY boat upgrades: Budget-friendly projects to enhance your (older!) boat
- Boat Security: Protecting your vessel from theft & vandalism
- Learning about diesel engine maintenance
- 2023 Rolex Fastnet Race – Part 3
- The dangers of running aground in a motor boat
- (954) 633-4878
- [email protected]
Compass Articles
- December 4, 2023
Yacht Rigging and Sails: Regular Care and Inspection
As a vessel carves its path through the winds and waves, its rigging and sails are the silent workhorses of performance and progression. At Fly Yachts , we bring our commitment to excellence to every aspect of yacht care, including the vital components above deck. Maintaining the rigging and sails through regular care and inspection is imperative for safe, optimal performance. Join us as we navigate through the best practices for maintaining these crucial elements for your yachting adventures.

The Symphony of the Masts: Rigging Maintenance
The rigging of your yacht demands precise attention to detail:
- Conduct visual inspections of all standing rigging components for signs of wear, corrosion, or damage.
- Check for loose fittings, clamps, and screws, properly securing them and replacing where necessary.
- Apply lubricants to moving parts such as sheaves and furling systems to ensure seamless operation.
Fly Yachts underscores the importance of thorough rigging care for harmonious voyages across the sea.
The Canvas That Catches the Wind: Sail Care
Sails, the very embodiment of seafaring heritage, require dedicated preservation efforts:
- Inspect sails regularly for any tears, abrasions, or stitching issues, making repairs promptly.
- Clean sails with appropriate solutions and techniques to prevent mildew and UV damage.
- Properly flake or roll sails for storage, avoiding unnecessary creases or stress points.
Our knowledge at Fly Yachts extends to the nuanced care of these majestic fabrics that animate your yacht.
Ropes and Lines: The Veins of Vessel Control

The diverse array of ropes and lines are the veins that channel control throughout your craft:
- Rinse ropes with fresh water to remove salt crystals and prolong their lifespan.
- Examine the outer sheath and inner core for any signs of deterioration or excessive wear.
- Store lines neatly, coiled or flaked, to avoid kinks and facilitate immediate usage.
Fly Yachts shares expert tactics for rope maintenance, safeguarding your mastery over the yacht’s command.
Life Among the Hardware: Inspecting Blocks, Winches, and Cleats
The deck hardware stands as a silent sentinel, ready for action:
- Inspect blocks for smooth pulley action and ensure they’re free of debris and corrosion.
- Service winches periodically by disassembling, cleaning, and lubricating.
- Check cleats and winch bases for any signs of loosening or wear and secure them firmly.
With Fly Yachts , rest assured every component is prepared to serve its critical role in every maneuver.
The High-Fliers: Inspecting Spars and Spreaders
The spars and spreaders, soaring high, bear witness to the sky’s moods:
- Ensure that spars are free of corrosion, particularly aluminum masts susceptible to galvanic action.
- Inspect spreaders for signs of damage and ensure that their angle and position are optimized for sail shape.
- Consider professional rig inspections at regular intervals, especially after challenging voyages or at the turn of the seasons.
Fly Yachts advocates for elevated levels of care, keeping the integrity of your yacht’s vertical components in check.

The Stitch in Time: Sail Repair and Seasonal Service
Sail service shouldn’t be reserved for evident damage alone:
- Allow a professional sailmaker to inspect and service your sails annually.
- Discuss sail optimization for performance or enhanced durability with your sail care provider.
- Address any potential issues early to avoid costly repairs or replacements down the line.
Fly Yachts suggests a proactive stitching strategy to ensure that your sails remain robust and effective.
Harnessing the Wind with Confidence
A well-maintained rigging and sail setup offers more than performance – it offers peace of mind:
- Utilize calm days for practice drills to familiarize the crew with rigging and sail handling.
- Engage in a routine schedule of care, ensuring your yacht is always prepared for the winds ahead.
- Keep detailed records of inspections and maintenance for a clear history of your yacht’s care.
Expert guidance from Fly Yachts ensures that every journey undertaken is backed by meticulous preparation and knowledge.

Conclusion: Sustaining Elegance and Power with Fly Yachts
The majesty of a yacht under full canvas is a sight that inspires awe and symbolizes freedom. Through disciplined care and regular inspection of rigging and sails, Fly Yachts steers owners towards a harmonious relationship with the forces of nature. For a tailored plan in maintaining these performance elements, consult with a Fly Yacht team member today.
Setting Sail with Assurance
Trust in Fly Yachts to cultivate the resilience and elegance of your yacht’s upper deck apparatus. By placing your rigging and sails in our capable hands, you are assured that every journey begins and ends with the unmatched splendor that can only be delivered by well-maintained equipment.

Fly Yachts’ Frequently Asked Questions
Why is regular rigging and sail maintenance important.
Maintaining rigging and sails ensures performance, safety, and longevity.
How often should yacht rigging be inspected?
Inspect rigging biannually and after heavy sailing or severe weather.
What are the signs that sails need repair or replacement?
Look for tears, stretching, discoloration, and hardware wear.
Can Fly Yachts handle rigging adjustments and tuning?
Yes, we provide professional rigging services, including adjustments and tuning.
How can I extend the life of my sails?
Avoid overloading, rinse with fresh water after use, and store dry.
What should I look for during a rigging system check?
Check for corrosion, damaged wires, loose fittings, and worn components.
Are there best practices for cleaning sails?
Use mild soap, avoid strong detergents, and rinse thoroughly with fresh water.
How do I prevent mildew on stored sails?
Ensure sails are bone dry before storage and keep them in a well-ventilated area.
What maintenance is required for sail attachment points?
Regularly inspect for wear, lubricate moving parts, and replace damaged hardware as needed.
Does Fly Yachts offer sail repair and maintenance services?
We provide sail inspections, repairs, cleaning, and preservation treatments.
At Fly Yachts, we offer a sweeping selection of yachts for sale , from the grandeur of super yachts to the bespoke appeal of center consoles, designed to resonate with a range of seafaring preferences. Navigate through our homepage and discover our full spectrum of services, showcasing our dedication to high standards in the yachting and aviation sectors. Visit our About Us page to learn about our rich history, expert team, and what makes us a leader in luxury yachting. The Build a Yacht page invites those with a vision for their custom vessel, offering numerous personalization options. Travelers can select their ideal yachting destination from our comprehensive Charter Destinations list. Our Compass Articles provide an array of insightful content for yachting enthusiasts of all levels. Yacht owners looking to sell can benefit from our tailored Sell Your Yacht services. For those planning a refined vacation on the water, our Yachts Charter options ensure a luxurious experience. And for those interested in aviation, our Aircraft for Sale page highlights a fleet of elite aircraft available for purchase. Stay informed on current yachting news with Gulfstream News , and if you require assistance or have any inquiries, our Contact page links you directly with our knowledgeable Fly Yachts team.
About FLY Yachts
Unmatched Industry Knowledge, Paired With Brokers Who Care Equals Yachting You Love.
Recent Posts

Yachting’s Hidden Gems: Lesser-Known Luxuries of the High Seas

Seafaring in Style: The Influence of Global Fashion on Yacht Design

The Golden Age of Yachting: Reflecting on a Century of Nautical Excellence
All Right Reserved. Designed and Developed by PenciDesign
Rigging Inspection Boats Checklist: Essential Steps for Ensuring Safety and Performance

Key Takeaways
- Essential rigging checks for safety and longevity.
- Inspect both external and internal components.
- Maintain peak performance with regular assessments.
- Verify safety equipment readiness promptly.
When it comes to ensuring the safety and reliability of your vessel, a Rigging Inspection Boats Checklist stands as a pivotal tool. Rigging plays a fundamental role in a boat’s structural integrity and performance, making regular inspections an imperative practice for any seafarer or boat owner. This checklist serves as a comprehensive guide, meticulously detailing crucial components to examine, ensuring that each facet of the rigging system is thoroughly assessed for optimal functionality and safety compliance.
- Boat Rigging Inspection Essentials
Mast and Boom Inspection
Shroud and stay examination, spreaders and spreader bar evaluation.
- Turnbuckle and Clevis Pin Check
- Rigging Tension Assessment
- Final Rigging Inspection Steps
Rigging Inspection Boats Checklist: Essentials
Thorough scrutiny is essential during a meticulous boat maintenance checklist , particularly when conducting a comprehensive Rigging Inspection. Evaluating the sailing rigging’s integrity is paramount, with a focus on detecting signs of wear, especially around rigging hardware and shackle jaws. Pay close attention to stainless steel shackle pins, checking for any sliver of screw threads or excessive wear that could compromise their strength.
Don’t overlook the significance of vital fasteners—even the smallest discrepancy could demand immediate emergency repairs. Keep an eye out for irregularities, such as using a plastic wire tie where a more robust solution is required. Beyond rigging, ensure that even seemingly unrelated elements like engine oil don’t pose a threat to the rigging system’s functionality. This methodical scrutiny guarantees the utmost safety and reliability of your vessel.
Inspect the mast and boom for any signs of damage or wear before setting sail. That is an essential step in ensuring your boat’s safety and smooth operation. Start by examining the standing rigging, which includes the wires and cables that support the mast. Look for any visible wear, such as fraying or corrosion. Pay special attention to the fittings and connections, checking for any loose or missing cotter pins. These small pins are crucial in securing the rigging and should be correctly shaped and properly sized.
Next, inspect the halyards, which are the ropes used to raise and lower the sails. Check for any signs of chafe or wear, especially near the attachment points. Look for any splices or knots that may have come loose. Ensure that the halyards move freely through their respective sheaves and pulleys.
Utilizing a rigging inspection boats checklist, shift your focus to the boom. Thoroughly examine it for cracks, dents, or signs of deformation, paying meticulous attention to the fittings and connections. Check for any loose or missing cotter pins and ensure the gooseneck and the connection between the boom and the mast are secure and functioning properly.
Before moving on to the shroud and stay examination, take a moment to ensure the mast and boom are in optimal condition. Once you have checked the mast and boom, it’s time to focus on the shrouds and stays. These crucial components connect the mast to the hull and support the rig. To ensure the safety and integrity of your boat’s rig, inspecting and maintaining the shrouds and stays regularly is important.
Here are three important things to check during your rigging inspection:
- Look for any wear or damage on the shrouds and stays. Inspect the wires for rust, corrosion, or broken strands. Any signs of deterioration should be addressed promptly to prevent further damage.
- Check that the turnbuckles are properly secured and that cotter pins or circle clips are in place and properly guarded. These components play a vital role in maintaining proper tension and alignment in the rigging.
- Pay attention to any signs of misalignment or uneven tension in the shrouds and stays. Ensure that all wires are properly tensioned and aligned to maintain the stability and balance of the mast.
Using a rigging inspection boats checklist, ensure the mast and boom are sound before focusing on shrouds and stays. Check for wear, rust, and misalignment; secure turnbuckles with cotter pins for rig stability. Regular inspections are vital for boat rig safety.
To ensure the safety and stability of your boat’s rig, it’s important to thoroughly evaluate the spreaders and spreader bar for any signs of cracks, wear, or improper attachment to the mast. Start by checking the alignment of the spreaders. They should bisect the shrouds at equal angles, ensuring proper load distribution.
Inspect the spreader tips for corrosion and potential cracking, as these can weaken the rigging. Verify that the spreader boots are securely in place to prevent chafing of the sails and potential damage.
Next, examine the spreader bar attachment points. Look for any signs of stress or wear, which could indicate a potential failure point. Ensure that the spreader bar is securely connected to the mast, using appropriate hardware and fittings. Any looseness or improper attachment should be addressed immediately to prevent accidents or damage to the rig.
- Marine Surveying St. Augustine, FL
- Marine Surveying, Thermal Imaging & Consulting
- Offshore Outfitting
- Presentations
- Thermal Imaging
- Ultrasound/Audiogauge
- Inspecting Sailboat Rigging
Rust is often a sign of crevice corrosion.
OLYMPUS DIGITAL CAMERA
Uncategorized
chainplate Crevice Corrosion Sailboat rigging
Recent Posts
- Trawler Fest 2016
- Carbon Fiber Rudder Inspection
- Inspecting Chainplates
Moisture trapped in a rudder
Delamination
- February 2016
- December 2015
- August 2015
- February 2015
- October 2014
- August 2014

The Yacht Rigger
Empowering Your Marine Adventures
Advanced Alternator Regulator
#1 Authorized Rainman Distributor in the USA
We’re committed to offer the lowest Rainman prices in the US!
Marine Solar & Electrical
Marine solar installations on all vessels
DIY Marina Wet Slips & Haul-Out Facilities
Slips can accommodate catamarans up to 55' with beam limitations at 30'
New Youtube Series
Join us as we venture into the world of Marine Professionals! Like Share & Subscribe!
The Yacht Rigger is a marine specialist group dedicated to marine upgrades and maintenance. From rigging, electrical, lithium batteries, solar, custom metal fabrication, air conditioning, deck hardware and much more.
We specialize in all types of yacht rigging, whether your boat is for cruising or racing, our team provides a comprehensive unbiased service tailored around you and your vessel. Please explore our services and products pages to discover what we have to offer.
Meet the crew
Featured Services
Rigging & lines, solar & electrical.
- Sailboat Arches
HVAC & Refrigeration
Quality brands.
High quality brands namely Blue Wave, Selden Furlex, Ewincher, Rainman, Spectra, Mantus, Harken, Waterline Design and more. We are currently expanding the store so keep an eye out.
Quality Services
At The Yacht Rigger we pride ourselves in offering top quality service, installation, and maintenance to a wide range of products and brands. Have a look at our lit of services below.

Marine Solar & Electrical Systems
The Yacht Rigger is proud to be the premier choice in Florida for marine solar installations on all vessels, from sailing catamarans, to cruising mono-hulls, to power cats and small motor trawlers. We’ve got your solar & electrical needs covered. Including new system installation, existing system troubleshooting, parts replacement, new system integration or additions, new battery banks and much more. Let our partnered ABYC certified technicians come out to take a look at your electrical needs and we’ll make sure you have an efficient, well integrated system up and running in no time.
Standing Rigging Production Facility
With our Wireteknik A350 swage machine and a production shop full of swage fittings, spools of KOS Stainless steel wire and wire rope, and brand new chrome bronze turnbuckles by the dozen, we can produce standing rigging from lifeline size – up to 5/8″ (16mm) standing rigging. Competitive pricing and top quality parts mean your new standing rigging will be safe for many years to come.
We have a very large inventory of Blue Wave standing rigging components on hand at all times. See our Blue Wave page for more details on this top quality Danish supplier.
We ship anywhere, so send us your orders for standing rigging and we’re happy to produce your rigging and ship it out to you, or come see us at the boat yard!
Lifeline Rigging
If you need your Lifeline rigging replaced, look no further. We offer full service Lifeline rigging replacement. We only use top of the line marine grade stainless steel products, and our A350 swaging machine can handle swaging up to 5/8″ (16mm) wire.
Let our team renew your Lifeline rigging and get back out on the water sailing safely.
Marina Wet Slips & Haul Out Facilities
In our wet slips we can accommodate catamarans up to 55′ with beam limitations at 30′. We have a large float bag on site for service work on catamarans such as thru-hull installations, sail drive removal, propeller work, and underwater light installations.
On the hard we are limited to a 16′ beam for haul out and offer full service bottom jobs as well as gelcoat repairs, propeller and shaft replacements, and even re-power projects (and more).
We do offer do it yourself “DIY” yard spaces, as well as DIY wet slip spaces, and all our wet slip spaces allow liveaboard and offer bathrooms with showers and laundry facilities.
Solar Frame & Arch Fabrication
We utilize the latest state of the art solar panels and build custom frames in house out of light weight marine grade bright anodized aluminium. (Stainless steel frame fabrication is also available if requested). Our goal is to maximize your vessel’s solar potential whilst maintaining minimalist concepts to create a beautiful, and highly functional end product.
Custom Frames Arches
Rigging Inspections & Consultations
The Yacht Rigger provides comprehensive rigging inspections on all masts to vessels located within our service area. We inspect all running and standing rigging. All rigging termination points are visually inspected. Sheave pins and sheaves inspected, spreaders, furler or headsail foils, and all gooseneck fittings. Electrical wiring is inspected for chafe/corrosion.
We also check all light fittings, blocks, cars, tracks, clutches, winches and any other hardware. A complete cleaning of all rigging ends, pins, and cars can be added if the mast is going into storage. We provide a detailed report of our findings, including suggestions for any additional parts and work required.
At the Yacht Rigger we also offer a consultation service designed to assist you with both troubleshooting as well as with selection of any new rigging parts, from winches or furling gear, to a new mast, no job is too big or too small. Please visit our Contact Us page and get in touch so that we can assist you!
HVAC (heat, ventilation, air conditioning) systems, helps to control the climate on your boat allowing you and your crew to enjoy the time on board all year long. Not only control the temperature on cold winters or hot summers, they also control the humidity levels, making the living area feel more comfortable and helping to keep the boat dry, increasing the life of electronics, fabrics, headliners, etc. reducing mold growth and other moisture related problems.
Investing in a new installation or upgrade of an existing one will extend your boating season and increase the value of your boat.
Winch Servicing
Servicing your winches regularly not only improves their longevity, but also greatly improves performance. Correctly cleaned and lubricated winches will operate faster, and require less force when grinding.
We can service all of your winches professionally, on site, in a matter of a few hours. We carry parts for most major brands and can source parts for almost any winch out there today.
Our riggers are highly competent splicers, capable of splicing any line in a given application. From basic polyamide docklines, to covered Vectran, we can assist you in selecting the correct line for the correct application. Be it a weight saving halyard for a race boat, or a topping lift for a cruiser, look no further than TYR.
Hardware Installation
At TYR we can supply all hardware relating to your mast and deck, for all brands of masts. Our team of expert riggers will guide you through getting the right equipment for your boat.
We supply many top of the line models of headsail furlers, including Selden Furlex and Harken. TYR can also provide servicing and spare parts for existing systems to ensure efficiency and reliability.
We supply a full range of blocks, clutches, cars and travelers from the leading brands Spinlock, Harken, Selden, and Ronstan. Be it a cruising boat wanting to maximize ease of use for all of running systems, or a high performance dinghy or racing yacht wanting to minimize weight, we will provide a product suited to your needs.
New Sails & Sail Covers
If you’re considering replacing your sails or sail covers, please get in touch with us through our contact portal. Our team has decades of experience in both cruising and racing and we’ve partnered with the most talented and detail oriented sailmakers and canvas specialists in the Tampa Bay area to offer you a comprehensive sail replacement service.
Our sail replacement service includes: Consultation – we’ll help you choose the sail material and cut that best suits your needs.
Measurement – if you fall within our service area we’ll come out to your boat and take precise measurements to make sure that your new sails perform optimally. We’ll also advise you regarding the variety of sail covers, mainsail storage systems, and sail furling systems available.
Installation – when your crisp new sails or sail covers are ready we’ll come out to your vessel and install them, to make sure they fit and perform exactly as needed.
Stern Arch & Davit Systems
If you are looking to store your tender on your stern, we have you covered. From large stern arches to smaller davit systems. We’ve partnered with suppliers from across the US to bring you the most cost effective, aesthetically pleasing, and practical solutions to this complex issue. We can also supply fully integrated solar and wind systems on top of our stern arches that will get you off the grid and ready to go out into the big blue!
Anchoring & Windlass Systems
We supply and install new windlasses, anchors, anchor chain, rode, and all the accessories in between. We can fabricate custom mounting platforms, install all the necessary switches, wiring, fuses, and additional batteries if needed.
Marine Electronics
At The Yacht Rigger we offer a comprehensive marine electronics service that includes new system installation, existing system troubleshooting, parts replacement, new system integration or additions, new battery banks and much more. Let our partnered ABYC certified technicians come out to take a look at your electrical needs and we’ll make sure you have an efficient, well integrated system up and running in no time.
Google Reviews
“ “ Stephen does regular work for me on rigging. He is very knowledgeable and dependable. First rate! ” Robert K
“ “ Steve and his crew listened to what we needed, then stopped by our just purchased 1997 Catalina 38 to look it over. In 10 minutes they diagnosed the issue, proposed a solution, removed the sail, gave me an estimate on money and time and off they went. Came in right on budget, hit the completion date on the mark, sent me photos to see the final product. Thoroughly professional and timely. I'd recommend these guys anytime, an will have them back on our boat as we need them for sure. ” Mike Conroy
“ “ Extremely knowledgeable in repair or upgrades to not just rigging, but all systems of sailboats. Professional and prompt service. These guys have helped my wife and I outfit our boat for live aboard cruising. From rigging replacement to solar panel install and also repair of systems specific to our boat, we couldn't have done it without them. Fair, reasonably priced, and always available for questions. 5 stars plus, nothing more I can say. ” Zach Duncan
“ “ These are the most professional guys I've met in the marine industry in St. Pete. They were very helpful in getting my boat ready for passage on a tight timeline. The job was done in time and on budget, but what really sets them apart is the fantastic communication. Highly recommend! ” Nate Mortensen
“ “ Great service. These guys are very knowledgeable. ” Pat M
Recent Posts / View All Posts
Contact number
We are monthly supporters. click below to donate..

- HVAC & Refrigeration Services
- Marine Solar
- Marine Electrical Systems
- Solar Frame Fabrication
- Standing Rigging & Forms
- Running Rigging & Forms
- Lifeline Rigging & Forms
- Anchor Chain & Rode Form
- DIY Marina Wet Slips
- Haul-Out Facilities
- Stern Arch & Davit Install
- Blue Wave USA
- Cyclops Load Sensors
- Robline Ropes
- Marlow Ropes
- Mantus Marine
- Tides Marine – SailTrack
- Anchor Chain and Rode
- Waterline Design
- Furlex Furling Systems
- Selden GX & CX Furlers
- Selden SMF System
- Bamar Products
- Hood Furling Systems

- Victron & Solar Panel Store
- Kilovault Batteries
- Custom Fabricated Frames & Arches
- Mabru Air Conditioners
- Velair Air Conditioners
- Rainman Watermakers
- Spectra Watermakers
- RuuviTag Pro
- Integrel Solutions
- Manuals/Catalogues
- Account details

Salt Creek Marina and Yard Rules & Regulations (DIY & Storage)
“Common Sense, Compliance with Laws, Consideration Toward Others” (January 1, 2023)
This agreement shall be effective on the date hereunder by and between the undersigned Owner or Agent of the vessel(s) hereinafter (“Vessel Owner”) described below and Salt Creek Marina, Inc. and The Yacht Rigger LLC located at 107 15th Ave SE, St. Petersburg, FL 33701.
8/21/2023 UPDATE – If a hurricane system becomes a named storm and your boat is in one of our wet slips you MUST move it back to its original berth. The boat is not allowed to stay. The owner is responsible for planning with their preferred captain, or The Yacht Rigger has two captains on staff.
1. Fees: The Yacht Rigger and Salt Creek Marina reserves the right to change its rates upon one (1) months’ notice.
- Monohull DIY Dry Storage will be $900 monthly or $225 weekly, with a minimum of 1 week required. After the first 4 weeks, the rate will increase by $50 per week, for the remainder of the boat’s duration.
- Monohull Wet Slip will be $1,100 monthly or $275 weekly, with a minimum fee of $100.
- Catamaran Wet Slip will be $2200 monthly or $550 weekly.
- Haul / Block / Relaunch – One Time Charge $12 per foot
- Emergency Haulout – $25 per foot
- Short Haul – – – Special Haul to be scheduled by The Yacht Rigger or approved contractor only + $175 contractor fee (includes normal haul out rate)
2. Insurance: Vessel owners must provide insurance with Salt Creek listed as additional insurer on their vessel before arrival. Vessels must always be insured.
3. Hurricane & Summer Storm Season: June 1 – November 30 Haul out boats for storage or DIY work on the hard during this time are required to remove all canvas (including but not limited to Bimini, sail covers, dodgers, e.g.) as well as all sails on the boom or furlers. Remove all moveable equipment: canvas, sails, dinghies from davits, cushions, water toys, grills, biminis, roller furling sails, etc. Canvas and sails must be stored below and not on deck. Lash down everything you cannot remove tillers, wheels, booms.
4. Live Aboard – Wet Slip Only (Yacht Rigger Only Rule): Starting January 1st, 2024, customers may NOT stay on their vessel during electrical refit work or other major modifications or upgrades down below. Due to the nature of these projects requiring major upheaval down below within your living space and the need for our teams to work efficiently. Rigging and “above deck” type work will permit liveaboards. As much as we would love to accommodate liveaboards during this time, it is simply too inefficient for us and expensive for you, the customer. For vessels with excessive items on board preventing efficient work, we will provide on-site storage pods at market rates.
5. Third Party Warranties: This includes any warranty claim that is to be made against the original manufacturer or seller of the vessel or product. Should a warranty claim arise, The Yacht Rigger will estimate the job accordingly. It will then be up to the customer to obtain approval from the applicable 3rd party (boat manufacturer, spar manufacturer, etc.). If approved & immediately upon completion of the warranty issues, the customer is solely responsible for the payment of the work completed. It is then the responsibility of the customer to be reimbursed by the applicable 3rd party.
6. Yard Hours: The boatyard hours are 8:00am to 6:00pm, Monday- Sunday. The boatyard gate locks at 6:00pm. You may come check on your vessel, re-secure rigging, canvas and pump out water during business hours. Please check in with the office if you are near closing hours.
7. Utilities: Boatyard provides power & water to vessel owners as a part of their agreement so long as the owner fully adheres to all Rules and Regulations. When you are finished with the water hoses, turn them off and place them back neatly in the area you found them. Please ask a Salt Creek Marina Boatyard Employee for access to either option.
8. Outside Contractors/ Subcontractors With Management approval (determined individually) contractors may work on a storage vessel for a fee of $40 a day in addition to monthly storage/dockage fee. The owner shall be responsible for informing the office of any subcontractor working on the vessel for any purpose whatsoever. The subcontractor shall submit insurance before any work can commence. Salt Creek Marina and/or The Yacht Rigger reserves the right at its sole discretion to stop unsafe work practices and if deemed necessary to order the offending worker(s) to leave the site at the Owner’s/Skipper’s sole risk and expense.
9. Supplies: All paint including but not limited to, bottom paint, primer or barrier paint, haul or topside paint, varnish or otherwise any paint being applied to your vessel must be purchased through the Boatyard or approved by Management. This policy is for safety and environmental protection purposes of all persons operating in the Boatyard. Paint will normally arrive within 24hrs of purchase.
10. Paint Spraying: There shall be no spraying in the Boatyard under any condition. Any person spraying any paint will be immediately expelled and fines levied.
11. Cleanliness: All vessel owners shall be responsible for keeping their area clean and professional. The Boatyard reserves the right to charge the vessel owner for any cleanup required to comply with RR. All debris associated with boat repair activities must be disposed of daily. A dumpster is located near the parking area.
12. Disposal: There is a designed disposal station of 55 gal drums for oil and one for oily rags and filters located near the office door. PLEASE DO NOT PUT GASOLINE IN THESE DRUMS.
13. Facilities: Bathrooms are provided as a courtesy to all Customers. We will make our best efforts to keep it clean but reserve the right to limit access any time. Please use the outside sink for heavy clean up and use the indoor head/sink for bathroom purposes only. The Yacht Rigger has its own set of facilities to be used by its staff and customers. Please do not use SCM facilities.
14. Parking: Park in the designated parking area. Vehicles should be parked clear of travel lift path, not in storage areas, on the seawall or blocking boats. Salt Creek Marina and/or The Yacht Rigger is not responsible for vehicles that are damaged by equipment or conditions in the yard
15. Regarding noise outside of the scope of work not being completed, i.e., radio/stereo volume, please be respectful of neighboring boat owners’ tenants.
16. Salt Creek Marina and/or The Yacht Rigger is not responsible for any theft or loss of items left on or around the vessel.
17. The yard takes no responsibility for accidents, injury, or death to any persons in or working within the yard at any time. All people wishing to enter the boatyard for any reason do so at their own risk.
18. Failure to comply with these rules and conditions can result in additional charges if Salt Creek Marina and/or The Yacht Rigger personnel are required to do site cleanup operations and/or will be asked to remove your boat from the marina.
19. Additional Rules:
- Owners are not permitted to test engines, run water for AC or other purposes while on the hard. All electricity and water shall be for the sole purpose of working on their vessel and disconnected when unoccupied.
- There are to be no mobile AC / Heater Units or Refrigeration Units to be run on the hard.
- No unfurling of sails will be permitted at any time, under any circumstance.
- There is to be no hot work, flame cutting, welding etc. to be done in the yard.
- Jack stands and blocking may only be used and moved by employees of Boatyard.
- Boatyard reserves the right to move vessels when needed without permission or notifying owners.
- Any trailer, dingy, mast, or other personal property not directly attached to the vessel must be pre-approved, additional charges will apply if approved.
- Packages – you are welcome to send packages to our address here, but please make sure they state your name and “CO The Yacht Rigger” and limit your packages to 5 a week.
Any modifications outside of these rules will be determined individually by Management. REMEMBER THESE RULES & REGULATIONS ARE FOR EVERYONE’S BENEFIT. PLEASE HELP KEEP THIS BOAT YARD A CLEAN & SAFE WORKPLACE. ** Salt Creek reserves the right to change these rules at any time.

Use coupon code to activate discount. Add to coupon code box on your cart page.
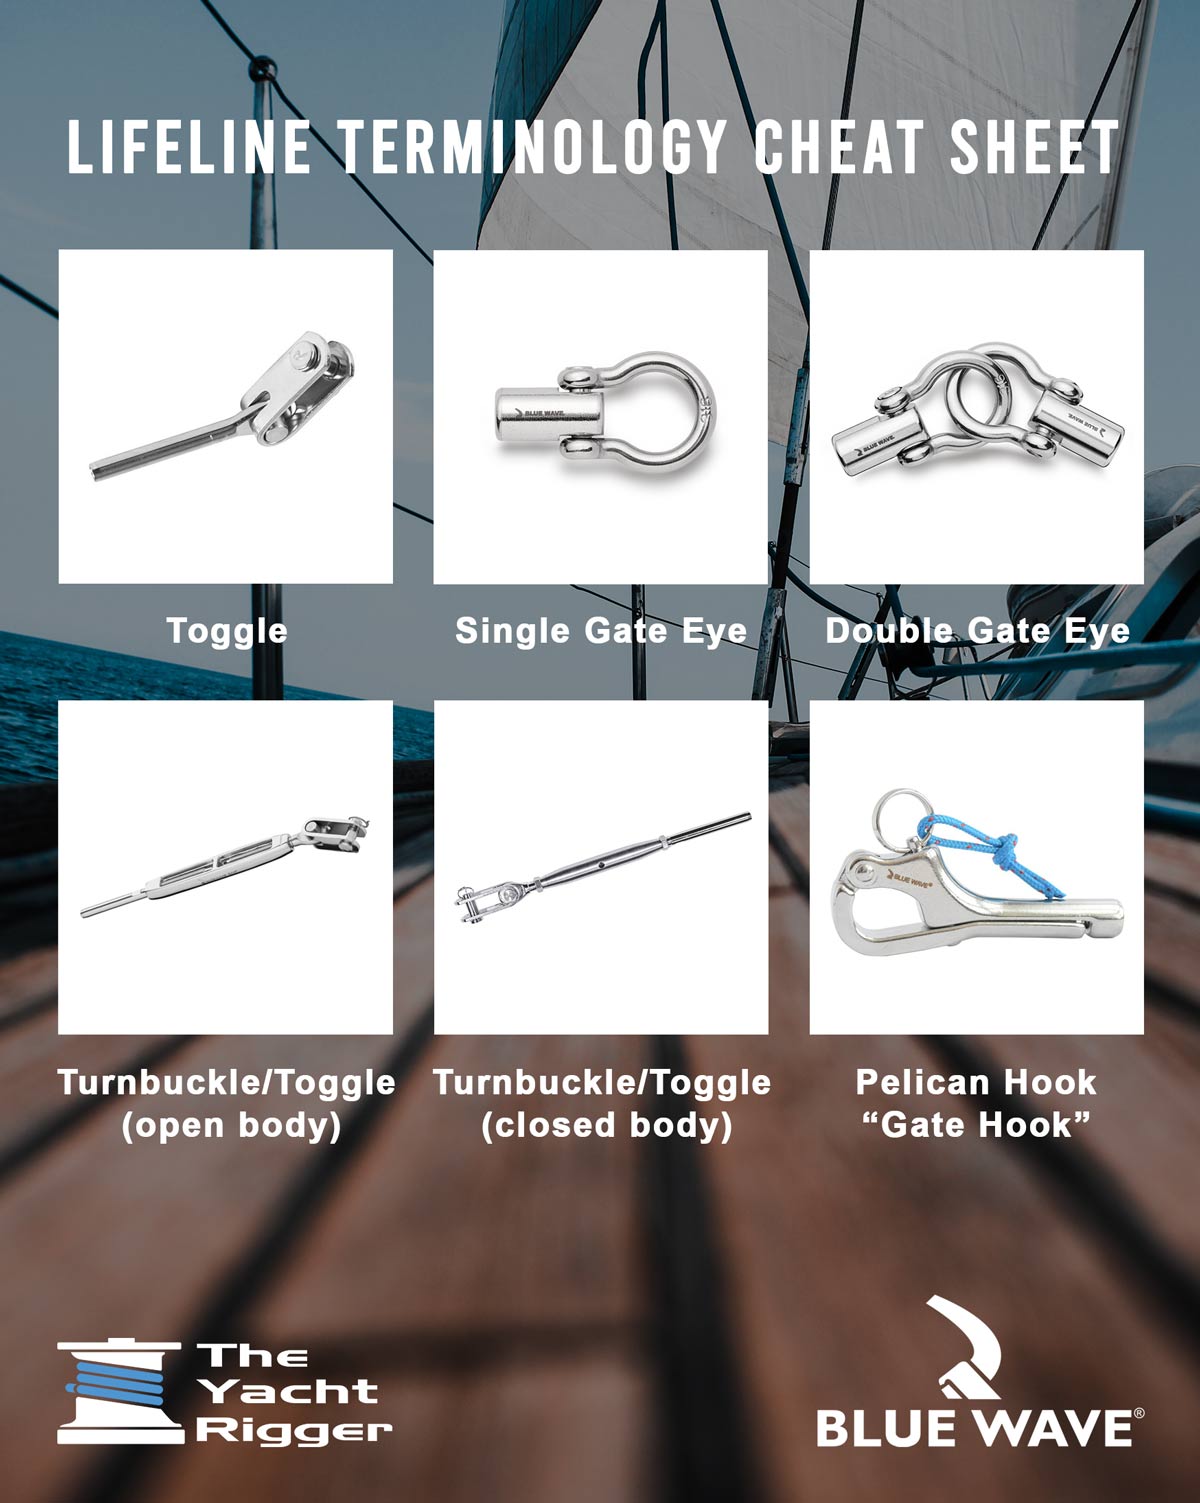
- Riggtech – Yacht & Architectural Rigging
- Riggtech Bosun’s Locker
- Rope and Splicing
- Standing Rigging / Rig Inspections
- Spar Building, Servicing & Painting
- Custom Fabrication
- Balustrading
- Shade Structures
- Architectural Gallery
- Yachting Gallery
- Supplier’s / Agencies
- Online Shop
Standing Rigging Inspections, Maintenance and Replacement
Standing Rigging Inspections – One part of sailboats and yachts that must be inspected, maintained, or even replaced when necessary is the standing rigging. It is comprised of fixed lines, wires, or rods that are designed to support each mast or bowsprit on sailing vessels. These specific components likewise reinforce the spars against increased loads when wind interacts with the sails.
Standing Rigging Inspections
A Standing Rigging Inspection must be done first to check the condition of the standing rigging, as issues with the standing rigging if not fix correctly and quickly can result in the mast falling down. When conducting inspections, you can easily identify components that require repairs and replacements.
Normally, the replacement of standing rigging should be done every 10 years. Generally, insurance companies today require the standing rigging be replaced approximately every 7-10 years, depending on how often, or how far the yacht is sailed, they may require the rigging to be replaced earlier than 7 years. (Check with your insurance company, as policies may vary) Insurance companies also commonly request a professional rigging inspection and survey of the yacht when a used boat is sold or if a new policy is to be obtained. If the standing rigging is in excess of 7-10 years, most insurance companies will not insure the yachts rigging.
When carrying out standing rigging inspections, you must start at the masthead. Looking closely for any signs of corrosion, cracks, or breaks of any kind in the standing rigging (ei. In the wire, terminal ends, rod, toggles, pins, backing plates etc.) as you are slowly lowered down the mast. When we conduct rigging inspections, we check over all mast and sailing components, all the way down to the chainplates. Other components that must be checked for any damages or performance issues include swivels, back and forestay fittings, tang plates and toggle fittings, shrouds, swaged terminal ends, mainsail track, spreaders, turnbuckles, chainplates, blocks, running rigging, sheaves, and spars etc.
Riggtech recommends getting an annual professional rigging inspection to check over all sailing components to ensure smooth and precise sailing, regardless of the conditions you’ll face.
Maintenance
Whether you are a racer or cruiser, it is important to maintain your yacht. Here are some parts of rigging that need to be checked and ways on how to maintain them. You can do it yourself or if you don’t have the time, we can do it for you!
- Halyard Swivels : Oiling halyard swivels makes releasing clips or removing twists in rope easier and smoother. (Purchase Harken OneDrop from our online shop)
- Sail Tracks : To make hoisting and lowering sails easy and smooth, it is a good practice to spray the tracks or bolt rope with some lubricant, we recommend Harken Sailkote. It is a silicon spray that stays extremely slippery after it dries. Head to our online shop to purchase some!
- Furler Bearings : Greasing furler bearings is quick and easy and makes furling sails in and out a breeze. Make sure to drop the sail to grease the bearings in the swivel and in the drum.
- Sheaves : Sheaves in the mast, on the deck or in blocks should be oiled, so they run smoothly, preventing corrosion and seizure of the bearings or sheaves. (Purchase Harken OneDrop from our online shop)
- Split Pins and Split Rings : Checking split pins and split rings is important to prevent clevis pins from falling out and leading to catastrophic failures. Checking for sharp edges in these is also important to prevent the sail from catching and potentially ripping. We recommend using amalgamating tape, electrical tape or silicon for protection and prevention.
Replacement
The most efficient and cost-effective way to replace the standing rigging to a yacht is to remove the entire mast and rigging from the yacht. This way you can do all the stays at the same time, you can make the pairs the same lengths and it is also much easier to check over the whole mast and make any repairs and replacements where needed. At Riggtech we make sure we replace every standing rigging component from the top pins to the bottom pins, so there isn’t any weak link.
The alternative is replacing the standing rigging while the mast is in the boat, we do not recommend this, as you have to support the rig systematically as you de-tension, remove, make and replace individual stays to the mast. This is a very time-consuming process, because it involves a lot of mast climbing, making individual stays and tensioning and de-tensioning, it can also be extremely dangerous if you don’t know what you’re doing.
Components that have either corroded or have obtained huge cracks and damages should be replaced right away to avoid compromising the whole standing rigging. If you want to know more about its inspection, maintenance, and replacement, feel free to contact us at Riggtech .
Optimized by: Netwizard SEO
Recent Posts
- Harken Ball Bearings: High-Performance Options for Marine Applications
- Clearing Boat Holding Tanks: ProPower Tank Treatment as The Main Solution
- Rocna Stainless Steel Anchors from Riggtech Helps Ensure Safe and Sound Mooring
- Ronstan Soft Shackles and How They Redefine Boat Rigging Connections
- Harken Marine Grip Tape Available at Riggtech: Navigate the Deck Safely
- Harken Winch Grease: Maintain Winch Parts for Optimal Efficiency
- RescueME AIS MOB Devices: Ensure Safety in Maritime Emergencies
- TefGel Available at Riggtech: Preventing Galling and Corrosion
- Musto Sailing Footwear Available at Riggtech: Navigate the Seas in Style
- Harken Winch Grease Available at Riggtech: Optimise Winch Performance
Riggtech Bosun’s Locker Newport:
[email protected] (02) 9997 2382
Royal Prince Alfred Yacht Club 9 /16 Mitala Street, Newport NSW 2106, Australia
Riggtech Pty. Limited:
[email protected] (02) 9997 8100
Royal Prince Alfred Yacht Club 2 /16 Mitala Street, NEW PORT BEACH, NSW 2106, Australia
- Architectural
- Shipping & Returns
- Terms & Conditions

Copyright © 2024 Riggtech. All Rights Reserved.
Web Design by: Netwizard Design
Attainable Adventure Cruising
The Offshore Voyaging Reference Site

- Cruising Sailboat Standing Rigging Inspection

In Part 1 we got the mast out of the boat and worked for hours inspecting a bunch of stuff…and now we get to work some more.
Still, all this effort is worth it to prevent a gravity storm, so let’s carry on.
And, just so you don’t totally despair at the prospect of reading all this boring detail, don’t forget that this is leading to the much-requested rig-inspection checklist .
So grab a cup of highly caffeinated coffee and let’s do it right. Deferred gratification is good for mast karma.
To continue reading:
Login (scroll down):
Learn About Membership
Please Share a Link:
More Articles From Online Book: Sail Handling and Rigging Made Easy:
- Six Reasons To Leave The Cockpit Often
- Don’t Forget About The Sails
- Your Mainsail Is Your Friend
- Hoisting the Mainsail Made Easy—Simplicity in Action
- Reefs: How Many and How Deep
- Reefing Made Easy
- Reefing From The Cockpit 2.0—Thinking Things Through
- Reefing Questions and Answers
- A Dangerous Myth about Reefing
- Mainsail Handling Made Easy with Lazyjacks
- Topping Lift Tips and a Hack
- 12 Reasons The Cutter Is A Great Offshore Voyaging Rig
- Cutter Rig—Should You Buy or Convert?
- Cutter Rig—Optimizing and/or Converting
- Cruising Rigs—Sloop, Cutter, or Solent?
- Sailboat Deck Layouts
- The Case For Roller-Furling Headsails
- UV Protection For Roller Furling Sails
- In-Mast, In-Boom, or Slab Reefing—Convenience and Reliability
- In-Mast, In-Boom, or Slab Reefing —Performance, Cost and Safety
- The Case For Hank On Headsails
- Making Life Easier—Roller Reefing/Furling
- Making Life Easier—Storm Jib
- Gennaker Furlers Come Of Age
- Swept-Back Spreaders—We Just Don’t Get It!
- Q&A: Staysail Stay: Roller Furling And Fixed Vs Hanks And Removable
- Rigid Vangs
- Rigging a Proper Preventer, Part 1
- Rigging a Proper Preventer—Part 2
- Amidships “Preventers”—A Bad Idea That Can Kill
- Keeping The Boom Under Control—Boom Brakes
- Downwind Sailing, Tips and Tricks
- Downwind Sailing—Poling Out The Jib
- Setting and Striking a Spinnaker Made Easy and Safe
- Ten Tips To Fix Weather Helm
- Running Rigging Recommendations—Part 1
- Running Rigging Recommendations—Part 2
- Two Dangerous Rigging Mistakes
- Rig Tuning, Part 1—Preparation
- Rig Tuning, Part 2—Understanding Rake and Bend
- Rig Tuning, Part 3—6 Steps to a Great Tune
- Rig Tuning, Part 4—Mast Blocking, Stay Tension, and Spreaders
- Rig Tuning, Part 5—Sailing Tune
- 12 Great Rigging Hacks
- 9 Tips To Make Unstepping a Sailboat Mast Easier
- Cruising Sailboat Spar Inspection
- Cruising Sailboat Running Rigging Inspection
- Cruising Sailboat Rig Wiring and Lighting Inspection
- Download Cruising Sailboat Rig Checklist

Hi John, A very nice series of articles. A few thoughts: There are (perhaps were at this time) rod rigging maintenance books that did not mention a dab of grease on the cold molded heads prior to re-assembly My rigger, now retired, said rod should be replaced every 100,000nm, but he said it depended on the size of the rod. It has been a while, but I remember larger rod needed to be replaced sooner than the rod on smaller boats. I would be curious about whether that can be confirmed. In Europe, I had a required periodic insurance survey which mentioned replacement of wire rigging every 8 years and rod at 10 years. I tried to challenge that and failed: in part as I was told all surveyors in the UK and EU adhered to that schedule. Mileage did not matter. In a number of my overwintering yards, over the years, I have had to leave the mast up. I always pressured up the backstay adjuster a bit and firmed up the running backstays to keep the rig from movement. I am always surprised when 6 months later everything is as I left it. (Having pressure on the backstay adjuster also keeps the adjuster from “breathing” as the atmospheric pressure changes which saves wear on the seals- I never leave it completely slack even at anchor). If it fails, there is a default position for my backstay adjuster that is basically full slack. I tried to tension the rig by bringing the turnbuckle to its most closed position and the backstay was not nearly tensioned enough when it was full slack. I had a pair of “tangs” made that were a few inches shorter than the default length of the adjuster. This allowed me to replace the whole adjuster with the tangs and get good tension on the backstay, albeit not adjustable. I was living aboard full-time and this was nice as well because I could continue to sail while the adjuster was off the boat for servicing, which often took a while if needing to be sent off. I wanted to consider DIY Dyform rigging when I re-rigged in the UK, but was told that Dyform was the name of the wire made in the UK, but that the company had stopped making it as they could not compete with the compacted wire coming out of Asia. I attempted to explore the province of the compacted wire I could find, but that was too confusing. Riggers I consulted and were working with were wary, so I went with rod. This was 10+ years ago, so please check it out. One rigger I know and some experienced sailors say that a rig that has been to sea in a hurricane should have the rigging made new. Same advice for a really hard grounding. In other words, some shock loading and abuse can be cause for re-rigging. My best, Dick Stevenson, s/v Alchemy

All good information. The big take aways for me are that no one really knows what the right replacement periods are, and further we have to guard against those expressing opinions that are more about serving their own interests than based on any real facts. I know of one rigger that states on their site that all rod should be replaced every six years, clearly more about commercial gain than anything else.
As to getting longer than ten years out of Rod, I was offered that at 12 years in 2019 by Pantaenius UK as long as I had the heads NDT tested, so I think that is a valid option, although, as always, it depends on the underwriter you end up talking to.
Can’t really see how the size of the rod would make a difference to required replacement time. I would think that would be more about the safety margins the designer had built into the rod sizing than anything else.

Although it is only of interest to a minuscule number of AAC readers, you are correct in noting that wooden boats, or at least plank on frame ones, cannot stand having their rig set up so hard that the lee shrouds do not go slack when hard on the wind. The traditional structure is simply not rigid enough although a modern wood/epoxy composite boat may be. The resulting flapping around is no doubt hard on the gear, but not as destructive as over stressing the structure would be. I wonder about the rigidity of some fibreglass boats as well, having sailed aboard some that did a lot of creaking and groaning in rough weather.
Another “advantage” of a wooden boat with a wooden mast is that the mast needs varnish every year. This is infinitely easier to do when it is horizontal rather than vertical and a lot easier when all of the standing and running rigging is removed. So, I unstep the mast and strip the gear every year which forces a close inspection of everything.
I have always had the notion that bronze turnbuckles, toggles and related hardware are not as subject to fatigue failure as stainless, but perhaps that is incorrect.
As you might of guessed, I put in that exception based on education from the horribly overpaid AAC wooden boat consultant…you.
Certainly makes sense since plank on frame wood will, in my limited experence, tend to permanently change shape over time if in any way over loaded. I’m thinking about wooden boats that hog over time, when I say that.
I wonder if this is a function of plank on frame not being a homogenous material, so that over loading changes the relationship between the planks and frames—slippage if you will.
And extrapolating from that maybe that’s why fibreglass boats, if properly constructed, are happy enough to have the lee shrouds tight without permanent damage.
A key point in all of this is that (counterintuitively) having the lee shrouds just firm when going to windward does not increase the maximum load on rig or hull when underway. Said load is governed by the maximum stability of the boat.
However, said no-slack tune, does increase the load on the hull when the boat is at rest, so I’m thinking that may be the problem.
A good discussion of that here: https://loosnaples.com/how-tos/tension-gauges/
And yes, as far as I know, bronze does not have the deterioration issues of stainless steel.

This all seems very reasonable. At the same time, it is very frustrating to me that we throw away huge amounts of rigging that is still in perfectly fine shape by coming up with a conservative time and miles based approach. In truth, conservatively sized rigging that has been well looked after and not damaged could go indefinitely. Unfortunately, I don’t know how you would practically implement this as conservatively sized would need to be quantified for each design and then you would need to make sure that it was always in good shape and never had any bad loading (forestays are subject to not nice loads so I would still replace them). And your engineer is spot on that little knicks on the surface are a really big deal in any highly loaded structure. So all in, I think your recommendation is about right.
One technique that I find very helpful when inspecting wire is to simply run your hand around it while it has a preload on it and make sure it is still round, if it feels lumpy at all, you have a problem. I do this around any areas that could be higher stress such as at the exits of fittings and around spreader tips. This is in no way a substitution for a more detailed check but it is something that you can check very quickly on a quick deck walk or whenever up the rig. I am going to have to try the trick of a phone for a magnifying glass, it will certainly be more stylish than the magnifying visor I use.
Regarding wire quality, it is definitely an issue and it is actually an issue with most materials now. The more reputable suppliers are likely to include a material cert and/or a certificate of conformance with each reel of wire without even being asked. Asking your rigger is not a bad idea although I suspect not all will be able to produce one even if they originally received it. I have gotten a copy with each set of wire that I have bought. One thing that I think is probably equally important is if you are having a rigger do a swage, ask for proof of calibration on the swaging machine. The dies in these wear and other things can get out and then you may have a swage that looks good but won’t hold well. I can think of 2 riggers who told me that they haven’t had any issues so they couldn’t see why it would be checked and on one of them, I looked at a terminal in their shop and could see it was no good but they were very busy making ends for people.
Great comment, full of great tips, thank you. I will include them in the final check list and then update these in depth articles with them.
To that end, three follow up questions:
- Could you elaborate a bit on checking for out of round by feel. I’m having trouble visualizing how I could feel an inconsistency, particularly in small diameter wire, that would not be gross enough to jump out at me visually.
- Do you know anything about the process of calibrating a swaging machine, and who would do that?
- What was it you saw on the swage that was “no good” that tipped you off that the machine was out of calibration?
Regarding feeling the wire to see if it is out of round, it just feels a tiny bit lumpy to me. If you take a 50′ long shroud, each individual strand is significantly longer, like maybe 60′. Winding around each other is what makes the end product only 50′. If you have a broken strand, the rest of the strands are trying to make a straighter line which is a lower energy state so they will pull in and force the loose strand out a bit as it is no longer held in by tension. It is subtle but you can feel it. I have felt it a few times including on a boat I was about to deliver, my parents daysailor and some club boats at a club my wife used to belong to so we could sail weeknights too. In all cases that I can remember, the broken strand had broken just inside the swage fitting so a visual inspection would not have caught it right away and we really had to look and sometimes cut to find it. I don’t know the incidence rate of breaking just inside the fitting versus just outside and it may be that there are many more failures outside but those are more easily caught. Regardless, if a strand is fully broken and there is tension on the wire, it will feel out of round in that area.
I am not totally sure what the calibration process is for these machines but I am aware of a few things that are done to check or calibrate. There are a series of MIL standards (MS51844E for example) for this stuff that I believe most people will use but there may be other standards I am not aware of. The most basic check is measuring the OD of a swaged fitting which can be done with a micrometer or calipers. This is actually something that can be done on every fitting and given how quick it is, may make sense as a customer. You can find charts of the acceptable range pretty easily, here is an example from Hayn: https://hayn.com/swage-specifications/
I would hope at the very least that any rigger has a go/no-go gauge and is checking the fittings but I am not confident that actually happens. You can also do a pull test of a few samples. There are many calibration services out there that handle all sorts of different tools and machinery and it is very common for people with equipment to have a calibration contract with them. There are generally 2 types of services, one where they actually perform a calibration and adjust or replace components as needed or one where they simply provide a measurement of where you are in your calibration range and then it is your responsibility to get service if needed. In truth, a lot of the calibration checks can be done yourself but you don’t get to claim that a professional calibration service did it so it depends on what you need. The real question is what you do if you measure and find you are out of calibration. Typically, that would mean you would need to check all samples since the last calibration that passed which is part of the reason why you try to make sure to never fail by doing preventative maintenance and regular calibration checks. Having said all this, it may be that you should either plan to measure and visually inspect the fittings upon receipt or you should be certain that your rigger is using a go/no-go (that is isn’t worn, these actually typically get calibration checked too) or measuring.
What you will see for poor swages depends a bit on the machine used, I think that by far the most common will be roller but there is some rotary going on in the marine world too. As Colin mentioned, some fittings can come out of straight. I don’t actually know at what point a fitting would fail but if I could visually see this, I wouldn’t want it unless the fitting manufacturer had a spec for acceptable that it was within. In the case that I could see, the fittings were noticeably not round either due to the dies being too worn or the shafts being out of parallel but I don’t think any number of passes (2 is usually the recommended and the max is like 3-4) would have fixed it. I also strongly suspect that a basic caliper measurement would show that the fittings had not been fully compressed but I didn’t need to go that far to know to walk away.
That’s great, thanks. As soon as you pointed out that a lump would appear to indicate a broken strand inside a swage, I got it. I will definitely add that to the check list and the above.
Also, thanks for the fill on checking swages, I will add that too.

Eric. What are your thought on checking the head diameters with a mic or caliper ( don’t like these as much, not as accurate) when the mast is out? Would there be apossibility of wear or deformation of the heads on older rigging? I had a surveyor tell me that the rig was too tight on The CS 30 that I bought last year. I am wondering if this constitutes the abuse that John mentioned? Thank you.
Colin Post CS 30 Top Hat
These are not measurements that should change over time, they tell you if the original swaging job was done properly. The outside diameters of swage fittings are not subject to wear and if there has been plastic deformation, that is a problem and you want to know it and condemn the fitting. Good calipers are fine for this, the tolerance band is reasonably wide but using a mic certainly doesn’t hurt and can help if you are right on the edge of the band.
How did your surveyor determine that the rig was overtensioned? Did they use a gauge? Did you sail the boat in 20 knots of wind and look at lee shrouds? Was the mast step deformed? Very few people will just be able to pull on the rig at the dock and do the mental calculation of the wire diameter, the span, etc and make an accurate determination. My limited experience with surveyors unfortunately suggests that you should be suspicious of statements like this from them. Still, it suggests you should carefully go through everything much like John has had to do with his new boat.
I would agree with Eric’s concerns about the surveyor’s assessment since it’s difficult for me to understand how he arrived at it in any sort of reliable way. It’s actually pretty difficult to over tension the rig on most production boats as the boat will bend long before the safety margins on the wire is exceeded.

Not all insurers are adamant about replacement of rigging at 8 or 10 years, so it’s worth asking them. As our rig was in perfectly good condition at ten years I asked our insurer if they would accept a rig inspection by a professional. They did, he did an excellent and through job and they extended our cover for two years. I’m in total agreement that rigging is not an area to skimp at all. Eric’s comment about bad quality swages due to worn and/or deformed swages is absolutely right. I’ve seen new swages that were bent or creased on a number of occasions and that’s just asking for trouble.
That’s good to hear. I remember you getting that done here in Nova Scotia. I will add that too.

Interesting discussion. My take on the considerable rig on Tanielle is to use SAF 2205 duplex stainless steel in rod form. I will machine end fittings from the same material and weld them to the rod. This ss is the same strength as Nitronic 50 but has far superior fatigue properties. My caps would require 26mm 316 but only 20mm 2205 rod saving weight and windage. So far the majority of mast manufacturers end communication once this is suggested so I imagine it will be impossible to insure the rig. I would see this rig lasting a very long time and probably never needing to be replaced. Of course it would still need inspecting and there will be galvanic issues with aluminium, eg foils and masts. An australian company Arcus Wire has the Hamma range of 2205 wire which I suspect is Indian. My next step will be to ask AE Smith the NZ rig engineer who did all the rig and mast calculations for Hoek design on Tanielle, to look at the 2205 issues and benefits.

Hi William, Your suggestions seem interesting. I’m not very competent on metals, but have noticed the benefits of duplex stainless. My question here wound be the welds. Wouldn’t they disrupt the uniform strength of the rod? The superior strength and corrosion resistance of duplex is usually explained by its tighter bidirectional crystalline structure. The welding process would leave a transition zone where the cold formed rod material goes from welded to not welded. I’d assume the crystalline structure would be left not homogenous, which would seem to be a weak spot? Even if this isn’t the case, I’d be wary of the transition from the thin rod to the larger terminal. Just the change in dimensions might make a focus point for loads…? All this is just questions, curiosity, not my opinions.
Since you seem positive to exotic materials and performance, a carbon mast would solve the corrosion problem, while simultaneously saving a lot of weight and being far stronger. While I’m at it: Using Dyneema for the standing rigging will also save a lot of weight, and money, and is easy to inspect and replace, which on the other hand must be done far more often. It will also be thicker than rod, but about the same as ordinary wire, so more drag in the air than rod. In my opinion, Dyneema is the only smart solution for a cruising multihull, due to the wide platform and rig configurations, while on a cruising monohull, I don’t think so. The high end racers use high modulus carbon rod these days. I’d never suggest that for a cruiser, but it does give minimum drag and max stiffness.
This is way past my pay grade, but your question about welding jumped into my mind too.
Hi William,
That’s interesting. That said, although I’m in no way qualified to evaluate your idea, my general recommendation for cruisers is to stay away from pioneering new technologies: https://www.morganscloud.com/2013/10/25/want-to-get-out-cruising-dont-be-a-pioneer/
Apologies if this is all obvious to you, I am not sure what you have studied in this regard. The old rule of thumb is that the higher strength an alloy is, the harder it is to attach to it. I have experience with Duplex 2205 but never with welding it and I would share some concerns voiced here about that unless there was a lot of tightly controlled post processing. Not only does welding affect the crystal structure, it leaves a prestress and leaves geometries that have stress concentrations if not processed right.
Most techniques of attachment like cut threads remove material and creates stress concentrations which decrease strength which is not good. There are some forming techniques such as used in heading rod, rolling threads, etc that build up material but these create geometric stress concentrations unless spread over an enormous area so that all changes are incredibly gradual.
There are some cool tricks that you can play to deal with a lot of this but I think applying them to rigging would get quite exotic and you should be looking to carbon or PBO or whatever first. For example, in fatigue applications engineers will sometimes spec things like shot peening, laser peening, cryogenic treating, etc but these all require process development and would require you to put a lot of different vendors together. I have spec’ed all the processes I listed at some point but they were always highly specialized applications where there would be lots of testing and we were willing to pay a lot for the performance needed.

Bell's rigging
Yacht Rigging and marine services
Rig inspection
At bell’s rigging we provide detailed rig inspection’s for any yacht of any size..
Rig inspections are a critical part of your yacht maintenance. Your yacht rigging should be checked regularly by a professional rigger to make sure there are no unknown issues you can not see from deck level that may fail when under load or even when static. Many insurance companies ask for yearly rig checks once the rigging is off an age normally 10 years or older.
Halyard wrap

An unknown halyard wrap on this rekman hydraulic furler bending the rod and destroying the foil, this could ultimately end up in rod failure and loss of forestay and then rig.

A bent stemball stud, weakening the structural integrity of the fitting and causing misalignment
Broken strand

1×19 stainless wire broken strand ultimately causing more load on the other strands causing more fatigue and eventually failure and breaking of the wire
Cracked swage

A crack found on this swage eye hard to see with out looking closely but our expert riggers know what to look for and are able to spot these issues and replace this back stay before potential failure of the swage.
Chafed halyard

This chafed halyard was found during a rig inspection, if not found in time and the chaffing were to continue it could result in the halyard snapping potentially with a fully loaded sail attached.
Spreader root

Often rivets can over time work themselves loose and start to pull away from the rig allowing the object they’re holding to do the same as was the case with this spreader root which was found just in time.
Our thorough rig checks include:
Standing rigging, mast head assembly, mast, boom and pools, furling gear , running rigging, all deck gear , chain plates , guard wires.
We carefully inspect every element for any signs of fatigue, wearing or broken parts. Once the inspection is carried out we will provide a written, in depth report, in which we list any findings with pictures and our observations or recommendations. This will be emailed to you, to read and of course you can call us with any questions you have regarding your rig inspection.
You are using an outdated browser. Please upgrade your browser to use our website.
Special Services
Additional boat inspection services.
We provide a variety of boat inspection services. All of our services are designed to ensure that our clients get the most information regarding the vessel being purchased or insured.
Service Types
Battery load, health, & charging system analysis, battery-capacity testing.
Battery-capacity testing is an essential part of battery maintenance. But how do you do it effectively? In theory, you add up the nameplate ratings on your battery strings and come up with an answer. The reality is this answer will invariably be wrong. Because cells age, battery ratings are always greater than their real capacity. The best way to get an accurate answer is to perform capacity tests on your batteries. Let’s begin by answering a basic question.
What is a battery’s capacity? In a nutshell, battery capacity is a measure of the energy it can store. When you test for capacity, you’re looking at the battery’s ability to deliver a specified amount of current at a constant rate to a specified end voltage for a specified time.
The main benefits of Battery Load testing are:
- Determining where the battery is on its predictable life curve.
- When to replace a battery.
- To locate weak cells and faulty intercell connectors.
Charging System Analysis
This will be the general health of the charging system and indicate how well the alternators and batteries are holding up and can indicate potential future replacement and reliability.
Rigging Inspection
A rigging survey is a type of boat inspection that evaluates a sailboat’s mast, boom, and associated rigging. Inspections are made at attachment points, welds, standing and running rigging, and includes the mast step and chain plates. Rigging surveys can be completed aloft or inspected while the rig is off the boat. Whether a rigging survey is needed depends on the age, prior use of the rig, and its intended purpose. It is recommended that a rigging survey be completed if the rigging is more than 10 years old or has seen heavy use. A rigging survey can help with early detection of damaged shrouds, cracked swages, and turnbuckles that are at the end of their service life. The rig also should be surveyed if the boat will be used offshore or heavily raced.
Corrosion Protection and Evaluation Survey
Dissimilar metals in the marine environment can lead to corrosion problems. Add the combined effect of separate electrical systems on each boat in a crowded marina, severe irreversible damage can occur in a very short time. Questions you might want to consider:
- Is damage occurring to the metal on your boat?
- What might be causing this corrosion to occur?
- What can be done to protect your boat?
This boat inspection survey can answer these questions and will evaluate the cathodic protection on your boat, check the AC and DC grounding systems and tell you the electrical potential of your vessel in relation to your marina. This information and any recommendations to improve your protection will be provided in a detailed report.
Lightning Strike Survey
The extent of the damage from a lightning strike is not immediately apparent. The lightning strike survey is a type of boat inspection that determines the condition of a boat, its electronics, rigging, steering, and other on board systems. The first thing that should be done if your boat is struck is to get it short-hauled as quickly as possible for a quick assessment of the hull. The reason is that when lightning exits your boat, it can leave via a through-hull fitting or even through the hull itself. Even if the force of the bolt doesn’t blow out a through-hull or cause hull damage, it may cause a gradual leak that could go unnoticed and sink your boat.
The amount of damage a boat sustains is determined in part by how the strike exits. In a properly bonded system that follows American Boat and Yacht Council standards, the strike should follow a low resistance path to a boat’s keel or an installed grounding plate, though few boats are equipped from the factory this way. While no two lightning strikes are exactly alike, examining a typical claim can shed some light on the possible damages your boat might have if it’s ever struck, some of which you may not have thought of. There can sometimes be collateral damage when a nearby boat gets hit, either the result of the lightning’s powerful electromagnetic field (EMF), or the current induced by the field running through the boat’s shore power cord. Some issues may not be obvious, but a direct hit usually causes more obvious and substantial damage.
Oil Analysis
Oil analysis is the easiest and cheapest way to regularly monitor the condition of your vessels engines, drives, generators and transmissions. With an oil analysis, you will get insights into your equipment and get the story without costly tear downs or unnecessary lubricant changes.
This type of boat inspection can reduce maintenance costs as well as provide peace of mind knowing that your equipment is safe and not wearing out at an excessive rate.
As part of a regular maintenance program, oil analysis allows potential engine problems to be indentified before the components actually fail or before the vessel is purchased. Oil analysis can show internal wear to the engine components and identify the existence of foreign substances that can be harmful to the engine and reduce its expected lifespan. This test includes a spectroscopic examination of the oil to determine the levels of metals, additives, water, and possibly coolant. The test will also measure viscosity and the percentage of solids in the oil. The test report will include possible causes of any irregularities. We are able to provide quality analysis no matter which type of lubricant is used. Other engine fluid analysis tests for diesel, gasoline, and coolant are also available.
Get a Quote
We’ve streamlined the marine survey process..
Fill out our easy-to-use form with the survey details and we’ll follow up with you to get the process started.
FREE SHIPPING ON ALL ORDERS OF $150, UNDER 50LBS
- Shop Products ▼
- Order Status
- Shipping Return
- Request Quote

Welcome to US Rigging Supply, your premier destination for top-quality rigging supplies and solutions. At US Rigging, we pride ourselves on being a trusted source for a wide range of rigging products, from wire rope and slings to hoists and hardware. With a commitment to excellence and safety, we cater to the diverse needs of industries such as construction, maritime, and manufacturing. Whether you are a seasoned professional or a DIY enthusiast, our user-friendly platform offers a comprehensive selection of reliable rigging equipment, accompanied by expert guidance and resources. Explore our extensive catalog and experience unparalleled service as you embark on your rigging projects with confidence. At US Rigging, we elevate your lifting and rigging experience to new heights.

TRENDING ITEMS

Gripple No. 1 Express Wire Rope Grip Joiner
 - Wire Rope Joiner (G-RG-04)")
Gripple Gripple® Lockable Wire Rope Grip - For 1/8”

DuraBrite 316 Stainless Steel Eye Bolt
")
DuraBrite 316 Stainless Steel Eye Nuts

Gripple No. 2 - Express Wire Rope Grip

Gripple Gripple Replacement Standard Wire Rope Grip - No. 3 - WLL 200 lbs.
")
Gripple Gripple Standard Loop Hangers - No. 2 - WLL 100 lbs. HVAC, lighting, electrical - (SOLD IN PACKS)

Safe-T-Strap 4' Low Rise Safety Strap w/ D-Ring

Gripple Gripple Express Loop Pipe Hangers - XP 1 - WLL 25 lbs. - Ideal for signage, shop fitting, lighting, and other lightweight fixtures

DuraBrite 5/8" - Tactical 316 Stainless Steel Trigger Snap

Safe-T-Strap 4' Residential Choker Strap w/ D-Ring & Loop

SWAGE-IT Swage-Right Swager - Light-Duty, Single Cavity - 1/16" Wire Rope
U.S. Rigging Supply is your trusted partner for rope, safety and rigging products. Trusted for over 40 Years. U.S. Rigging Supply is a certified ISO 9001:2015 standard company.
SHOP ROPE BY CONSTRUCTION

GEAR YOU WILL LOVE

Kong KNG-538-12

ProClimb Twist Lock Oval I-Beamer

ProClimb Triple Lock Oval I-Beamer

Swage-Right Deluxe SRS Hand-Swaging Tool Kit w/ Cutter
")
Swage-Right 7x19 | 304 Stainless Steel Guy Wire Rope (Aircraft Cable)

Pelican Rope 1/2" - Arborist-16™ Freedom Arborist Climbing Line

Pelican Rope 5/8" - 3 Strand Composite Vertical Lifeline - Hook & Thimble

ProClimb Twist Lock Modified D Steel Carabiner

ProClimb Copper Head Carabiner

ProClimb Large Aluminum Rope Pulley

Swage-Right Medium-Duty 6-Cavity Swager

Shop Arborist
U.S. Rigging Supply offers quantity price breaks on most items and special quotes for orders exceeding our price breaks. If you currently are or would like to become a distributor of our products, please call 888-260-7444 for current distributor pricing.
Recent Blog Posts

The Importance of Using Tool Lanyards on the Jobsite - ProClimb Self-Locking Tool Lanyards
Tool lanyards are an essential piece of safety equipment for any worker who works at heights. They c
Continue Reading

Why do we call it Guy Wire?
Have you been curious where the term "guy wire" came from? Perhaps you've wondered whether the corre
U.S. RIGGING CINEMA
THE 10 BEST Moscow Boat Rides & Cruises
Boat rides & cruises in moscow.
- Boat Rentals
- Scuba & Snorkeling
- Fishing Charters & Tours
- Water Sports
- Stand-Up Paddleboarding
- Surfing, Windsurfing & Kitesurfing
- Kayaking & Canoeing
- Waterskiing & Jetskiing
- Parasailing & Paragliding
- River Rafting & Tubing
- Dolphin & Whale Watching
- Speed Boats Tours
- Submarine Tours
- 5.0 of 5 bubbles
- 4.0 of 5 bubbles & up
- 3.0 of 5 bubbles & up
- 2.0 of 5 bubbles & up
- 3rd Transport Ring (TTK)
- District Central (TsAO)
- Garden Ring
- District Northern (SAO)
- Good for Big Groups
- Good for Couples
- Good for a Rainy Day
- Budget-friendly
- Good for Kids
- Hidden Gems
- Honeymoon spot
- Good for Adrenaline Seekers
- Adventurous
- Things to do ranked using Tripadvisor data including reviews, ratings, photos, and popularity.

1. Flotilla Radisson Royal

2. Moscow River Boat Tours

3. Sup-Club

4. Akvanavt Diving Centre

5. Diving Center Crocus City Oceanarium

6. CheapRussia Tours
7. Kite School Kiteclass

8. SUP Center
9. Erwin. Reka
11. Easy Russia Tour Guide
12. Lovely Russia Tours

13. Capital River Boat Tours - Moscow Centre

14. Alfa Centr
15. Diving Club Divers

16. Sup Outdoor

17. MORE MOSCOW
19. Soho Sailing Style
20. Diving Center Crocodile

21. Dive-Project

22. Mosparokhodstvo
24. Kosinskiy Children Marine Club

25. Kayak Moscow
26. DIVECLUB CHE

27. FLOW Moscow

28. Moswake

29. Morskiye Volki

30. S-cruises
What travelers are saying

- CheapRussia Tours
- Easy Russia Tour Guide
- Lovely Russia Tours
- MORE MOSCOW
- Insider Moscow Tours
- Flotilla Radisson Royal
- Moscow River Boat Tours
- Capital River Boat Tours - Moscow Centre
- Diving Center Crocus City Oceanarium
VIDEO
COMMENTS
Yacht rigging: your essential pre-season rig check guide. Few things are more important during the spring fit-out than a thorough yacht rigging and spar inspection. Duncan Kent runs through the priorities. During the spring fit-out we often appear to lavish far more attention on the engine and electrical systems than we do on the rig, despite ...
Check for white powder and pitting on aluminum mast steps and at the base of the mast. 5. Inspect the condition of the mast step. Mast steps here are often in a damp environment, and a lot of mast steps are made from non-stainless steel on older boats, which can rust. Some boats have an aluminum mast step.
My inspection process includes a rigging-wire wipe-down with a rag that easily snags on tiny cracks. It includes careful scrutiny of hardware junctions. I search for signs of chafe, especially where fiber or wire running rigging makes directional changes at sheave boxes, and around where the headsail furler's top swivel rides.
Aug 14, 2015. It's one of the most important features on a sailboat, but many owners put standing rigging at the back of their minds when it comes time to do their pre-season safety checks. A prudent sailor should inspect his or her standing rig at least once each season and should know when the time comes to replace most or all of it.
Secure the structural integrity and safety of your yacht with our authoritative guide on rigging inspection and maintenance. Learn the art of vigilant rigging upkeep, crucial for the performance and reliability of your sailing vessel. Our manual emphasizes the importance of routine checks on wires, masts, and fittings to spot early signs of wear, corrosion, or damage. By embracing a meticulous ...
Embark on a journey to mastering yacht rigging maintenance with Fly Yachts, where we decode the essentials to keep your vessel in prime sailing condition. Learn the art of regular rig inspections, identifying signs of wear, corrosion, and potential failure in wires, rods, and fittings. Grasp the importance of tension adjustments to ensure optimal performance and forestall undue stress on your ...
Professional Inspections. If you're not confident in your ability to inspect your boat's rig, you can hire a professional — a rigger or surveyor — to do it for you. Riggers specialize in rigging, which is an advantage, but they could be biased since they also sell rigging. An inspection, including going aloft, should be under $100 for a 30 ...
The inspection will look for items such as cracks in rigging components, misalignment of stays and corrosion. Rig tensions should be checked and adjusted as necessary. A written record should be completed listing existing or potential concerns. Every 5 years or so, more thorough rig checks should be carried out, which involve disassembly of the ...
Keep your yacht's rigging and sails in top condition with our detailed care and inspection strategies. Dive into the world of nautical maintenance and uncover the techniques to ensure optimal performance and longevity of your vessel's most dynamic components. We reveal the critical points to examine regularly, from cable tension to sail integrity, to prevent equipment failure and maintain the ...
Rigging plays a fundamental role in a boat's structural integrity and performance, making regular inspections an imperative practice for any seafarer or boat owner. This checklist serves as a comprehensive guide, meticulously detailing crucial components to examine, ensuring that each facet of the rigging system is thoroughly assessed for ...
February 3, 2016 / RDB. In the January issue of the Boat US Marine Insurance Magazine I have written an article on how to inspect your rigging. I did this because a lot of us sailboat owners are in areas where it is difficult to locate a rigger to do inspections for us. We as sailboat owners need to be able to keep an eye on our rigging.
The Yacht Rigger is a marine specialist group dedicated to marine upgrades and maintenance. From rigging, electrical, lithium batteries, solar, custom metal fabrication, air conditioning, deck hardware and much more. We specialize in all types of yacht rigging, whether your boat is for cruising or racing, our team provides a comprehensive ...
Standing Rigging Inspections - One part of sailboats and yachts that must be inspected, maintained, or even replaced when necessary is the standing rigging. It is comprised of fixed lines, wires, or rods that are designed to support each mast or bowsprit on sailing vessels. These specific components likewise reinforce the spars against ...
Check that all internal halyards and reefing lines are run correctly and are not crossed over each other. Article—running rigging. 3 Years / 30k Miles. Check that all internal halyards run aft of the spreader bars or bolts. Article—running rigging. 3 Years / 30k Miles. Rig Wiring and Lighting Inspection.
Wire standing rigging on an offshore cruising boat should be replaced every 10 years, or 30,000 miles, whichever comes first. The time requirement is because wire is more prone to corrosion than rod (see below). This recommended replacement cycle can certainly be argued over, for example extended for boats sailing in fresh water, but our ...
Rig inspections are a critical part of your yacht maintenance. Your yacht rigging should be checked regularly by a professional rigger to make sure there are no unknown issues you can not see from deck level that may fail when under load or even when static. Many insurance companies ask for yearly rig checks once the rigging is off an age ...
We offer comprehensive inspections of masts, spars, hardware, running and standing rigging, lifelines, deck equipment, etc. These examinations provide much needed peace of mind while underway for boat owners, captains, crew and insurance companies. We recommend at least a full visual inspection every year to ensure tha
A rigging survey is a type of boat inspection that evaluates a sailboat's mast, boom, and associated rigging. Inspections are made at attachment points, welds, standing and running rigging, and includes the mast step and chain plates. Rigging surveys can be completed aloft or inspected while the rig is off the boat.
Whether your boat is big or small, Puget Sound Rigging is a trusted resource for sailboat rigging. Our friendly riggers provide high-quality modern rigging solutions to maximize the performance and safety of your vessel. Our goal is to build lasting relationships with our customers so that we can provide the best service possible.
At US Rigging, we pride ourselves on being a trusted source for a wide range of rigging products, from wire rope and slings to hoists and hardware. With a commitment to excellence and safety, we cater to the diverse needs of industries such as construction, maritime, and manufacturing. Whether you are a seasoned professional or a DIY enthusiast ...
Moscow City: View Moscow Beneath Your Feet. $96. Details. River Cruise on Luxurios Radisson Ship with a guided excursion: time to relax and soak in the gorgeous Moscow landscape. Our guide will accompany you and reveal the details behind the structures on the river banks around you.
Explore the scenic and historic attractions of Moscow from the water with the best boat tours and cruises. Enjoy the views of the Kremlin, the Cathedral of Christ the Savior, and the Sparrow Hills on a relaxing or informative boat ride. Or, spice up your trip with some water sports and activities in Moscow. Find out more on Tripadvisor.
On this map you can see the details of the longest and most classic of the Flotilla Radisson boat tours: 2. Companies that do boat tours on the Moskva River. There are many companies that do cruises on the Moskva River, but the 4 main ones are: Capital River Boat Tour Company (CCK) Mosflot. Flotilla Radisson.